
Welcome to Design one:
I am very excited to begin this semester as this is the first time Jardine artist get to take a high school design class for high school credit while in the 8th grade. We are going to have fun creating, responding, connecting, and presenting our ideas, our processes, and our final work, while learning studio thinking processes that will help you beyond your time within the art studio. Below is a copy of my sylabus that you may read, share with your parents, or go to if you have any question. Also, all lesson will be posted here and on google classroom. You are expected to check this page and google classroom sites as I will have video's, slide shows, and examples of projects we are working on. Please know it is your responsibility to watch these videos, and slide shows in the case of an absent so you know what to do when you get back to the studio. Once you watch the required videos, ect., you will draw out your ideas and come to class prepared to create. This will elemate down time in the studio as we are very busy this semster.
Project One: Sketchbook Cover
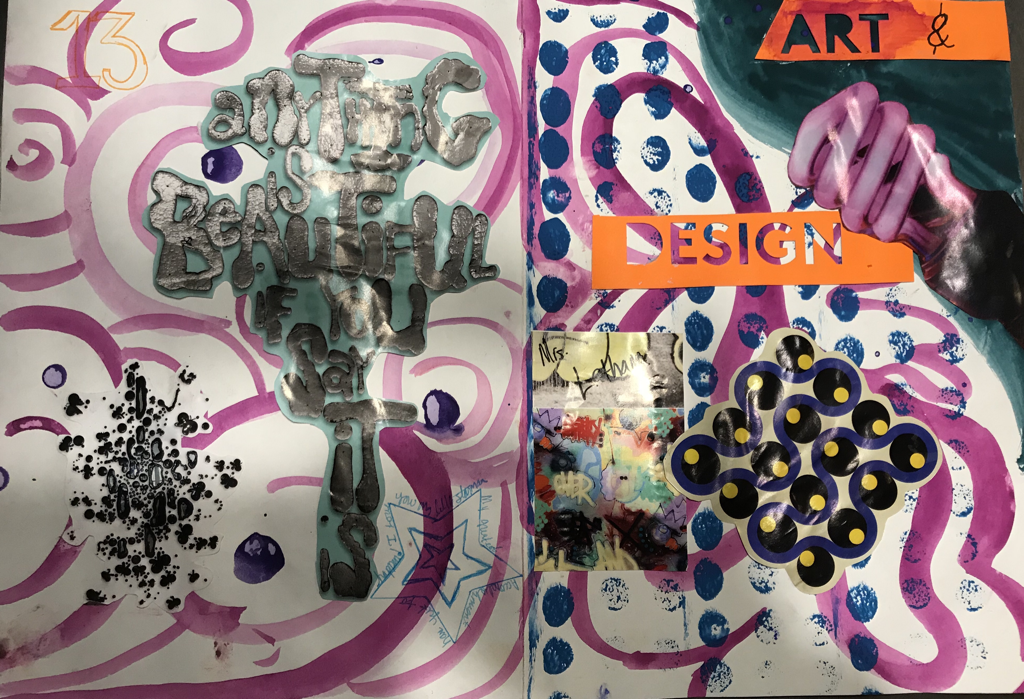
Using the prompt: Who am I, your task is to create a sketchbook cover that conveys an artistic visual as to who you are. You may collage, paint, draw, use a variety of mix media, to convey these ideas. Having your name on your work is not enough. I want you to dig deeper and figure out others symbols, quotes, fonts and text, collaged images ect. That you may use to visually enhance your work. The following rubric is how you will be evaluated.
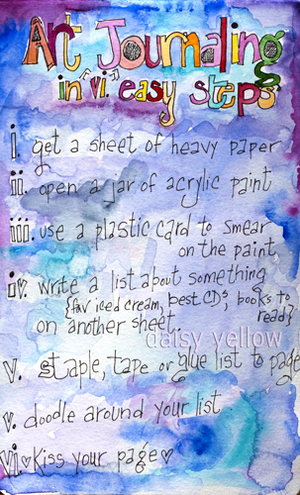
Lesson Introduction: Dive into art making. Create a design on your cover. The challenge for this semester to use the prompt "Who am I?" to create a visually compeling cover for your sketchbook.
Lesson Objective: Create sketchbook cover that uses art journaling practices , learn classroom procedures and expectations while engaged in art making. Students begin to learn studio thinking processes on day one.
Instruction & Process:
Day one: Let's paint/ explore with painting your cover so we can build our ideas upon something other than white paper.
Day Two: explore with a variety of media to enhance your journal page.
Day Three: Assemble your sketchbook and take a picture of your final work. Submit it to google classroom.
Materials needed: Paper, tempra cakes, ink pens, scissors, magazines, markers, and stamps.
Rubric: docs.google.com/spreadsheets/d/e/2PACX-1vQdmpSWFlUKN2WJ7qiEW4gtKzDIpV2FWuGE6lSv3atqO1yS80vszNykCuPvoXYfNQoCJp4GJ_p4Z_eR/pubhtml
Attach a photo of your work when you submit this to google classroom.
Time to Reflect
After reflecting on your work, and looking at the rubric, what score do you think you should get out of 16 score points within the rubric? 1 pt.
Are you pleased with your work? 1pt.
What is something you wish you could change? 1pt.
What was the hardest challenge of this project? 1 pt.
Please take a picture of your work and submit it with this reflection. Now it is time to assemble your book. Remember to put the papers in order in your sketchbook.
LESSON TWO/ Create your Digitial Portfolio
What is a portfolio? A collection of your artwork
Why do we have to have one? To showcase our growth and interests as an artists. To share our work and to create a digital presence. To learn the 21st century skill of building a website.
Objectives:
- I can create a website.
- I can write an artist statement that reflects where I am as an artist.
- I can upload photos to my site in order to show my personal growth both short and long term.
- I can understand and demonstrate digital citizenship.
Steps to creating your site.
- Go to google sites.
- Click on the new google sites on the bottom right column.
- Click on the plus sign in bottom corner.
- Name your site Your First & Last Name
- Your Homepage should say… Your name and Art Portfolio
- On the right you see three tabs. Inserts, pages, themes. The insert page helps you build each page. The pages tab creates separate pages and the themes controls your font styles and size.
- Your portfolio needs to have a Home page, a page titled My Artwork, and a page titled Artist Statement. You will be expected to write a detailed artist statement. In your sketchbook you have an artist statement worksheet. Follow the prompts and you will great.
tto see my portfolio example.
Student Checklist
- The Homepage is an introduction of yourself. It must include at least one picture of yourself or of you and your family and friends. Use this page to share some of your personal interests. Think of it as an “about me” page. Tell us something about yourself? Consider including your favorite quote
- My Artwork: On this page you will upload pictures of your work. You will give your work a title, and then medium that you created it with. Example: Title: The Thinking Chair, Medium: Digital Photography
- Artist Statement: Write a detailed artist statement. Please be mindful of your grammar, and punctuation. Follow the artist statement flowchart in your sketchbook. Here is an electronic copy of that document.
file:///C:/Users/clatham/Downloads/Artist-Statement-Flow-Chart-final1.pdf
Once you are finished, publish it using your first and last name and then submit the link to google classroom under the portfolio assignment. Set the view for Topeka 501 so you may share it with future art teachers.
Discussion points:
- Their invisible audience – many students choose to set their digital portfolios to be limited to users on our school’s Google Apps domain. However, that means that everyone in our community who has an account can access student work. Eportfolios can be viewed by students, teachers, administrators, parents, and anyone with access to a username/password. This should influence students to write informatively without oversharing, and place emphasis on grammar and spelling.
- Appropriate commenting – write a comment that is specific and/or can initiate a discussion. Something like, “I liked your use of color” or “I see you painted a guitar. Do you play any other instruments?” Constructive criticism such as “ I am curious as to why you chose this specific color green, It doesn’t work for me because it doesn’t go well with the rest of your color scheme.”
- Digital citizenship and having a sound understanding of creative commons, permission, and giving credit to others for their work.
- Inserting an image by linking to the URL of the image online rather than taking a screen snapshot or dragging a copy of the image to the desktop. By using the URL, students can simply point to something else online. The alternative is to copy/take/steal a version of it which is tantamount to theft (depending on how the work is licensed).
"Digital citizenship" is an umbrella term that covers a whole host of important issues. Broadly, it's the guidelines for responsible, appropriate behavior when one is using technology. But specifically, it can cover anything from "netiquette" to cyberbullying; technology access and the digital divide; online safety and privacy; copyright, plagiarism, and digital law, and more. " for more resources check out this page.
REFERENCES:
www.educatorstechnology.com/2013/10/5-excellent-videos-to-teach-your.html
Nine Elements - Digital Citizenship
Videos
How to create an electronic portfolio.
https://youtu.be/nqbibjtgIZ8
Great Student Examples here!!!
sites.google.com/topekapublicschools.net/adisyn-caryl/artist-statement
sites.google.com/topekapublicschools.net/cjohnston/home
https://sites.google.com/topekapublicschools.net/jacobcassell2021/home
https://sites.google.com/topekapublicschools.net/kaydeevotaw/home
https://sites.google.com/topekapublicschools.net/kamm/home
https://sites.google.com/topekapublicschools.net/meganhuffman/home
Please create a file in your google drive that says 8th grade art. Keep all photos of all projects in this file.
Lesson Objective: Students will get there classroom code and learn how to upload pictures to google drive and submit their picture for grading via google classroom.
National Standards: Producing: Anchor Standard 4: Analyze, interpret, and select artist work for presentation.
Materials needed: Chromebook and photos of finished work.
Grading Format: This is part of your end of the semester final. Make sure you do it!!!
Zentangles: Lines, Shapes, Patterns/ Principles of design
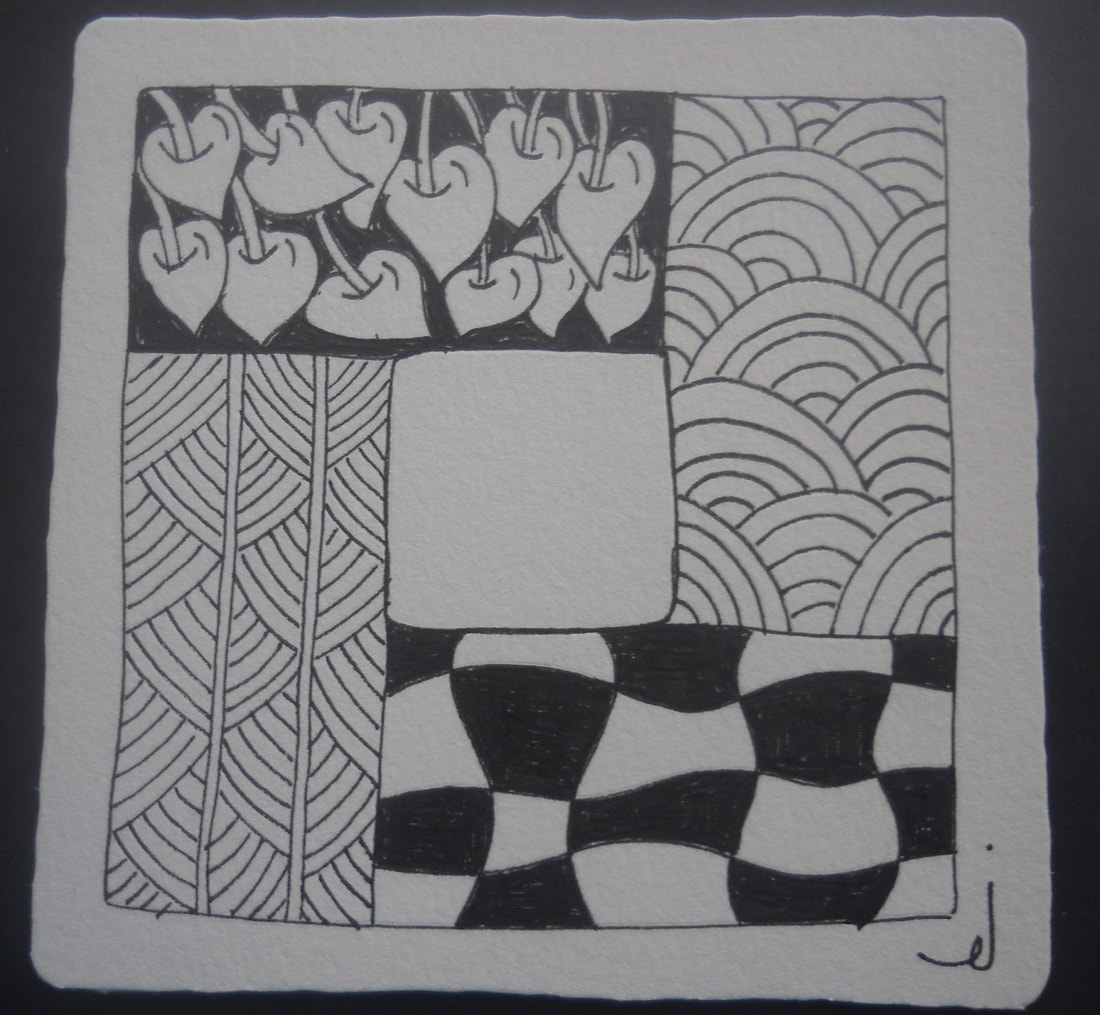
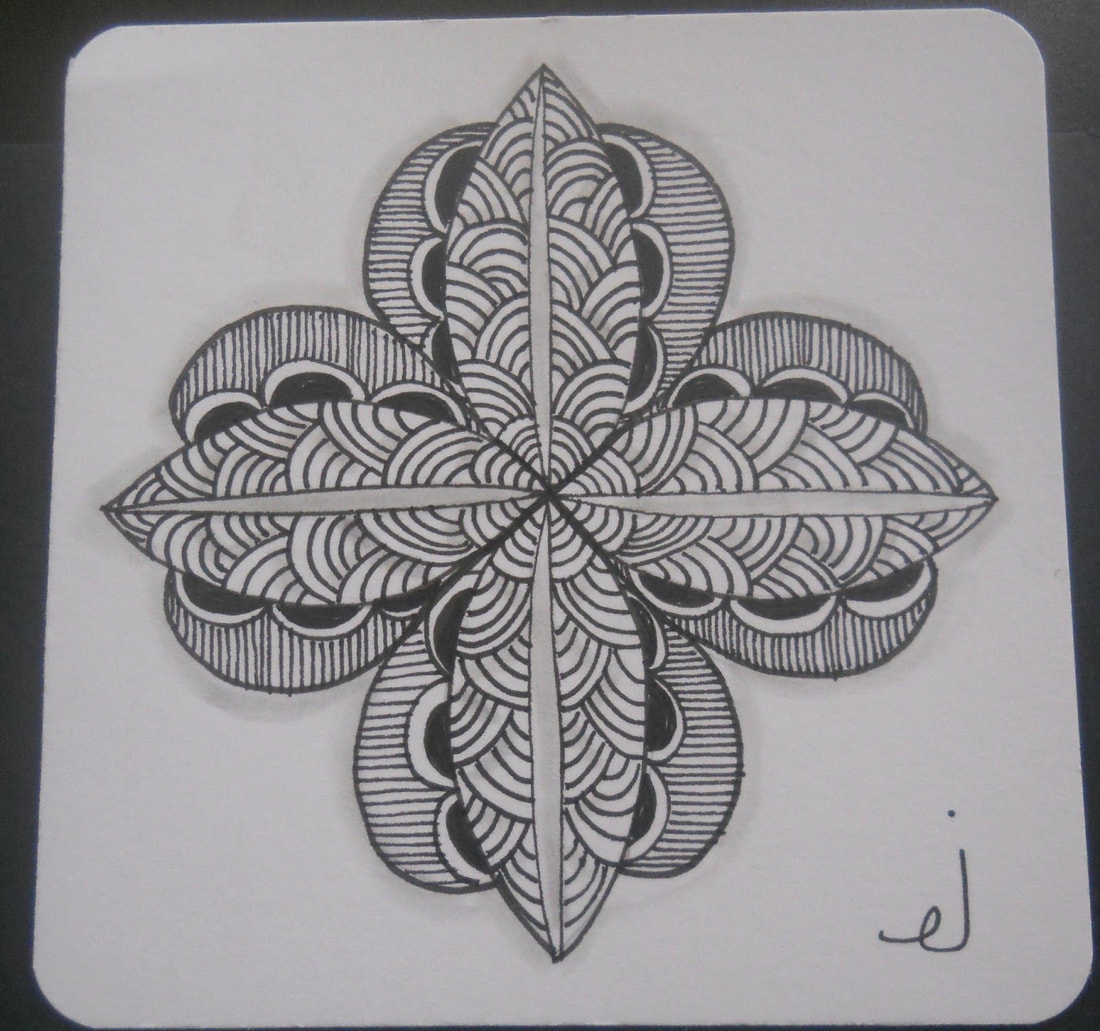
This week, our sketchbook assignment is to draw 3 thumbnail sketches of Zentangles. The zentangles must be at least 4 x 4 inches and have detailed attention to line, shapes, and patterns. After completing your three thumbnail sketches, you are going to complete a final one useing fine tip sharpie and 6x6 paper. This work is going to be our first class critique and will be displayed in the hallway. I want you to think about how you can use the principles of design to help guild your creative process.
Day one : Draw Three thumbnails in your sketchbook
Day Two: Pick the one you like best and draw it on 6x 6 inch paper. Use pencil first then go over it with your sharpie.
Last Day: Take a picture of your final work and upload it with your picture of sketches to google classroom. Don't forget to turn it in to Mrs. Latham, this is getting hung and the premis for our first critic.
|
|
What is a Zentangle? Zentangle - A Zentangle is an abstract drawing created by using repetitive patterns. It is usually structured within a certain shape. Drawing a Zentangle is entertaining, relaxing, and a great way to express yourself creatively.
String - A string is generally a random line drawn in pencil which creates an area within which you draw your tangles.
Tangle - In its verb form “tangle” means to draw a tangle. You tangle a tangle, and in that process create Zentangle art. In its noun form this word is used as a replacement for “pattern.”
For more information about the Zentangle process, go to www.Zentangle.com
The Eight Steps of the Zentangle Method
01 – Gratitude and Appreciation Get comfortable, take a few deep breaths and feel gratitude and appreciation –
Step 02 – Corner Dots Place a light pencil dot in each corner, about a pen's width from the edges. Now it’s no longer a blank piece of paper.
Step 03 – Border Connect those dots with a light pencil line, straight or curvy, to create a square. This is your border.
Step 04 – String Inside the border, draw a light pencil line or lines to make what we call a "string." The string separates your tile into sections, in which you draw your tangles. A string can be any shape. It may be a curvy line that touches the edge of the border now and then, or series of straight lines that go from one side of the border to the next.
Step 05 – Tangle A tangle is a predefined sequence of simple strokes that make up a pattern. Draw your tangles in pen inside (usually) the pencil strings and borders.
Step 06 – Shade Add shades to parts to create positive and negative space.
Step 07 – Initial and Sign This is art you created. On the back, place your name, and hour.
Step 08 – Appreciate Hold your tile at arm’s length. Turn it this way and that. Appreciate what you just created.
Introduction to Photography/ elements and Principles
What is photography?
This is a discussion of what makes something art, what types of jobs someone who does photography can do, and why people engage in photography.
Lesson Objective: Students will learn how to take interesting photographs, use digital editing and thier knowlege of the elements and principles of design to create digital art.
National Standards:
Creating
(Cr1.1.7) Apply methods to overcome creative blocks.
(Cr1.2.7) Develop criteria to guide making a work of art or design to meet an identified goal.
(Cr2.1.7) Demonstrate persistence in developing skills with various materials, methods, and approaches in creating works of art or design.
(Cr2.2.7) Demonstrate awareness of ethical responsibility to oneself and others when posting and sharing images and other materials through the internet, social media, and other communication formats.
(Cr2.3.7) Apply visual organizational strategies to design and produce a work of art, design, or media that clearly communicates information or ideas.
Presenting
(Pr4.1.7) Compare and contrast how technologies have changed the way artwork is preserved, presented, and experienced
(Pr5.1.7) Based on criteria, analyze and evaluate methods for preparing and presenting art.
Responding
(Re7.2.7) Analyze multiple ways that images influence specific audiences.
(Re8.1.7) Interpret art by analyzing art-making approaches, the characteristics of form and structure, relevant contextual information, subject matter, and use of media to identify ideas and mood conveyed.
Vocabulary: SCARE simplify, close/closer in proximity to object, angle, rule of thirds, even lighting, implied texture, macro photography, portrait, layers, transparency
Keagan activities: Stand up, hand up, pair up?
Instruction & Process: Slide show, game, scavenger hunt, photo shoots, digital editing
Materials needed: Snapseed app, Ipads, chromebooks, view finders
Day one: introduction to Photography
Day two: Photography scavenger hunt
Day three/ four: Edit with snap seed/ Create a slide share/ turn in.
Grading Format: Peer review
Resources: https://thejournal.com/articles/2013/11/18/9-iphone-photography-projects.aspx?=FETCLN
http://edynamiclearning.com/courses/middle-school-photography-course/
This is a discussion of what makes something art, what types of jobs someone who does photography can do, and why people engage in photography.
- Simplify: Get rid of excess objects — the water bottle on the picnic table, the junky papers — that clutter up the background; make the canvas as "blank" as possible.
- Close/closer: "A lot of times people take pictures too far away," Get close and closer to your subject. That doesn't mean using the zoom option; it means "Zoom with your feet."
- Angle: Be creative as you're taking your picture. Try to find an unusual angle from which to shoot. That could mean standing on a picnic table or tree stump and looking down or lying on the grass and shooting up.
- Rule of thirds: The best compositions are often the ones where the main subject is either in the right third or left third of the image. So shift the image that way.
- Even lighting. "You want even lighting," If there's some kind of shadow across the face, move the camera or the subject around to eliminate that. "Usually the best time to take pictures is early in the morning or late in the afternoon when the lighting isn't as harsh," she notes. "Foggy days are great for taking pictures — or overcast or even rainy days."
Lesson Objective: Students will learn how to take interesting photographs, use digital editing and thier knowlege of the elements and principles of design to create digital art.
National Standards:
Creating
(Cr1.1.7) Apply methods to overcome creative blocks.
(Cr1.2.7) Develop criteria to guide making a work of art or design to meet an identified goal.
(Cr2.1.7) Demonstrate persistence in developing skills with various materials, methods, and approaches in creating works of art or design.
(Cr2.2.7) Demonstrate awareness of ethical responsibility to oneself and others when posting and sharing images and other materials through the internet, social media, and other communication formats.
(Cr2.3.7) Apply visual organizational strategies to design and produce a work of art, design, or media that clearly communicates information or ideas.
Presenting
(Pr4.1.7) Compare and contrast how technologies have changed the way artwork is preserved, presented, and experienced
(Pr5.1.7) Based on criteria, analyze and evaluate methods for preparing and presenting art.
Responding
(Re7.2.7) Analyze multiple ways that images influence specific audiences.
(Re8.1.7) Interpret art by analyzing art-making approaches, the characteristics of form and structure, relevant contextual information, subject matter, and use of media to identify ideas and mood conveyed.
Vocabulary: SCARE simplify, close/closer in proximity to object, angle, rule of thirds, even lighting, implied texture, macro photography, portrait, layers, transparency
Keagan activities: Stand up, hand up, pair up?
Instruction & Process: Slide show, game, scavenger hunt, photo shoots, digital editing
Materials needed: Snapseed app, Ipads, chromebooks, view finders
Day one: introduction to Photography
Day two: Photography scavenger hunt
Day three/ four: Edit with snap seed/ Create a slide share/ turn in.
Grading Format: Peer review
Resources: https://thejournal.com/articles/2013/11/18/9-iphone-photography-projects.aspx?=FETCLN
http://edynamiclearning.com/courses/middle-school-photography-course/
Macro Photography
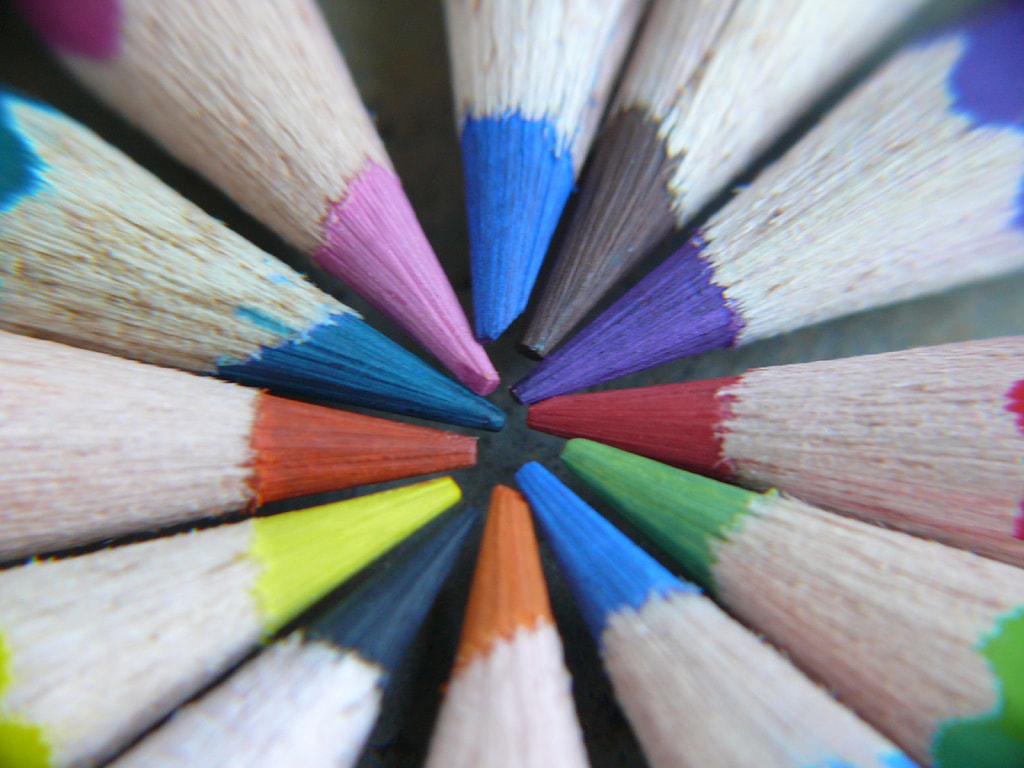
Macro Photography: Photos of images or subjects that are taken very close and change the perspective to become more of a pattern, texture, our in the case radial design.
Macro photography is a fun thing to explore and experiment with—and there’s a lot of objects that make great subjects. You can start with the more traditional flowers and insects, or search instead through your house for items that seem unimportant and make them shine with good lighting or by highlighting a texture or pattern.
http://www.shawacademy.com/blog/15-macro-photography-ideas-to-get-creative-juices-flowing/
TIme To Create
In the event that you are absent, you can print off a papry copy of the scavenger hunt below. I can't wait to see your pictures!
| photography_bingo_.pdf |
Art nouveau & gustav klimt
| art_nouveau_scratchboard_drawing__an_introduction_to_gustav_klimt.pdf |
https://www.emaze.com/@AOOQTLCTC/gustav-klimt-copy1

INtroduction to ARCHITECTURE/ printmaking
Lesson Introduction:
Architecture is both the process and the product of planning, designing, and constructing buildings or any other structures. Architectural works, in the material form of buildings, are often perceived as cultural symbols and as works of art.An architect is a licensed professional who organizes space. The architecture profession has always been a combination of art and science.Architects design houses, office buildings, skyscrapers, landscapes, ships, and even entire cities. The services offered by a licensed architect depend on the type of project being developed.The average median income of an architect 76,930.
Lesson Objective: Students can identify and describe famous architectural works. Student can create and design a fantasy city around their works of art. Student can make a relief print using styrofoam.
National Standards:
Creating
(Cr1.1.7) Apply methods to overcome creative blocks.
(Cr1.2.7) Develop criteria to guide making a work of art or design to meet an identified goal. (Cr2.1.7) Demonstrate persistence in developing skills with various materials, methods, and approaches in creating works of art or design.
(Cr2.3.7) Apply visual organizational strategies to design and produce a work of art, design, or media that clearly communicates information or ideas.
(Cr3.1.7) Reflect on and explain important information about personal artwork in an artist statement or other format.
Presenting
(Pr5.1.7) Based on criteria, analyze and evaluate methods for preparing and presenting art.
Responding
(Re8.1.7) Interpret art by analyzing art-making approaches, the characteristics of form and structure, relevant contextual information, subject matter, and use of media to identify ideas and mood conveyed.
(Re9.1.7) Compare and explain the differences between an evaluation of an artwork based on personal criteria and an evaluation of an artwork based on a set of established criteria.
Connecting
(Cn10.1.7) Individually or collaboratively create visual documentation of places and times in which people gather to make and experience art or design in community.
(Cn11.1.7) Analyze how response to art is influenced by understanding the time and place in which it was created, the available resources, and cultural uses.
Vocabulary: Architecture, warm and cool colors, matrix, relief print, brayers
Keagan activities: time pair share/ artist interview as reflection.
Instruction & Process:
Materials needed:• Styrofoam printing plates • Pens • Watercolor Paint • Watercolor Paper • Brayers, Ink Trays and Printing Ink, pencils, erasers.
Resouces
Demo Video for Weebly. https://vimeo.com/30564693
http://beckermiddleart.blogspot.com/
https://www.theartofed.com/content/uploads/2015/03/Architectural-Reflection-Prints.pdf
https://www.thoughtco.com/what-is-an-architect-175914
Grading Format: Rubric
Architecture is both the process and the product of planning, designing, and constructing buildings or any other structures. Architectural works, in the material form of buildings, are often perceived as cultural symbols and as works of art.An architect is a licensed professional who organizes space. The architecture profession has always been a combination of art and science.Architects design houses, office buildings, skyscrapers, landscapes, ships, and even entire cities. The services offered by a licensed architect depend on the type of project being developed.The average median income of an architect 76,930.
Lesson Objective: Students can identify and describe famous architectural works. Student can create and design a fantasy city around their works of art. Student can make a relief print using styrofoam.
National Standards:
Creating
(Cr1.1.7) Apply methods to overcome creative blocks.
(Cr1.2.7) Develop criteria to guide making a work of art or design to meet an identified goal. (Cr2.1.7) Demonstrate persistence in developing skills with various materials, methods, and approaches in creating works of art or design.
(Cr2.3.7) Apply visual organizational strategies to design and produce a work of art, design, or media that clearly communicates information or ideas.
(Cr3.1.7) Reflect on and explain important information about personal artwork in an artist statement or other format.
Presenting
(Pr5.1.7) Based on criteria, analyze and evaluate methods for preparing and presenting art.
Responding
(Re8.1.7) Interpret art by analyzing art-making approaches, the characteristics of form and structure, relevant contextual information, subject matter, and use of media to identify ideas and mood conveyed.
(Re9.1.7) Compare and explain the differences between an evaluation of an artwork based on personal criteria and an evaluation of an artwork based on a set of established criteria.
Connecting
(Cn10.1.7) Individually or collaboratively create visual documentation of places and times in which people gather to make and experience art or design in community.
(Cn11.1.7) Analyze how response to art is influenced by understanding the time and place in which it was created, the available resources, and cultural uses.
Vocabulary: Architecture, warm and cool colors, matrix, relief print, brayers
Keagan activities: time pair share/ artist interview as reflection.
Instruction & Process:
- Get two pieces of paper, put your name on it and your class on the back.
- Draw a horizon line on your paper. Using the tempera cakes paint one side of your paper a warm color and the other side of your paper a cool color. Think of nights scenes, stormy skies, colorful sunsets. Paint both of them and put them on the drying rack. MAKE SURE YOUR NAME IS ON THEM!!
- Pick a building and draw your fantasy city around the architectural object.
- Get a piece of foam from Mrs. Latham, put your name on it, and tape your drawing on top of the foam.
- Use a pen to trace over your drawing and the building. Make sure you are pushing hard. Once you have finished, go over your line again on the styrofoam. NOW YOU ARE READY TO PRINT!
- Inking: use the brayer to roll ink on your matrix. Make sure you have enough ink on the matrix to pull a good print.
- Line your paper up to match the top corners and then place the paper on the inked matrix.
- RUB THE BACK OF YOUR PAPER WITH THE CLOTH
- Pull the paper off of matrix. You will pull three prints. Label them ⅓, ⅔,3/3.
- Take a picture of all three separately and turn in to google classroom.
Materials needed:• Styrofoam printing plates • Pens • Watercolor Paint • Watercolor Paper • Brayers, Ink Trays and Printing Ink, pencils, erasers.
Resouces
Demo Video for Weebly. https://vimeo.com/30564693
http://beckermiddleart.blogspot.com/
https://www.theartofed.com/content/uploads/2015/03/Architectural-Reflection-Prints.pdf
https://www.thoughtco.com/what-is-an-architect-175914
Grading Format: Rubric
Introduction to LINO CUTS and andy warhol

Remember to think in reverse!!! Letters, Numbers and Symbols need to be drawn backwards! Your print is reflection of drawing.
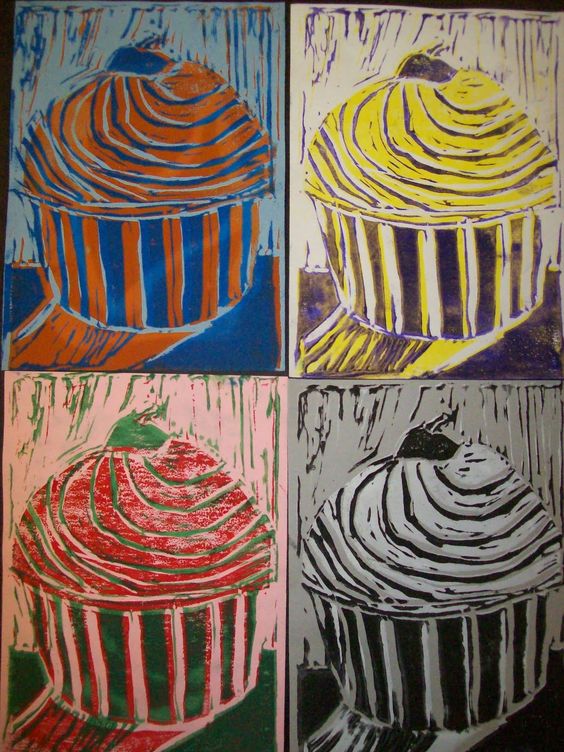
Lesson Objective: Students can create an Andy Warhol style 2 ink process lino-cut print.
Vocabulary: Brayer, ink, pop art, Andy Warhol, lino-cut, printmaking,
Instruction & Process: Direct instruction, video, table handouts.
Materials needed: Brayer, ink, treys, soft linocut, carving tools, pencil,
Grading Format: See the Rubric above.
Resources: http://linocutboy.com/top-ten-tips-linocutting/
http://cceart.blogspot.com/search?updated-max=2011-02-23T15:18:00-05:00&max-results=20&start=34&by-date=false
http://www.instructables.com/id/How-to-Make-Linocuts/
Time To Create
CONGRATS, THIS HAS BEEN THE TOUGHEST ASSIGNMENT TO DATE AND YOU DID IT!!!
Vocabulary: Brayer, ink, pop art, Andy Warhol, lino-cut, printmaking,
Instruction & Process: Direct instruction, video, table handouts.
Materials needed: Brayer, ink, treys, soft linocut, carving tools, pencil,
Grading Format: See the Rubric above.
Resources: http://linocutboy.com/top-ten-tips-linocutting/
http://cceart.blogspot.com/search?updated-max=2011-02-23T15:18:00-05:00&max-results=20&start=34&by-date=false
http://www.instructables.com/id/How-to-Make-Linocuts/
Time To Create
- Make a list of five things that are a part of everyday life. Think what’s “popular” that you can draw…ie, soda can, shoes, cupcakes, ect.
- Find an image of this and really look at it. Practice drawing it in your sketchbook. You should have three drawings.
- Once you are confident, draw your image on the linoleum. Remember, THINK BACKWARDS. ANYTHING YOU PUT ON YOUR LINOCUT WILL BE BACKWARDS WHEN PRINTED. If you have a symmetrical design, this isn't a problem, however, numbers and letters are.
- Draw your image onto your linoleum with pencil. When you like it, trace over it with your black sharpie.
- SAFETY FIRST: Rules for using lino cutting tools.
- ALWAYS CUT AWAY FROM YOU.
- KNOW WHERE YOUR FINGERS ARE AT ALL TIMES.
- In this step you should CAREFULLY start cutting away your negative space, or the part of your linocut print that you want to show the white of the page, with no ink. Cut away just the outside negative space of the image for the first inking. Remember the video, this is a TWO step inking process.
- Because we are doing Warhol Style, you will want to print one of each NEON COLOR for your “Background”
- Clean your linocut, go back and carve in the details.
- Now use opposite colors to print over your dry background.
- Sign the bottom corner when dry, take a picture and turn it in.
CONGRATS, THIS HAS BEEN THE TOUGHEST ASSIGNMENT TO DATE AND YOU DID IT!!!
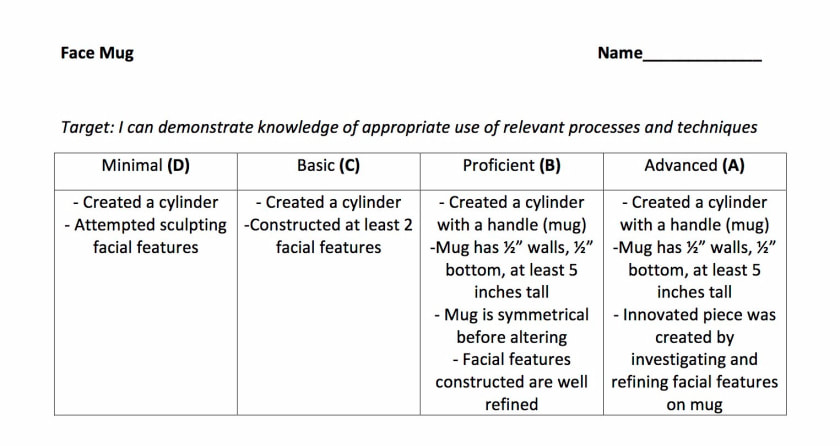
MONSTER MUGS
- Design three monsters that have specific talents/powers/character traits.
- Your monster should have:
- Nose (optional)
- Feet (optional)
- Mouth
- Eyes
- Nose (optional)
- Your monster must include texture (feathers, scales, wrinkles, warts, ect.)
- Keep in mind that these will be mugs. Draw your sketches as mugs!
- Your monster should have 3 specific talents/powers/character traits. You should also have a name for your monster.
- Upload these traits and the name of your monster to Google Classroom along with an image of your mug.
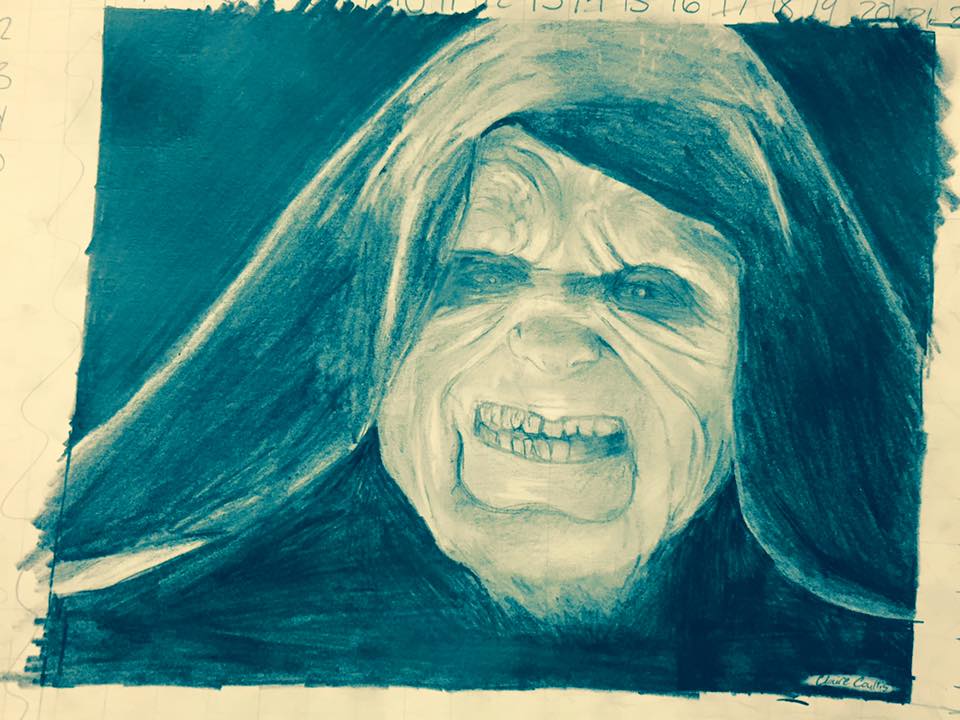
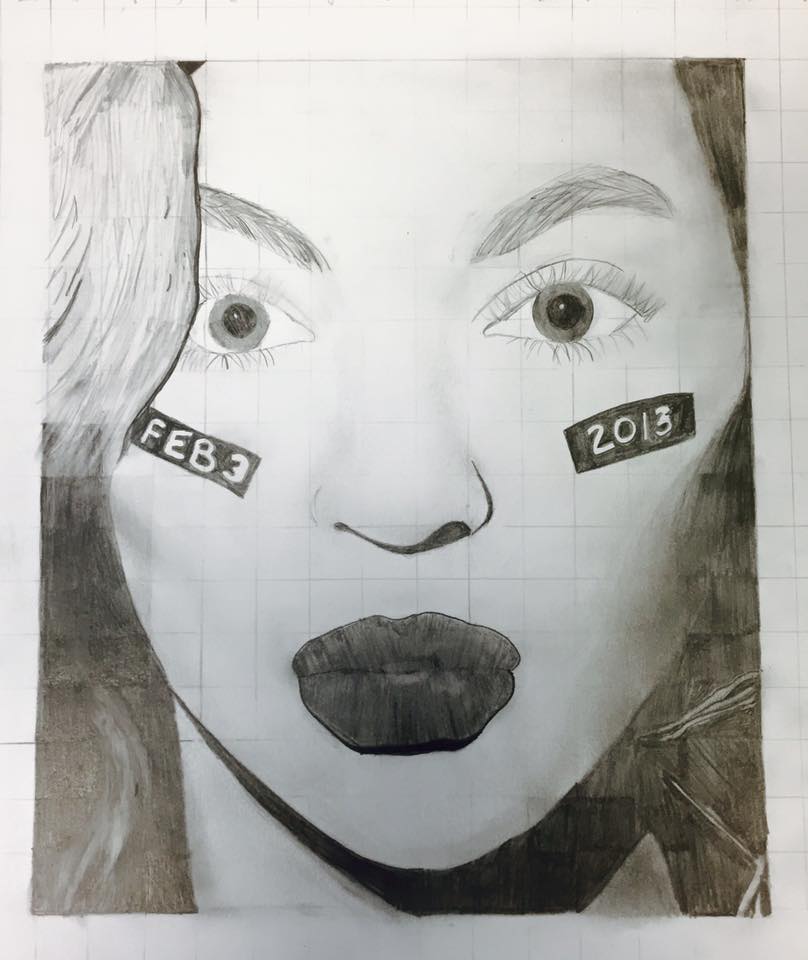
Portraiture Grid Drawing
Back by popular demand students are getting pumped for a lesson that has become quite the tradition at Jardine.
Lessons: Grid drawing and self-portrait.
Objective: In this lesson we are going to shift to a different method of drawing. Students will be introduced to the importance of grid and how it allows us to keep our work in proportion. Students are building upon and further explore the use of value and line weight within a drawing. In addition, students are weaving paper and using a numbering system to create their finished project. Craft is always important but is a major focus for this lesson as well. Also during this lesson, we will focus on collaborative learning.
Kansas Standards: Standard two; Benchmark 1 and 2. Standards five: Benchmark one. Standard Six; Benchmark two.
Introduction: This is an introduction to a new method of drawing. We will create a self-portrait using a grid. Building on the influence of value, we are now incorporating the idea of space and texture. Once our portraits are finished we will cut them and weave them in with the photocopied version that you have been working from.
Materials: white paper, a photo copy of the students’ pictures. (These will have to be taken and printed ahead of time), drawing pencils, tracing paper, erasers, scissors, rulers, tape, glue, black paper to frame their work.
Vocabulary: Grid system, value scale, cut-lines, weaving, texture
Resources: Mrs. Folk, Lyons High School; I wanted to do a grid drawing for part of my unit and I remembered how much I loved doing this.
Examples: See below.
Demonstration /Guided Practice: This project is going to need a lot of scaffolding. Students are going to have to draw a grid ½ inch by ½ on both pieces of paper. I plan on showing them how to do this, and then I will check their grid before they begin to draw. Next they will number the back of each paper. For an 8 ½ x 11 they will have 17 spaces by 22. They will need help with this also. Lastly, you will need to demonstrate how to cut and begin the weaving process. If they get confuses, they can reference their numbers on the back to get back on track.
Guidelines for the assignment: In this lesson we are going to shift to a different method of drawing. Students will be introduced to the importance of grid and how it allows us to keep our work in proportion. Students are building upon and further explore the use of value and line weight within a drawing. In addition, students are weaving paper and using a numbering system to create their finished project. Craft is always important but is a major focus for this lesson as well.
Time to Create a Grid Drawing
Use these steps to create a grid drawing lesson plan:
“If you’re overwhelmed by the size of a problem, break it down into many bite sized pieces.” Breaking the drawing into “bite sized pieces,” or small squares. ~ Chuck Close
Lessons: Grid drawing and self-portrait.
Objective: In this lesson we are going to shift to a different method of drawing. Students will be introduced to the importance of grid and how it allows us to keep our work in proportion. Students are building upon and further explore the use of value and line weight within a drawing. In addition, students are weaving paper and using a numbering system to create their finished project. Craft is always important but is a major focus for this lesson as well. Also during this lesson, we will focus on collaborative learning.
Kansas Standards: Standard two; Benchmark 1 and 2. Standards five: Benchmark one. Standard Six; Benchmark two.
Introduction: This is an introduction to a new method of drawing. We will create a self-portrait using a grid. Building on the influence of value, we are now incorporating the idea of space and texture. Once our portraits are finished we will cut them and weave them in with the photocopied version that you have been working from.
Materials: white paper, a photo copy of the students’ pictures. (These will have to be taken and printed ahead of time), drawing pencils, tracing paper, erasers, scissors, rulers, tape, glue, black paper to frame their work.
Vocabulary: Grid system, value scale, cut-lines, weaving, texture
Resources: Mrs. Folk, Lyons High School; I wanted to do a grid drawing for part of my unit and I remembered how much I loved doing this.
Examples: See below.
Demonstration /Guided Practice: This project is going to need a lot of scaffolding. Students are going to have to draw a grid ½ inch by ½ on both pieces of paper. I plan on showing them how to do this, and then I will check their grid before they begin to draw. Next they will number the back of each paper. For an 8 ½ x 11 they will have 17 spaces by 22. They will need help with this also. Lastly, you will need to demonstrate how to cut and begin the weaving process. If they get confuses, they can reference their numbers on the back to get back on track.
Guidelines for the assignment: In this lesson we are going to shift to a different method of drawing. Students will be introduced to the importance of grid and how it allows us to keep our work in proportion. Students are building upon and further explore the use of value and line weight within a drawing. In addition, students are weaving paper and using a numbering system to create their finished project. Craft is always important but is a major focus for this lesson as well.
Time to Create a Grid Drawing
Use these steps to create a grid drawing lesson plan:
- Choose a photograph and print them as a 4×6 photograph.
- Choose a final piece of paper – 8×12, students will draw double the size of the photograph.
- Grid the photograph – My students’ grid their 4×6 photograph into ½ inch by ½ inch squares.
- Count the number of boxes in the photograph and the final paper to make sure they match.
- Number the boxes on the photograph and final paper. Make sure the numbers coordinate. There should be 1-8 on the top row, and 1-12 on the left collumn.
- Start drawing the contour lines of the photograph.
- Be sure students are look at each individual box as they draw
- Match the values of from the photograph into each square.
“If you’re overwhelmed by the size of a problem, break it down into many bite sized pieces.” Breaking the drawing into “bite sized pieces,” or small squares. ~ Chuck Close

Monochromatic Self Portraits/ digital editing
Congratulations Jardine 8th graders, very soon you will be leaving Jardine to further your education at the High School Level. I would like you all to take time to reflect on your time here as a Jardine Jaguars, and more importantly, reflect on this particular juncture of your own personal life. The next four years will be the catalyst in beginning to build an academic foundation for future life endeavors. Your academic foundation can lead you down pathways that may ultimately effect your adult lives. In the next five years you will have to ask yourself questions such as "where do I want to go to college"? "What skill set or training should I obtain to work in a specific industry? "What do I want to do as a career and where do I see myself as as young adult?" These questions are overwhelming but its important to pause for a moment and consider them.
In this lesson we are going to explore the concept of the self portrait and reflect on our time here as well as our future.
Objective: I can create a self portrait of myself using tints and shade of one color.
I can utilize technology to posterize a photo of myself.
TIME TO CREATE
- Find a picture of yourself taken in the last 6 months. You can use snaps with filters but nothing covering your face. But I don't take pictures of myself Mrs. Latham... I will take a photo of you. Your welcome.
- Using pixler editor pixlr.com/editor/ crop your image and make sure it is 800x 1000 pixels.
- Under the adjustment setting, posterize your photo and then turn into black and white under the same tab, or take your photo and put it in www.itoon.net/ and use filter # 29. Your choice.
- Upload image to the shared file in google classroom.
- Get your photo and tape it to the window, or use the light box to trace all the shapes and contours of your portrait.
- Transfer image from tracing paper to canvas paper.
- NOW IT's TIME TO PAINT! The darkest values are going to be solid hue or color.
- we are going to make a value scale of tints and paint each value going darkest to lights. This is going to take several day. Don't rush and stick with the pace.
