
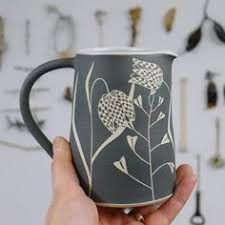
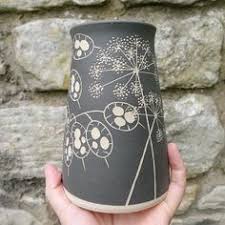
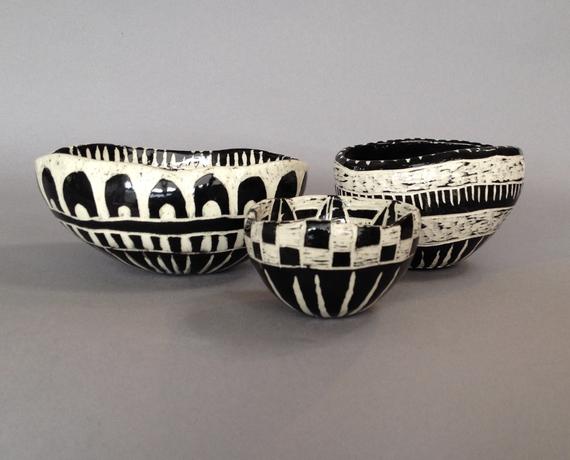
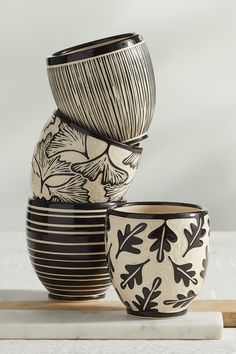
Sgraffito Pinch Pots
In this lesson we are learning to apply sgraffito which is a decorative technique used on a clay surface. This process is produced by applying three or more layers of under glaze to an unfired ceramic body. When the clay body is leather hard in its drying stage, the technique requires the removal of surface area as to reveal parts of the underlying layer. The contrast between the positive and negative space creates a beautiful design. For this lesson, you are successful when you have created a pinch pot that has a contrasting decorative pattern on the entire exterior surface of your bowl or pot.
MOnsters with k-2
Lesson Introduction:
We will look at some artist and art movements that are taking the creative ideas of children and turning them into art.
Essential Questions:
What factors prevent or encourage people to take creative risks?
How does collaboration expand the creative process?
How do artist and designers learn from trial and error?
Success Criteria: My Monster is successful when I have completed the task using slab and hand building techniques and have created a visual likeness to my clients drawings. My monster must be constructed using slab building techniques or adding together two pinch pots but IT CAN NOT BE A SOLID CHUNK OF CLAY!!!! My monster must be at least five inches tall, can stand on its own and be glazed to reflect the ideas of the client.
Extra Credit:
In the event that the monster is a functional ware, such as a vase, storage box, or object with a lid, extra credit will be given. 5 points
If the artist decides to give the monster to the client, extra credit will also be available. 15 points.
Learning Objective:
I can work from the ideas of 2d to 3d creating work that can stand. I can work collaboratively with my peers to complete the project.
I can use slab building and, or double pinch pot building methods to create clay monster sculptures.
I can demonstrate proper construction of clay and identify the various stages of the clay body as it dries.
I can use glaze effectively and explain the importance of the kiln.
National Standards:
Anchor Standard 1: Generate and conceptualize artistic ideas and work.
Anchor Standard 2: Organize and develop artistic ideas and work.
Anchor Standard 3: Refine and complete artistic work
Anchor Standard 5: Develop and refine artistic techniques and work for presentation.
Anchor Standard 10: Synthesize and relate knowledge and personal experiences to make art. Enduring Understanding: Through art-making, people make meaning by investigating and developing awareness of perceptions, knowledge, and experiences.
Vocabulary: Slab, slip score, double pinch pot, air bubbles, kiln, bisque ware, greenware, leather hard, blending, texture, glaze
Collaborative activities: students are recreating work drawn from elementary students. Design students are working collaboratively to help each other build and to clean up between each class.
Instruction & Process:
Time To Create:
Day One:
Look critically at your drawing.
How can you turn it into a 3d form?
Discuss your strategies with your ½ table team.
Get you clay and roll our your slabs. Let them harden up just enough to begin building them.
Day Two:
Begin slipping, and scoring the corners of your slabs to create a form.
Add the details such as limbs, horns, teeth, coils, etc.
Day Three:
Smooth out, clean up, blend, and add texture where needed.
Day four:
Take one last time to make sure it is reflective of the elementary drawing. photograph both your work and the clients drawing and turn in to google classroom.
Make sure your put your initials and class hour on the bottom before putting on the cart to go to the kiln closet!
Tiempo para crear:
Día uno:
mire críticamente su dibujo.
¿Cómo puedes convertirlo en una forma 3d?
Discute tus estrategias con tu ½ mesa de equipo.
Consigue que la arcilla y rodar nuestras tus losas. Deje que se endurezca lo suficiente para comenzar a construirlos.
Día dos:
Comience a resbalar, y marque las esquinas de las losas para crear una forma.
Agregue los detalles como libs, cuernos, dientes, bobinas, etc.
Día tres:
alise, limpie, mezcle y agregue textura donde sea necesario.
Día cuatro:
Tome una última vez para asegurarse de que refleja el dibujo elemental. fotografíe su trabajo y los clientes dibujando y entregue el aula de Google.
¡Asegúrese de poner sus iniciales y horas de clase en la parte inferior antes de poner el carrito para ir al armario del horno!
Materials needed: Clay, sculpting tools, glaze, kiln, sculpting tools, plastic.
Grading Format: Peer assessment form rubric/ Conference with Teacher.
Resources:
This lesson was created in collaboration with Bridget Lee of Jardine Elementary Topeka Ks.
James DeRosso’s Monster video https://youtu.be/8hjIhqrC_WY
James DeRosso’s website http://www.monster8all.com/
Artist Joshua Margolis https://www.awesomeinventions.com/kids-drawings-clay-sculptures/
The Monster Project https://themonsterproject.org/
Introduction to photography
In this lesson students are working collaboratively to learning basic rules of photography, reviewing their understanding of the elements and principles of art and design, and create a presentation in a slide show.
This is important because students are learning to take quality photographs.
Students are successful when they have turned in a slide show that covers the elements and principles of design. The photos are cropped and edited, labeled and uploaded in a slide show presentation. Each student is responsible for turning in a slide show to google classroom.
What is photography?
This is a discussion of what makes something art, what types of jobs someone who does photography can do, and why people engage in photography.
Lesson Objective: Students will learn how to take interesting photographs, use digital editing and thier knowlege of the elements and principles of design to create digital art.
National Standards:
Creating
(Cr1.1.7) Apply methods to overcome creative blocks.
(Cr1.2.7) Develop criteria to guide making a work of art or design to meet an identified goal.
(Cr2.1.7) Demonstrate persistence in developing skills with various materials, methods, and approaches in creating works of art or design.
(Cr2.2.7) Demonstrate awareness of ethical responsibility to oneself and others when posting and sharing images and other materials through the internet, social media, and other communication formats.
(Cr2.3.7) Apply visual organizational strategies to design and produce a work of art, design, or media that clearly communicates information or ideas.
Presenting
(Pr4.1.7) Compare and contrast how technologies have changed the way artwork is preserved, presented, and experienced
(Pr5.1.7) Based on criteria, analyze and evaluate methods for preparing and presenting art.
Responding
(Re7.2.7) Analyze multiple ways that images influence specific audiences.
(Re8.1.7) Interpret art by analyzing art-making approaches, the characteristics of form and structure, relevant contextual information, subject matter, and use of media to identify ideas and mood conveyed.
Vocabulary: SCARE simplify, close/closer in proximity to object, angle, rule of thirds, even lighting, implied texture, portrait, layers, transparency
Keagan activities: Stand up, hand up, pair up?
Instruction & Process: Slide show, game, scavenger hunt, photo shoots, digital editing
Materials needed: Snapseed app, Ipads, chromebooks, view finders
Day one: introduction to Photography
Day two: Photography scavenger hunt
Day three/ four: Edit with snap seed/ Create a slide share/ turn in.
Grading Format: Rubric
Resources: https://thejournal.com/articles/2013/11/18/9-iphone-photography-projects.aspx?=FETCLN
http://edynamiclearning.com/courses/middle-school-photography-course/
This is a discussion of what makes something art, what types of jobs someone who does photography can do, and why people engage in photography.
- Simplify: Get rid of excess objects — the water bottle on the picnic table, the junky papers — that clutter up the background; make the canvas as "blank" as possible.
- Close/closer: "A lot of times people take pictures too far away," Get close and closer to your subject. That doesn't mean using the zoom option; it means "Zoom with your feet."
- Angle: Be creative as you're taking your picture. Try to find an unusual angle from which to shoot. That could mean standing on a picnic table or tree stump and looking down or lying on the grass and shooting up.
- Rule of thirds: The best compositions are often the ones where the main subject is either in the right third or left third of the image. So shift the image that way.
- Even lighting. "You want even lighting," If there's some kind of shadow across the face, move the camera or the subject around to eliminate that. "Usually the best time to take pictures is early in the morning or late in the afternoon when the lighting isn't as harsh," she notes. "Foggy days are great for taking pictures — or overcast or even rainy days."
Lesson Objective: Students will learn how to take interesting photographs, use digital editing and thier knowlege of the elements and principles of design to create digital art.
National Standards:
Creating
(Cr1.1.7) Apply methods to overcome creative blocks.
(Cr1.2.7) Develop criteria to guide making a work of art or design to meet an identified goal.
(Cr2.1.7) Demonstrate persistence in developing skills with various materials, methods, and approaches in creating works of art or design.
(Cr2.2.7) Demonstrate awareness of ethical responsibility to oneself and others when posting and sharing images and other materials through the internet, social media, and other communication formats.
(Cr2.3.7) Apply visual organizational strategies to design and produce a work of art, design, or media that clearly communicates information or ideas.
Presenting
(Pr4.1.7) Compare and contrast how technologies have changed the way artwork is preserved, presented, and experienced
(Pr5.1.7) Based on criteria, analyze and evaluate methods for preparing and presenting art.
Responding
(Re7.2.7) Analyze multiple ways that images influence specific audiences.
(Re8.1.7) Interpret art by analyzing art-making approaches, the characteristics of form and structure, relevant contextual information, subject matter, and use of media to identify ideas and mood conveyed.
Vocabulary: SCARE simplify, close/closer in proximity to object, angle, rule of thirds, even lighting, implied texture, portrait, layers, transparency
Keagan activities: Stand up, hand up, pair up?
Instruction & Process: Slide show, game, scavenger hunt, photo shoots, digital editing
Materials needed: Snapseed app, Ipads, chromebooks, view finders
Day one: introduction to Photography
Day two: Photography scavenger hunt
Day three/ four: Edit with snap seed/ Create a slide share/ turn in.
Grading Format: Rubric
Resources: https://thejournal.com/articles/2013/11/18/9-iphone-photography-projects.aspx?=FETCLN
http://edynamiclearning.com/courses/middle-school-photography-course/
| photography_bingo_-_google_docs.pdf |
Digital PORTFOLIOS
What is a portfolio? A collection of your artwork
Why do we have to have one? To showcase our growth and interests as an artists. To share our work and to create a digital presence. To learn the 21st century skill of building a website.
Objectives:
- I can create a website.
- I can write an artist statement that reflects where I am as an artist.
- I can upload photos to my site in order to show my personal growth both short and long term.
- I can understand and demonstrate digital citizenship.
Steps to creating your site.
- Go to google sites.
- Click on the new google sites on the bottom right column.
- Click on the plus sign in bottom corner.
- Name your site Your First & Last Name
- Your Homepage should say… Your name and Art Portfolio
- On the right you see three tabs. Inserts, pages, themes. The insert page helps you build each page. The pages tab creates separate pages and the themes controls your font styles and size.
- Your portfolio needs to have a Home page, a page titled My Artwork, and a page titled Artist Statement. You will be expected to write a detailed artist statement. In your sketchbook you have an artist statement worksheet. Follow the prompts and you will great.
tto see my portfolio example.
Student Checklist
- The Homepage is an introduction of yourself. It must include at least one picture of yourself or of you and your family and friends. Use this page to share some of your personal interests. Think of it as an “about me” page. Tell us something about yourself? Consider including your favorite quote
- My Artwork: On this page you will upload pictures of your work. You will give your work a title, and then medium that you created it with. Example: Title: The Thinking Chair, Medium: Digital Photography
- Artist Statement: Write a detailed artist statement. Please be mindful of your grammar, and punctuation. Follow the artist statement flowchart in your sketchbook. Here is an electronic copy of that document.
file:///C:/Users/clatham/Downloads/Artist-Statement-Flow-Chart-final1.pdf
Once you are finished, publish it using your first and last name and then submit the link to google classroom under the portfolio assignment. Set the view for Topeka 501 so you may share it with future art teachers.
Discussion points:
- Their invisible audience – many students choose to set their digital portfolios to be limited to users on our school’s Google Apps domain. However, that means that everyone in our community who has an account can access student work. Eportfolios can be viewed by students, teachers, administrators, parents, and anyone with access to a username/password. This should influence students to write informatively without oversharing, and place emphasis on grammar and spelling.
- Appropriate commenting – write a comment that is specific and/or can initiate a discussion. Something like, “I liked your use of color” or “I see you painted a guitar. Do you play any other instruments?” Constructive criticism such as “ I am curious as to why you chose this specific color green, It doesn’t work for me because it doesn’t go well with the rest of your color scheme.”
- Digital citizenship and having a sound understanding of creative commons, permission, and giving credit to others for their work.
- Inserting an image by linking to the URL of the image online rather than taking a screen snapshot or dragging a copy of the image to the desktop. By using the URL, students can simply point to something else online. The alternative is to copy/take/steal a version of it which is tantamount to theft (depending on how the work is licensed).
"Digital citizenship" is an umbrella term that covers a whole host of important issues. Broadly, it's the guidelines for responsible, appropriate behavior when one is using technology. But specifically, it can cover anything from "netiquette" to cyberbullying; technology access and the digital divide; online safety and privacy; copyright, plagiarism, and digital law, and more. " for more resources check out this page.
REFERENCES:
www.educatorstechnology.com/2013/10/5-excellent-videos-to-teach-your.html
Nine Elements - Digital Citizenship
Videos
How to create an electronic portfolio.
https://youtu.be/nqbibjtgIZ8
Great Student Examples here!!!
sites.google.com/topekapublicschools.net/adisyn-caryl/artist-statement
sites.google.com/topekapublicschools.net/cjohnston/home
https://sites.google.com/topekapublicschools.net/jacobcassell2021/home
https://sites.google.com/topekapublicschools.net/kaydeevotaw/home
https://sites.google.com/topekapublicschools.net/kamm/home
https://sites.google.com/topekapublicschools.net/meganhuffman/home
WELCOME TO DESIGN!
This class is for high school credit. We are going to have fun creating, responding, connecting, and presenting our ideas, our processes, and our final work, while learning studio thinking processes that will help you beyond your time within the art studio. Above is a copy of the syllabus. Please read, share with your parents, and become familiar with classroom expectations. All lesson will be posted here and on google classroom. You are expected to check this page and google classroom sites as I will have video's, slide shows, and examples of projects we are working on. Please know it is your responsibility to watch these videos, and slide shows in the case of an absent so you know what to do when you get back to the studio. Please come back prepared to create. This will help you maximize your time in the studio.
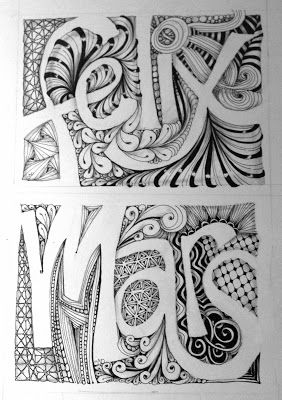
POSITIVE/ negative space Sketchbook covers.
|
|
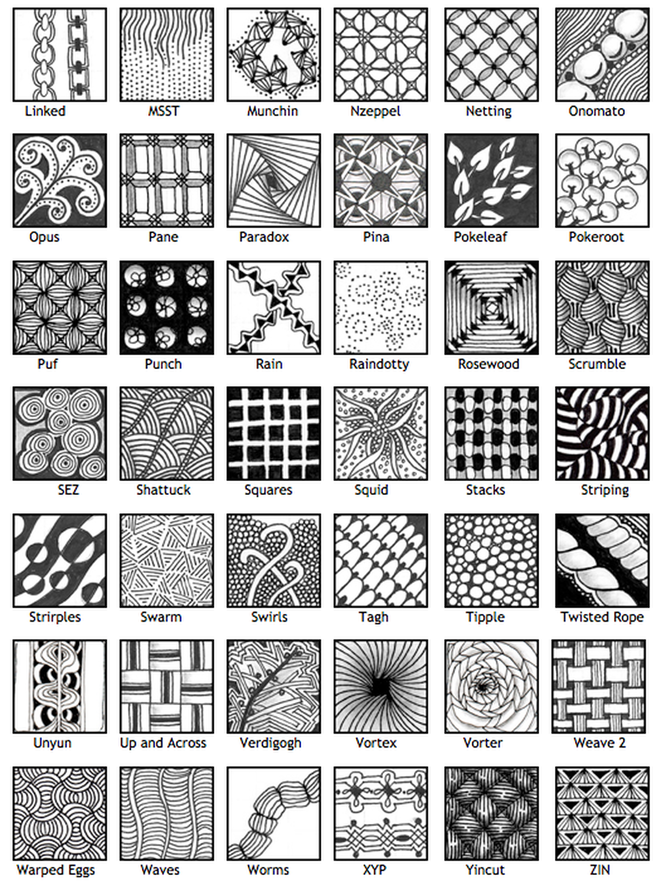
In this lesson we are learning to create a z entangle sketchbook cover placing emphasis on possessive and negative spacial relationships.
This is important because we are learning to use lines and shape and applying design principles such as pattern, contrast, proportion, unity and repetition to make successful art.
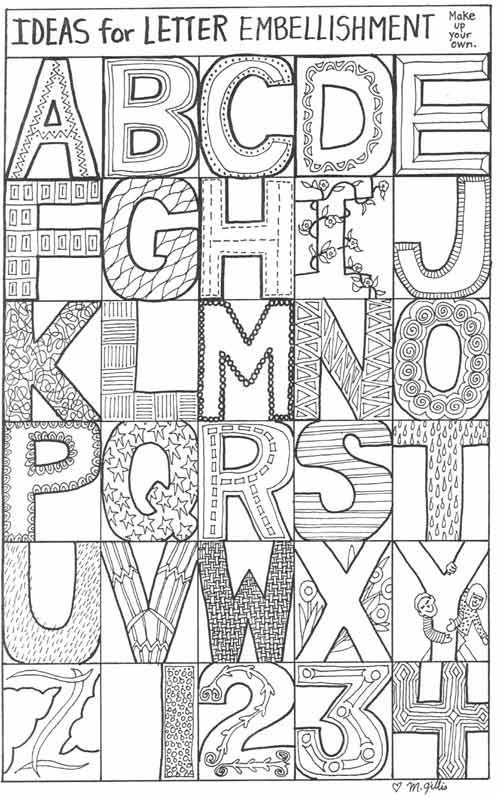
Students are successful when they have completed a full sketchbook cover with one side having first name and other side must have an inspirational word , the word design, or student's last name. One side must have the name in white with the background in of z entangles, while the other side will be reverse having letters in zentagles and back ground left white.
1/7/2020 I am successful when I have three different thumbnail ideas inside of my sketchbook cover. Each thumbnail will have a practice letter and a z entangle.
1/10/2020 I am successful when I have both pages filled with my first name and the work of my choice. My name is patterns while the background is white. The back page is reverse and the word is white while the background is all patterns. Student have a least five patterns that are used repeatedly in both pages to create unity and contrast.
Time to Create
5 Students must have five patterns they use in repetition throughout both pages.
4 Students have four days to complete. Due date: 1/13/2020
3 Students must have three thumbnails on the inside cover as part of the planning process.
2 Two full page words. The front should have your name, the back has either your last name, design 1, or a positive affirmation such as hope, or dream. One side must have the letters designed with the background left white. The other page must be opposite and have heavy and complete pattern in the background and the shapes of the letters left white
1 Must be in one media of either marker or gel pen, student gets to choose.
Take a picture and upload to google classroom when you are finished.
Hora de crear
5 Los estudiantes deben tener cinco patrones que usan en repetición en ambas páginas.
4 Los estudiantes tienen cuatro días para completar. Fecha de vencimiento: 13/01/2020
3 Los estudiantes deben tener tres miniaturas en la cubierta interior como parte del proceso de planificación.
2 Dos palabras de página completa. El frente debe tener su nombre, el reverso debe tener su apellido, diseño 1 o una afirmación positiva como esperanza o sueño. Un lado debe tener las letras diseñadas con el fondo en blanco. La otra página debe ser opuesta y tener un patrón pesado y completo en el fondo y las formas de las letras se dejan en blanco
1 Debe estar en un medio de rotulador o bolígrafo de gel, el estudiante puede elegir.
Tome una imagen y subir a Google aula cuando haya terminado.
This is important because we are learning to use lines and shape and applying design principles such as pattern, contrast, proportion, unity and repetition to make successful art.
Students are successful when they have completed a full sketchbook cover with one side having first name and other side must have an inspirational word , the word design, or student's last name. One side must have the name in white with the background in of z entangles, while the other side will be reverse having letters in zentagles and back ground left white.
1/7/2020 I am successful when I have three different thumbnail ideas inside of my sketchbook cover. Each thumbnail will have a practice letter and a z entangle.
1/10/2020 I am successful when I have both pages filled with my first name and the work of my choice. My name is patterns while the background is white. The back page is reverse and the word is white while the background is all patterns. Student have a least five patterns that are used repeatedly in both pages to create unity and contrast.
Time to Create
5 Students must have five patterns they use in repetition throughout both pages.
4 Students have four days to complete. Due date: 1/13/2020
3 Students must have three thumbnails on the inside cover as part of the planning process.
2 Two full page words. The front should have your name, the back has either your last name, design 1, or a positive affirmation such as hope, or dream. One side must have the letters designed with the background left white. The other page must be opposite and have heavy and complete pattern in the background and the shapes of the letters left white
1 Must be in one media of either marker or gel pen, student gets to choose.
Take a picture and upload to google classroom when you are finished.
Hora de crear
5 Los estudiantes deben tener cinco patrones que usan en repetición en ambas páginas.
4 Los estudiantes tienen cuatro días para completar. Fecha de vencimiento: 13/01/2020
3 Los estudiantes deben tener tres miniaturas en la cubierta interior como parte del proceso de planificación.
2 Dos palabras de página completa. El frente debe tener su nombre, el reverso debe tener su apellido, diseño 1 o una afirmación positiva como esperanza o sueño. Un lado debe tener las letras diseñadas con el fondo en blanco. La otra página debe ser opuesta y tener un patrón pesado y completo en el fondo y las formas de las letras se dejan en blanco
1 Debe estar en un medio de rotulador o bolígrafo de gel, el estudiante puede elegir.
Tome una imagen y subir a Google aula cuando haya terminado.
Contrast makes things more visually interesting!
SYMMETRICAL BALANCE and contrast
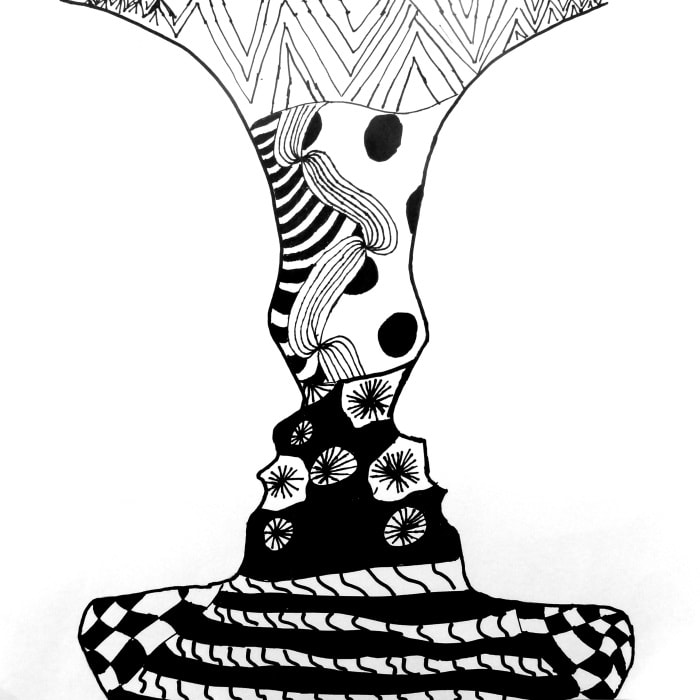
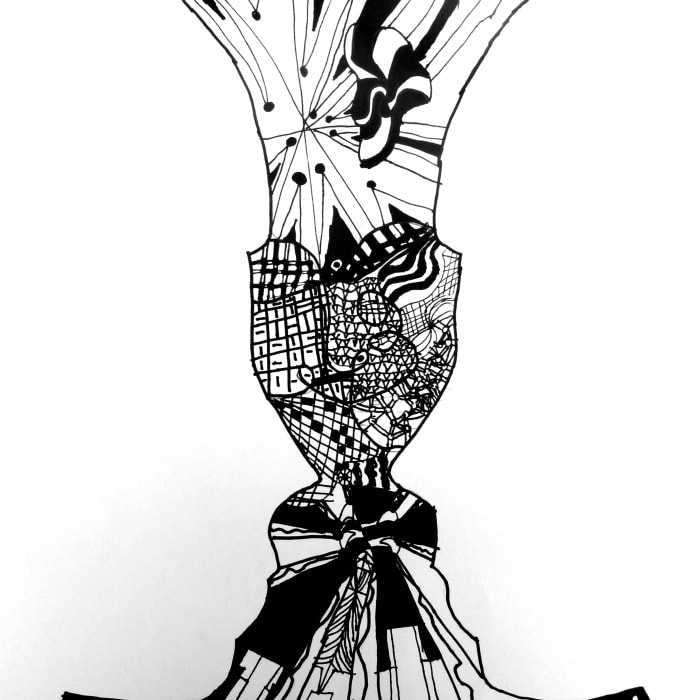
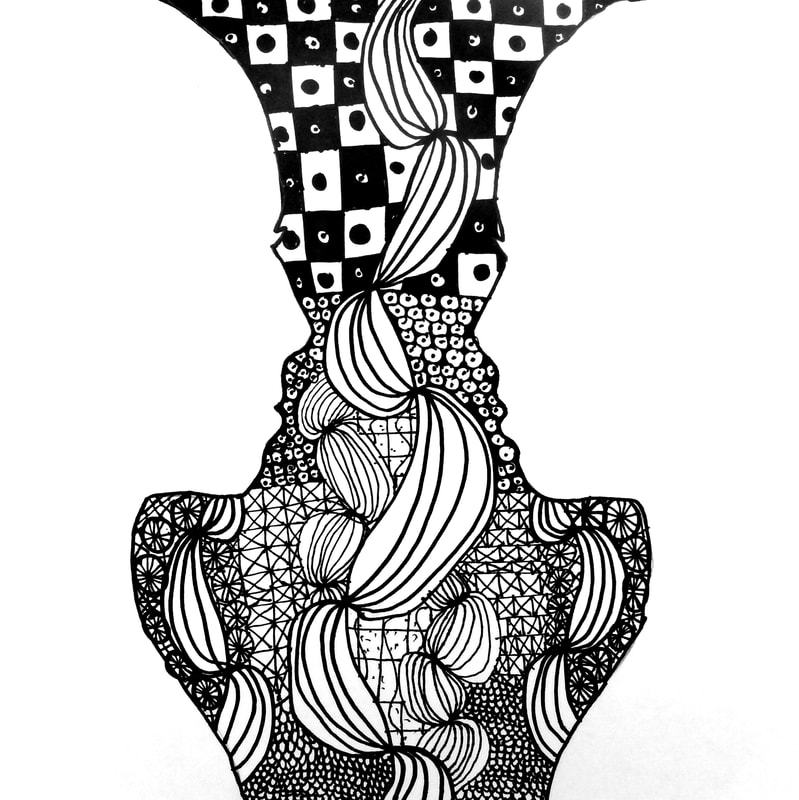
In this lesson we are learning to expand on our knowledge of zentangle patterns to create patterns of contrast. In this studio practice we are placing emphasis on possessive and negative spacial relationships within a symmetrical balance.
This is important because we are learning to use shapes and black and white contrast.
Day one: I am successful when I have practiced three different thumbnail ideas inside of my sketchbook that have symmetrical figures that create a vase. Each thumbnail will have a practiced portion of a z entangle. pattern.
Students are successful when they have created two symmetrical figures, that has three or more contrasting patterns in the center area that looks like a vase. The two figures are left white or can be colored in to become black figure shapes. Work must be glued to a black or white back ground paper, signed, photographed and turned in to google classroom.
Time to Create
5 The five focuses are craftsmanship, symmetry, contrast in shapes and patterns , using repetition and unity.
4 Students have four days to complete
3 Students must have three or more contrasting patterns in their design.
2 Two symmetrical figures are left white or colored in solid black.
1 Must be finished in ultra fine tip sharpie
Radial Balance in Gothic Architecture
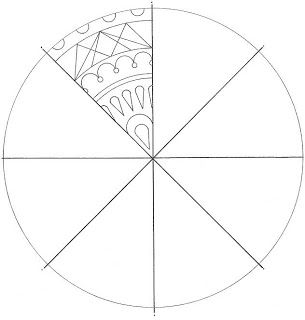
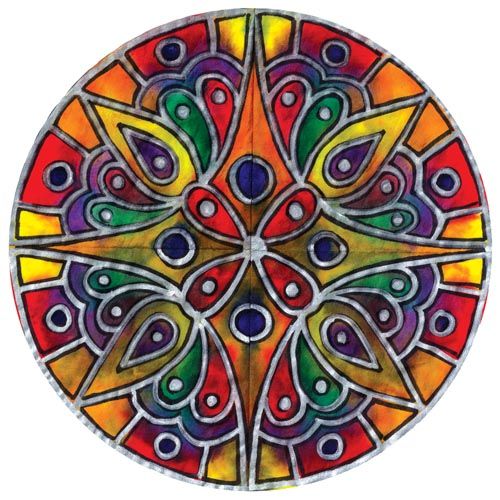
In this lesson students are learning to create radial design while also learning to identify specific cultural artifacts that utilizes radial design. In this studio practice we are placing emphasis on radial balance.
This is important because it helps us understand how radial design is created and in importance of contrasting colors.
Day one: I am successful when I have traced the template Mrs. Latham has give me in my sketchbook, researched and have drawn three different possible ideas for my radial design.
Students have successfully completed the projects when they have drawn a complex radial design on the giant piece of diffusing paper using both metallic and then outlined the metallic in black sharpie. The remaining white areas left in the circle has been colored with marker and have a stained glass effect. The work is photographed and turned in to google classroom.
Time to Create
- Research plan three ideas and draw in sketchbooks using the template Mrs. Latham gave me.
- Get final circle from Mrs. Latham, YOU GET ONE, and ONE ONLY!
- Put your name, hour on the back with pencil on the bottom round edge.
- fold it into eighths or three times .
- Draw your design on ONE section of the circle.
- Unfold the circle ONCE so you can trace the pattern. Fold and unfold tracing the pattern until all 8 sections are drawn.
- Trace with metallic sharpie.
- Outline metallic sharpie with black sharpie.
- Fold back into 1/4th and Color in white areas with bright prang markers.
- Use water and stippling brush to make the colors bleed. Do not drag brush across paper, just dab it.
- Hang it up to dry if there is no room on the drying rack.
