
WElcome my most amazing artist!!!
Hello 7th grade! On this page you will find links, videos, slides shows, examples and lessons we are doing this semester in 7th. If you are absent, please refer to this page and see what's going on. I can't wait to see what ideas you have for this year as we are going to make some serious art.
Day One: What's in the bag?
"What's in the bag" is a collaborative art making where kids are engaged and learning to work together on day one. This lesson comes from https://www.theartofed.com/2016/08/08/first-day-school-play-games/
Name of the Game: What’s in the Bag?This game challenges students to be creative using predetermined materials and an engaging prompt. It is best played in groups of three to six students. Use the stages of the game to talk about your expectations for classroom atmosphere, material use, cleanup, and listening. Before play, share some brief expectations for work and rules. These will depend on the age of your kids and your personal classroom management style.
Game Guidelines
From this lesson students will learn how to interact within the art room. They will work collaboratively while working towards the goals of the following.
I can create a sculptural work of art in a collaborative group.
I can discuss work of art using the T. A.G. method of critique.
In the lesson we are also focusing on three studio habits of mind and will learn how to envision, stretching and explore, and engaging and persisting through the lesson.
This lesson has been modified so that I can teach my new students how to use materials, clean up. We also discuss constructive feedback in the art room. Using T.A.G. Students are guided through a critique of the work that was made. Tell the artist something you like about the work. Ask a question about the piece. Give some sort of constructive feedback that would help the artist with issues they may have experienced while creating their work.
Name of the Game: What’s in the Bag?This game challenges students to be creative using predetermined materials and an engaging prompt. It is best played in groups of three to six students. Use the stages of the game to talk about your expectations for classroom atmosphere, material use, cleanup, and listening. Before play, share some brief expectations for work and rules. These will depend on the age of your kids and your personal classroom management style.
Game Guidelines
- Treat others with respect.
- Work must follow the rules of the game or it will be disqualified.
- A high-quality and visually appealing product must be produced.
- Each group will present their work to the class at the end of the game.
- Work must be completed in the allotted time.
- Each team member must participate.
- You must use everything from the bag.
- Work must be able to be picked up and moved at the end of class.
From this lesson students will learn how to interact within the art room. They will work collaboratively while working towards the goals of the following.
I can create a sculptural work of art in a collaborative group.
I can discuss work of art using the T. A.G. method of critique.
In the lesson we are also focusing on three studio habits of mind and will learn how to envision, stretching and explore, and engaging and persisting through the lesson.
This lesson has been modified so that I can teach my new students how to use materials, clean up. We also discuss constructive feedback in the art room. Using T.A.G. Students are guided through a critique of the work that was made. Tell the artist something you like about the work. Ask a question about the piece. Give some sort of constructive feedback that would help the artist with issues they may have experienced while creating their work.
Lesson Two:
How to turn in work using google classroom
Please create a file in your google drive that says 7th grade art. Keep all photos of all projects in this file.
Lesson Objective: Students will get there classroom code and learn how to upload pictures to google drive and submit their picture for grading via google classroom.
National Standards: Producing: Anchor Standard 4: Analyze, interpret, and select artist work for presentation.
Materials needed: Chromebook and photos of finished work.
Grading Format: This in not for credit.
Lesson Three: Sketchbook Covers.

Lesson Introduction: Dive into art making. Create a design on your cover. The challenge is this semester is to hide your name in a design.
Lesson Objective: Create artwork using wax resist, learn classroom procedures and expectations while engaged in art making. Students begin to learn studio thinking processes on day one.
Vocabulary: Wax resist
Instruction & Process: Write your name on the page in any style/ text that you like then hide it in a line design. Use oil pastel to make your line marks. Fill the page. Second, paint the entire thing in water color and see what happens?
Materials needed: Paper, watercolor, oil pastel,
Resources:paintingwatercolor.com/Art-Lessons/Art-Lesson-Wax-Resist.html
Lesson Four: Building a digital Portfolio
What is a portfolio? A collection of your artwork
Why do we have to have one? To showcase our growth and interests as an artists. To share our work and to create a digital presence. To learn the 21st century skill of building a web site.
Objectives:
Steps to creating your site.
Once you are finished, publish it using your first and last name and then submit the link to google classroom under the portfolio assignment.
Discussion points:
"Digital citizenship" is an umbrella term that covers a whole host of important issues. Broadly, it's the guidelines for responsible, appropriate behavior when one is using technology. But specifically, it can cover anything from "netiquette" to cyberbullying; technology access and the digital divide; online safety and privacy; copyright, plagiarism, and digital law, and more. " for more resources check out this page.
REFERENCES:
www.educatorstechnology.com/2013/10/5-excellent-videos-to-teach-your.html
Nine Elements - Digital Citizenship
Videos
How to create an electronic portfolio.
https://youtu.be/nqbibjtgIZ8
Great Student Examples here!!!
sites.google.com/topekapublicschools.net/adisyn-caryl/artist-statement
sites.google.com/topekapublicschools.net/cjohnston/home
https://sites.google.com/topekapublicschools.net/jacobcassell2021/home
https://sites.google.com/topekapublicschools.net/kaydeevotaw/home
https://sites.google.com/topekapublicschools.net/kamm/home
https://sites.google.com/topekapublicschools.net/meganhuffman/home
Why do we have to have one? To showcase our growth and interests as an artists. To share our work and to create a digital presence. To learn the 21st century skill of building a web site.
Objectives:
- I can create a web site.
- I can write an artist statement that reflects where I am as an artist.
- I can upload photos to my site in order to show my personal growth both short and long term.
- I can understand and demonstrate digital citizenship.
Steps to creating your site.
- Go to google sites.
- click on new google sites on the bottom right column.
- Click on the plus sign in bottom corner.
- Name your site Your First & Last Name
- Your Homepage should say…Art Portfolio
- Go to the three dots… and make a duplicate page. Name it 7th Grade Gallery.
- Go to the three dots… and make a second duplicate pate. Name it Artist Statement.
- The home page: This is an introduction to what this web site is. You may include photos of yourself or of you and your family and friends. Use this page to share some of your personal interests. Think of it as an “about me” page. Tell us something about yourself? You can also include your favorite quote or a photo of you being you.
- 7th grade gallery: On this page you will upload all of your work. You will title the work by naming the assignment. You may also name your artwork, have fun with it but keep it school appropriate.
- Artist Statement: Follow the guided questions on page five of your sketchbook. Here is a digital link incase you are not in class.
Once you are finished, publish it using your first and last name and then submit the link to google classroom under the portfolio assignment.
Discussion points:
- Their invisible audience – many students choose to set their digital portfolios to be limited to users on our school’s Google Apps domain. However, that means that everyone in our community who has an account can access student work. Eportfolios can be viewed by students, teachers, administrators, parents, and anyone with access to a username/password. This should influence students to write informatively without oversharing, and place emphasis on grammar and spelling.
- Appropriate commenting – write a comment that is specific and/or can initiate a discussion. Something like, “I liked your use of color” or “I see you painted a guitar. Do you play any other instruments?” Constructive criticism such as “ I am curious as to why you chose this specific color green, It doesn’t work for me because it doesn’t go well with the rest of your color scheme.”
- Digital citizenship and having a sound understanding of creative commons, permission, and giving credit to others for their work.
- Inserting an image by linking to the URL of the image online rather than taking a screen snapshot or dragging a copy of the image to the desktop. By using the URL, students can simply point to something else online. The alternative is to copy/take/steal a version of it which is tantamount to theft (depending on how the work is licensed).
"Digital citizenship" is an umbrella term that covers a whole host of important issues. Broadly, it's the guidelines for responsible, appropriate behavior when one is using technology. But specifically, it can cover anything from "netiquette" to cyberbullying; technology access and the digital divide; online safety and privacy; copyright, plagiarism, and digital law, and more. " for more resources check out this page.
REFERENCES:
www.educatorstechnology.com/2013/10/5-excellent-videos-to-teach-your.html
Nine Elements - Digital Citizenship
Videos
How to create an electronic portfolio.
https://youtu.be/nqbibjtgIZ8
Great Student Examples here!!!
sites.google.com/topekapublicschools.net/adisyn-caryl/artist-statement
sites.google.com/topekapublicschools.net/cjohnston/home
https://sites.google.com/topekapublicschools.net/jacobcassell2021/home
https://sites.google.com/topekapublicschools.net/kaydeevotaw/home
https://sites.google.com/topekapublicschools.net/kamm/home
https://sites.google.com/topekapublicschools.net/meganhuffman/home
Elements of art 3d cube
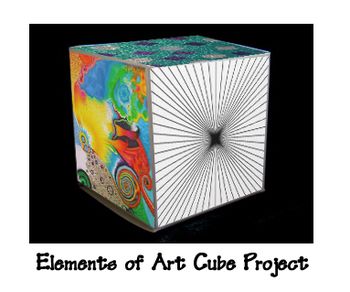
Lesson Plan: Elements of Art Cube
Studio habits of mind objectives: I can practice and develop craft. I can engage and persist. I can stretch and explore. I can reflect as an artist. Express: In my work I can conveys an idea, mood, or place that expresses some part of me
(1) Know the Elements of Art (2) Illustrate each element (3) Assemble a cube
Standards: http://www.nationalartsstandards.org/
Vocabulary: line, shape, space, color, value, texture, form, thumbnail sketch.
Collaborative component: Gallery walk, Kahoots introduction.
Materials: Cube pattern printed on large card stock, pencils, markers, or colored pencils
Instruction
- Plan your ideas in thumbnail sketches in your sketchbook.
- Teacher must approve before you move on to final cube.
- illustrated one element in each square or each side, with the exception of form (that's the cube!).
- When the design is complete, cut and glue into the cube shape.
by Alyssa Johnson (submitted Jan 23, 2014)
Washington Elementary School - MN, United States
for grade level » Middle (6-8)
duration 3 sessions (about 40 minutes per session)
media type » Drawing
Assessment Take a picture of your cube and submit it with a copy of the rubric below.
one point perspective: names
LESSON PLAN OBJECTIVE:
I CAN CREATE SPACE AND MAKE 3D LETTERS ON A 2D PLANE USING ONE POINT PERSPECTIVE.
I CAN APPLY ONE POINT PERSPECTIVE TO BLOCK LETTERS AND OR GRAFFITI.
MATERIALS
PENCIL COLOR PENCIL, PENS, SHARPIES, PAPER, RULER
VOCABULARY: One point perspective, vantage point, horizon line, space, 3d, 2d,
OPTION 1:
OPTION 2: WILDSTYLE GRAFFITI
LENGTHEN LETTERS: START WITH LETTER AND THEN ABSTRACT IT TO HAVE CURVES.
ADD ARROWS.
PLACE YOUR VANTAGE POINT ON THE BOTTOM OF THE PAGE. MAKE SURE THAT YOU DO NOT EXTEND YOUR LINES ALL THE WAY TO THE VANTAGE POINT.
INSTEAD, EXTEND LINE ¼ TO ½ INCH AND THEN STOP AND PLACE THE PARALLEL LINES TO COMPLETE THE SQUARE.
COLOR THE WHOLE PAGE. THINK ABOUT YOUR USE OF VALUE.
TIME TO CREATE
Resources
http://www.studentartguide.com/articles/one-point-perspective-drawing
One point perspective.jpg
http://prezi.com/llf1qa3n4p77/?utm_campaign=share&utm_medium=copy&rc=ex0share
Kagan activities: During discussion use time pair share for discussion. Stand up, stray, at the bell, find a contrasting color.
Instruction & Process: Follow the art of ed resource and watch video.
Grading Format: https://docs.google.com/document/d/1Z7CltWi8aDuRHLEbD4LwOY8f2ry5emWHTPaY0o6nuDM/edit
Recourses:
https://www.theartofed.com/2017/08/18/implement-graffiti-inspired-unit-week-one/
https://prezi.com/r2nkjiwvcsxx/graffiti-names/?webgl=0
https://prezi.com/rnh4-tuhktcp/1-point-perspective-in-art/?utm_campaign=share&utm_medium=copy
http://www.graffitidiplomacy.com/FreeGraffitiDrawingLessons.html
http://arteascuola.com/2015/10/name-in-graffiti-style/
https://prezi.com/ctb1mp4tmfv8/graffiti-art/?webgl=0#
I CAN CREATE SPACE AND MAKE 3D LETTERS ON A 2D PLANE USING ONE POINT PERSPECTIVE.
I CAN APPLY ONE POINT PERSPECTIVE TO BLOCK LETTERS AND OR GRAFFITI.
MATERIALS
PENCIL COLOR PENCIL, PENS, SHARPIES, PAPER, RULER
VOCABULARY: One point perspective, vantage point, horizon line, space, 3d, 2d,
OPTION 1:
- BLOCK LETTERS CREATE EVENLY SPACED BOXES ACROSS YOUR PAGE.
- USE THE ENTIRE BOX TO MAKE LETTER
- PLACE YOUR VANTAGE POINT ON THE BOTTOM OF THE PAGE AND DRAW LINES FROM CORNERS OF LETTERS TO THE VANTAGE POINT.
- SELECT YOUR COLORS AND USE VALUE TO COLOR IN THE LETTERS.
OPTION 2: WILDSTYLE GRAFFITI
LENGTHEN LETTERS: START WITH LETTER AND THEN ABSTRACT IT TO HAVE CURVES.
ADD ARROWS.
PLACE YOUR VANTAGE POINT ON THE BOTTOM OF THE PAGE. MAKE SURE THAT YOU DO NOT EXTEND YOUR LINES ALL THE WAY TO THE VANTAGE POINT.
INSTEAD, EXTEND LINE ¼ TO ½ INCH AND THEN STOP AND PLACE THE PARALLEL LINES TO COMPLETE THE SQUARE.
COLOR THE WHOLE PAGE. THINK ABOUT YOUR USE OF VALUE.
TIME TO CREATE
- Practice rough sketch in your sketchbook. Plan out your color scheme and add your one point perspective. ..Make sure it looks "3d"
- Show Mrs. Latham and then get your final paper.
- Draw your name in pencil. Make sure it take up the whole page and has one point perspective.
- Frame out your name or word with a line that outlines your name.
- Outline your drawing with sharpie
- Color in your one point “3d” area first.
- Choose a contrasting color and color the rest.
- Cut out and glue to paper.
- Cut it out one more time to go with the shape of your name.
- Don't forget to tag it, take a pic, and turn it in to hang or take home. Your choice.
Resources
http://www.studentartguide.com/articles/one-point-perspective-drawing
One point perspective.jpg
http://prezi.com/llf1qa3n4p77/?utm_campaign=share&utm_medium=copy&rc=ex0share
Kagan activities: During discussion use time pair share for discussion. Stand up, stray, at the bell, find a contrasting color.
Instruction & Process: Follow the art of ed resource and watch video.
Grading Format: https://docs.google.com/document/d/1Z7CltWi8aDuRHLEbD4LwOY8f2ry5emWHTPaY0o6nuDM/edit
Recourses:
https://www.theartofed.com/2017/08/18/implement-graffiti-inspired-unit-week-one/
https://prezi.com/r2nkjiwvcsxx/graffiti-names/?webgl=0
https://prezi.com/rnh4-tuhktcp/1-point-perspective-in-art/?utm_campaign=share&utm_medium=copy
http://www.graffitidiplomacy.com/FreeGraffitiDrawingLessons.html
http://arteascuola.com/2015/10/name-in-graffiti-style/
https://prezi.com/ctb1mp4tmfv8/graffiti-art/?webgl=0#
3D letters/ paper mache project
3D letters/ Paper Mache project
Lesson Plan:
https://docs.google.com/a/tps501.org/viewer?a=v&pid=sites&srcid=ZWRnZS1jb2xlLmsxMi5pYS51c3xlZC1jby1hcnQtZGVwYXJ0bWVudHxneDo3MWM5OTdjNDFmY2E0NGI3
Objectives:
I can understand how to construct a 3D letter sculpture using good craftsmanship.
I can create a theme for my project based on things that are relevant to myself.
Project Goals:
1. I can create a block letter of one of my initials and that includes items that represent me. I am willing to consider other symbols that are not trademark and can be done in 3d and stand on its own.
2. I can make my block letter so that it’s able to stand on its own.
3. I can create a theme for my letter that give personal meaning to my work.
4. I can use craftsmanship when constructing my letter so that is shaped well with smooth edges.
Time to create:
Steps:
1. Brainstorm a list of things of things that represent you. Come up with ideas for a single theme.
2. Sketch your letter in your sketchbook, it can be any kind of typeface. Do some research.
3. Draw out your letter on the chip board. Once it is exactly how you want it, cut it out.
4. Use this piece as a template to trace your second letter.
5. Place/glue cups between your two pieces of cardboard....making sure that the two letters line up.
6. Place tape over the open area (where you see the cups.)
7. Paper mache the edges and the whole letter.
8. Prime your letter with white gesso.
9. Sketch your designs on the front and back of this letter.
10. Paint your letter.
11. Take a picture and turn it in. Get both sides of your sculpture.
RUBRIC:
/uploads/2/8/1/6/28165013/your_rubric__creating_a_painting___creating_3d_letters__paper_mache.html
https://sites.google.com/a/edge-cole.k12.ia.us/ed-co-art-department/class-websites/8th-grade-art/3d-block-letter
http://www.slideshare.net/RebeccaDrews/architectural-letter-sculpture
<iframe src="//www.slideshare.net/slideshow/embed_code/key/M6tOVSL
Coil Pots
COIL POTS CHECKLIST
HELPFUL TIP: Put your name on your pot. If someone takes it, I cannot help you if your name isn’t on it.
HELPFUL TIP: Put your name on your pot. If someone takes it, I cannot help you if your name isn’t on it.
- Create 3 sketches of coil pots that use repetition and pattern in your sketchbook. Color these or write down colors you want to use. KEEP THESE SKETCHES.
- Roll out a clay slab, as demoed in class, to build the base for your pot.
- Start to execute and build your coil pot based on the design in your sketchbook.
- Set out to dry and Ms. Wilbur will fire it for you. We will have a glaze day later in the semester.
- Take a photo of your pot and upload it to Google Classroom.
Monster Mugs
- Design three monsters that have specific talents/powers/character traits.
- Your monster should have:
- Nose (optional)
- Feet (optional)
- Mouth
- Eyes
- Nose (optional)
- Your monster must include texture (feathers, scales, wrinkles, warts, ect.)
- Keep in mind that these will be mugs. Draw your sketches as mugs!
- Your monster should have 3 specific talents/powers/character traits. You should also have a name for your monster.
- Upload these traits and the name of your monster to Google Classroom along with an image of your mug.
INtro to Drawing
Objective: I can find a triadic color scheme on the color wheel. I can determine shadow, midtones, and highlights, with in my color scheme. I can draw an eye, nose, or eye using my understanding of the rule of thirds to create an interesting composition.
Vocabulary: Highlights, shadows, Mid tone, composition, triadic color scheme, contour drawing, gestural drawing.
Vocabulary: Highlights, shadows, Mid tone, composition, triadic color scheme, contour drawing, gestural drawing.
grid painting
Objective:
Students will get an Introduction to individuals who are currently making positive change in our world.
Students will apply the concepts of highlights, mid tones, and shadow to create a collaborative grid painting of the following activist.
Students will learn the split complementary color scheme.
Vocabulary: Split complementary color scheme, grid painting, shadow, mid tone, highlight, portrait, activism
Introduction to photography
What is photography?
This is a discussion of what makes something art, what types of jobs someone who does photography can do, and why people engage in photography.
Lesson Objective: Students will learn how to take interesting photographs, use digital editing and thier knowlege of the elements and principles of design to create digital art.
National Standards:
Creating
(Cr1.1.7) Apply methods to overcome creative blocks.
(Cr1.2.7) Develop criteria to guide making a work of art or design to meet an identified goal.
(Cr2.1.7) Demonstrate persistence in developing skills with various materials, methods, and approaches in creating works of art or design.
(Cr2.2.7) Demonstrate awareness of ethical responsibility to oneself and others when posting and sharing images and other materials through the internet, social media, and other communication formats.
(Cr2.3.7) Apply visual organizational strategies to design and produce a work of art, design, or media that clearly communicates information or ideas.
Presenting
(Pr4.1.7) Compare and contrast how technologies have changed the way artwork is preserved, presented, and experienced
(Pr5.1.7) Based on criteria, analyze and evaluate methods for preparing and presenting art.
Responding
(Re7.2.7) Analyze multiple ways that images influence specific audiences.
(Re8.1.7) Interpret art by analyzing art-making approaches, the characteristics of form and structure, relevant contextual information, subject matter, and use of media to identify ideas and mood conveyed.
Vocabulary: SCARE simplify, close/closer in proximity to object, angle, rule of thirds, even lighting, implied texture, macro photography, portrait, layers, transparency
Keagan activities: Stand up, hand up, pair up?
Instruction & Process: Slide show, game, scavenger hunt, photo shoots, digital editing
Materials needed: Snapseed app, Ipads, chromebooks, view finders
Day one: introduction to Photography
Day two: Photography scavenger hunt
Day three/ four: Edit with snap seed/ Create a slide share/ turn in.
Grading Format: Peer review
Resources: https://thejournal.com/articles/2013/11/18/9-iphone-photography-projects.aspx?=FETCLN
http://edynamiclearning.com/courses/middle-school-photography-course/
This is a discussion of what makes something art, what types of jobs someone who does photography can do, and why people engage in photography.
- Simplify: Get rid of excess objects — the water bottle on the picnic table, the junky papers — that clutter up the background; make the canvas as "blank" as possible.
- Close/closer: "A lot of times people take pictures too far away," Get close and closer to your subject. That doesn't mean using the zoom option; it means "Zoom with your feet."
- Angle: Be creative as you're taking your picture. Try to find an unusual angle from which to shoot. That could mean standing on a picnic table or tree stump and looking down or lying on the grass and shooting up.
- Rule of thirds: The best compositions are often the ones where the main subject is either in the right third or left third of the image. So shift the image that way.
- Even lighting. "You want even lighting," If there's some kind of shadow across the face, move the camera or the subject around to eliminate that. "Usually the best time to take pictures is early in the morning or late in the afternoon when the lighting isn't as harsh," she notes. "Foggy days are great for taking pictures — or overcast or even rainy days."
Lesson Objective: Students will learn how to take interesting photographs, use digital editing and thier knowlege of the elements and principles of design to create digital art.
National Standards:
Creating
(Cr1.1.7) Apply methods to overcome creative blocks.
(Cr1.2.7) Develop criteria to guide making a work of art or design to meet an identified goal.
(Cr2.1.7) Demonstrate persistence in developing skills with various materials, methods, and approaches in creating works of art or design.
(Cr2.2.7) Demonstrate awareness of ethical responsibility to oneself and others when posting and sharing images and other materials through the internet, social media, and other communication formats.
(Cr2.3.7) Apply visual organizational strategies to design and produce a work of art, design, or media that clearly communicates information or ideas.
Presenting
(Pr4.1.7) Compare and contrast how technologies have changed the way artwork is preserved, presented, and experienced
(Pr5.1.7) Based on criteria, analyze and evaluate methods for preparing and presenting art.
Responding
(Re7.2.7) Analyze multiple ways that images influence specific audiences.
(Re8.1.7) Interpret art by analyzing art-making approaches, the characteristics of form and structure, relevant contextual information, subject matter, and use of media to identify ideas and mood conveyed.
Vocabulary: SCARE simplify, close/closer in proximity to object, angle, rule of thirds, even lighting, implied texture, macro photography, portrait, layers, transparency
Keagan activities: Stand up, hand up, pair up?
Instruction & Process: Slide show, game, scavenger hunt, photo shoots, digital editing
Materials needed: Snapseed app, Ipads, chromebooks, view finders
Day one: introduction to Photography
Day two: Photography scavenger hunt
Day three/ four: Edit with snap seed/ Create a slide share/ turn in.
Grading Format: Peer review
Resources: https://thejournal.com/articles/2013/11/18/9-iphone-photography-projects.aspx?=FETCLN
http://edynamiclearning.com/courses/middle-school-photography-course/
Time to create
| photography_bingo_.pdf |
Student Examples:
Introduction to Kandinsky, ABSTRACT art and synaethesia
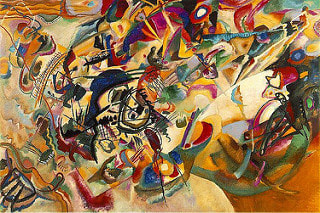
One of Kandinsky’s best known works
- ● Considered by many to be
- his masterpiece
- ● Immense preparation went
- into it - over 30 preliminary
- pencil sketches and
- watercolor paintings
- ● Inspired by music
Action painting / introduction to abstract expressionism
I can explore abstract expressionism using the techniques of Jackson Pollock.
references https://www.moma.org/learn/moma_learning/themes/abstract-expressionism
references https://www.moma.org/learn/moma_learning/themes/abstract-expressionism
