8th Grade / Spring 17
This is your place to find all the lessons, videos, and examples of projects we will do this semester. If you miss our class, this is where you can to catch up on anything you missed out on. This page will always be linked to your assignments on google classroom. I am very excited to have so many returning students and am greatful to have you a second time around. I look forward to working with all of you and watching you develop your creativity and craft as an artist!
Journal Covers
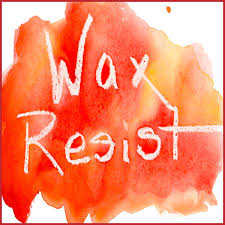
Lesson Introduction: Dive into art making. Create a design on your cover. The challenge is to hide your name.
Lesson Objective: Create artwork using wax resist, learn classroom procedures and expectations while engaged in art making. Students begin to learn studio thinking processes on day one.
Vocabulary: Wax resist
Instruction & Process: Write your name on the page in any style/ text that you like then hide it in a line design. Use oil pastel to make your line marks. Fill the page. Second, paint the entire thing in water color and see what happens?
Materials needed: Paper, watercolor, oil pastel,
Resources:paintingwatercolor.com/Art-Lessons/Art-Lesson-Wax-Resist.html
PRoject one: Elements and PRinciples Introduction
Project One:Elements and Design Booklets
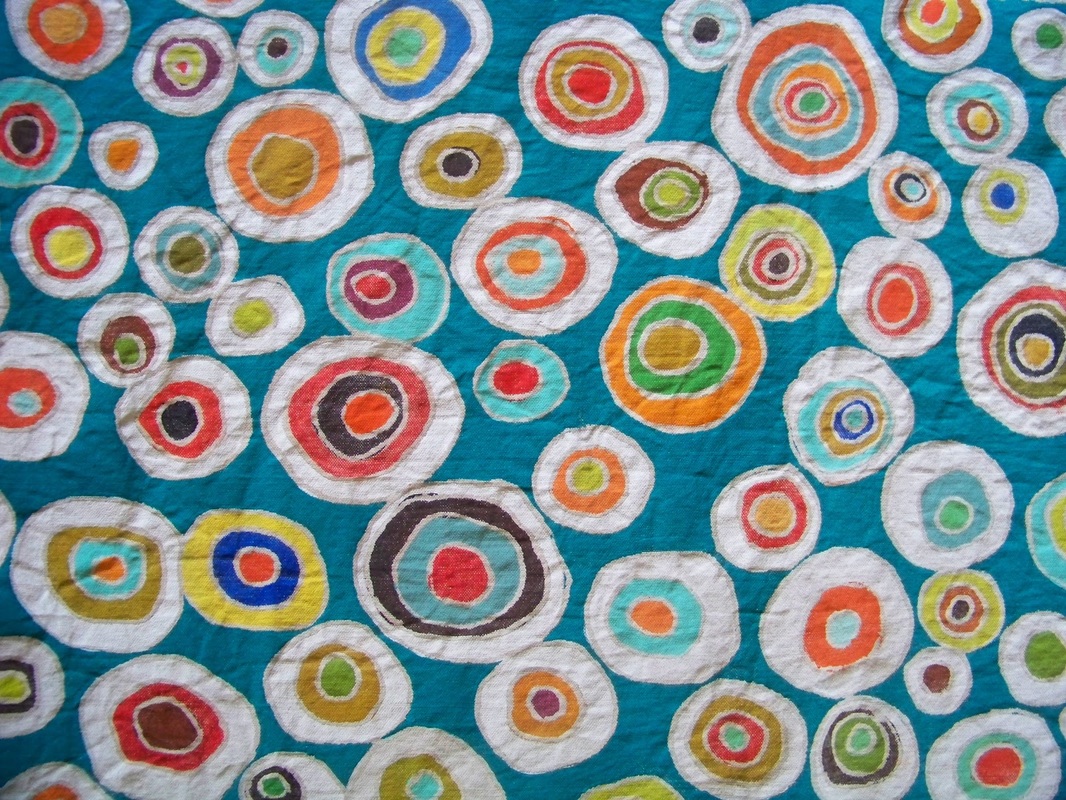
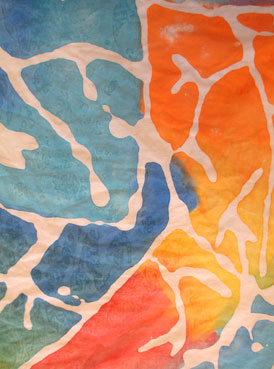
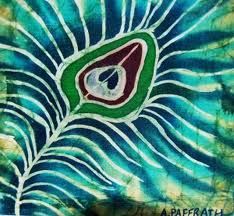
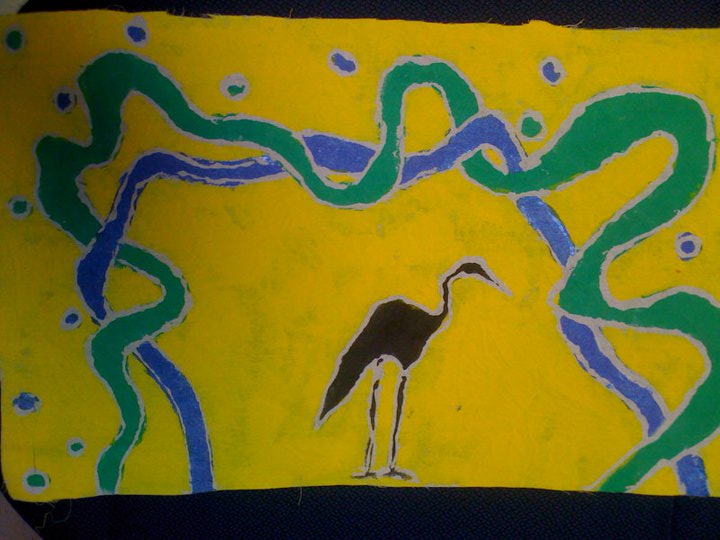
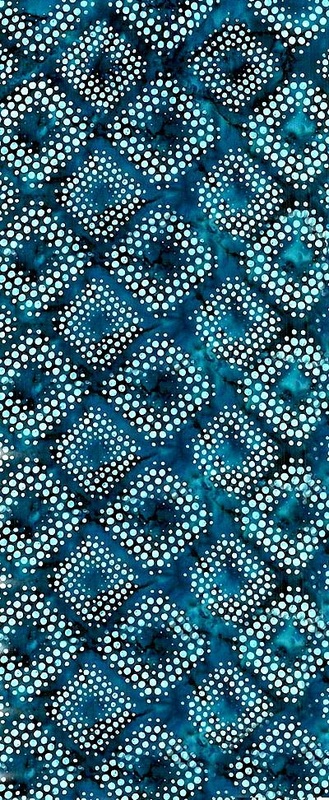
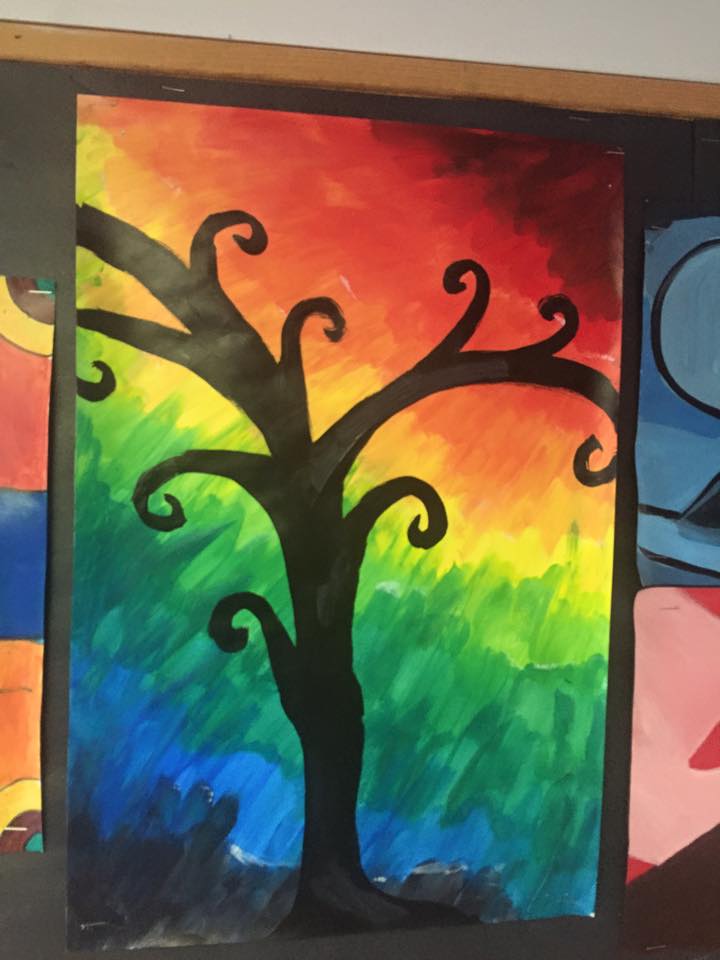
Introduction to Batik
Building on our knowledge of design principles, I wanted to give my students an opportunity to apply the principals of design while learning about the textile art of Batik. This week students will be creating a batik work similar to the ones below.
Materials: bleached muslin, scissors, rulers, pencils, paint brushes, acrylic paint, and gel glue.
Introduction to Batik: Batik is a process of creating two-dimensional designs on fabric. The process is at least two thousand years old - evidence of this process has been found throughout the Middle and Far East as well as parts of Africa. The Batik designs created on the island of Java in Indonesia are the most well-known today. The designs reflect the culture, religion and natural surroundings of the Javanese.
The process involves waxing areas of fabric so that the fibers cannot absorb dye. Areas of fabric that are waxed first remain white (or what ever color the fabric is before starting the process); areas waxed after dyeing remain the color of the dye. http://www.teachers.net/gazette/AUG03/tebbetts.html
Step One: look at your booklet and pick two or three principals you want to explore.
Step Two: Draw three thumbnail sketches of ideas in your sketchbook. Take your time as this is a crucial as you will not get to move on without having a well developed plan. You must get approval from Mrs. Latham before getting the muslin to draw on.
Step Three: Draw your design on 12 x 12 piece of cloth
Step Four: Lay cloth over wax paper, then trace your drawing with gel glue, and let dry for 24 hours.
Step Five: Paint with watered down Acrylic paints. Make sure you paint from lightest colors to darkest colors and do not paint over the areas you want to keep light. Let it dry for 15-20 minutes and then soak it in the tub in the sink.
Step Six: Wash the glue out in warm water, wring and hang to dry on the drying rack.
Batik from ksumatarted
References:
http://pearmama.blogspot.ca/2013/03/diy-batik-glue-resist-pearmama.html?m=1
http://www.teachers.net/gazette/AUG03/tebbetts.html
The above images came from pinterest and are the work of a variety of artist. These images are used to give my students a variety of design and will solely be used for examples of design. Students will not be allowed to copy this work.
Below is a video that provides instruction: I will demonstrate this procedure in class but for those of you that missed it or need a refresher, please watch. It does a great job of showing you how to create a wax free batik.

Follow the link below to the rubric.
docs.google.com/document/d/1KEvp7cV3XwjcY__fawMrbZ24ZR75pSiSMqnqaLgHf2k/edit
Time to Reflect
What was the most challenging aspect about this project?
Are you satisfied with the outcome of your work?
If given the chance to do over again, name one thing you wish you could do differently?
Did you rely on your knowledge of the principles and elements of art for this project?
What elements and Principles did you use?
Mini Lesson/ What is ARt?
This lesson is used to get students responding and connecting with ideas about art. We will watch the video as a bell opener and then use Kagan strategies to discuss it's content. If you missed this, please watch the video and type a response in the comment sections in google classroom.
mINI/lESSON FOR sKETCHBOOK
Introduction to Surrealism
Warning: this video has some disturbing content but I decided to use it because it is produced by the Tate, and does a wonderful job explaining surrealism.
| surrealismpowerpoint.pdf |
Introduction to Surrealism
Lesson Introduction: Video, Powerpoint , look at posters in the room.
Lesson Objective: I can collage things considering scale and proportion to create surreal art. I can describe the surrealism art movement. I can create work that show space by using scale, overlapping, foreground, middle-ground and background for perspective.
National Standards:
Creating
(Cr1.1.7) Apply methods to overcome creative blocks.
(Cr1.2.7) Develop criteria to guide making a work of art or design to meet an identified goal. (Cr2.1.7) Demonstrate persistence in developing skills with various materials, methods, and approaches in creating works of art or design.
(Cr2.3.7) Apply visual organizational strategies to design and produce a work of art, design, or media that clearly communicates information or ideas.
(Cr3.1.7) Reflect on and explain important information about personal artwork in an artist statement or other format.
Presenting
(Pr5.1.7) Based on criteria, analyze and evaluate methods for preparing and presenting art. (Pr6.1.7) Compare and contrast viewing and experiencing collections and exhibitions in different venues.
Responding
(Re7.1.7) Explain how the method of display, the location, and the experience of a n artwork influence how it is perceived and valued.
(Re7.2.7) Analyze multiple ways that images influence specific audiences.
(Re8.1.7) Interpret art by analyzing art-making approaches, the characteristics of form and structure, relevant contextual information, subject matter, and use of media to identify ideas and mood conveyed.
(Re9.1.7) Compare and explain the differences between an evaluation of an artwork based on personal criteria and an evaluation of an artwork based on a set of established criteria.
Connecting
(Cn11.1.7) Analyze how response to art is influenced by understanding the time and place in which it was created, the available resources, and cultural uses.
Vocabulary: Collage, Surrealism, Foreground, middleground, background, horizon line, juxtapositions, landscape, horizon line, dreams, psychology, scale, balance, collage, color, contrast, culture, emphasis, fantasy, form, line, mixed media, mood, perspective, proportion, repetition, rhythm, shape, space, stream of consciousness, style, symbol, texture, theme, unity, value
Artist: Salvador Dali, Yves Tanguy, Rene Magritte, Joan Miro
Keagan activities: Stand up, hand up, pair up. Discuss a weird dream you have that you can remember.
Celebrity interview upon completion.
Instruction & Process: Time to Create Page, have on tables and overhead.
Materials needed: Scissors, Glue sticks, x-acto knives, 12x18 paper, drawing pencils, erasers
Grading Format: Rubric and Artist Statement
https://docs.google.com/document/d/1CP-FpDU8pQKSn7Y0UAR2Al-OMzcwF8uY3Z5FgOnRik4/edit
References:
http://www.theartstory.org/movement-surrealism.htm
http://cassandrabailey.weebly.com/surrealism-lesson-plan.html
Artsonia: Lesson 2409 by Mrs. Eileen Ellis (submitted Apr 6, 2009)
Saint Richard Elementary - OH, United States
for grade level » Middle (6-8)
Examples: This is my first year teaching this lesson so I will post student examples after we have completed the lesson.
http://www.artsonia.com/slideshow.asp?project=268969
Tier One: Incorporate a mix of drawing and mix media in your project.
Tier Two: Use only cut outs for your collage.
Time to Create
- Think about your theme of your dream. What feelings do you wish to express in your work?
- search magazines and collect background and object photos. Store these pictures in your bin or sketchbook to use later.
- Experiment with placement of various objects on selected background pieces. Remember to emphasize dream or nightmare like qualities that appear within the various combinations. Remember foreground, middle ground, background and scale
- Carefully trim objects and glue to background.
- Mount on construction paper and use a white correction pen to sign the finished pieces.
- Discuss your work by writing an artist statement. This is what you need to talk about in your statement.
- Name your work
- What makes your work dreamlike or nightmare like? Is there a theme?
- Discuss your process in this work, how did you get here?
CELEBRITY Grid Drawings
Back by popular demand students are getting pumped for a lesson that has become quite the tradition at Jardine.
Lessons: Grid drawing and self-portrait.
Objective: In this lesson we are going to shift to a different method of drawing. Students will be introduced to the importance of grid and how it allows us to keep our work in proportion. Students are building upon and further explore the use of value and line weight within a drawing. In addition, students are weaving paper and using a numbering system to create their finished project. Craft is always important but is a major focus for this lesson as well. Also during this lesson, we will focus on collaborative learning.
Kansas Standards: Standard two; Benchmark 1 and 2. Standards five: Benchmark one. Standard Six; Benchmark two.
Introduction: This is an introduction to a new method of drawing. We will create a self-portrait using a grid. Building on the influence of value, we are now incorporating the idea of space and texture. Once our portraits are finished we will cut them and weave them in with the photocopied version that you have been working from.
Materials: white paper, a photo copy of the students’ pictures. (These will have to be taken and printed ahead of time), drawing pencils, tracing paper, erasers, scissors, rulers, tape, glue, black paper to frame their work.
Vocabulary: Grid system, value scale, cut-lines, weaving, texture
Resources: Mrs. Folk, Lyons High School; I wanted to do a grid drawing for part of my unit and I remembered how much I loved doing this.
Examples: See below.
Demonstration /Guided Practice: This project is going to need a lot of scaffolding. Students are going to have to draw a grid ½ inch by ½ on both pieces of paper. I plan on showing them how to do this, and then I will check their grid before they begin to draw. Next they will number the back of each paper. For an 8 ½ x 11 they will have 17 spaces by 22. They will need help with this also. Lastly, you will need to demonstrate how to cut and begin the weaving process. If they get confuses, they can reference their numbers on the back to get back on track.
Guidelines for the assignment: In this lesson we are going to shift to a different method of drawing. Students will be introduced to the importance of grid and how it allows us to keep our work in proportion. Students are building upon and further explore the use of value and line weight within a drawing. In addition, students are weaving paper and using a numbering system to create their finished project. Craft is always important but is a major focus for this lesson as well.
Time to Create a Grid Drawing
- Choose a photograph – make sure there is enough value contrast in photo. Copy and paste photo to a google doc and then add it to the folder in classroom so it can get printed. You want it to be a 8x10, and you only want the head and shoulders of the person you are drawing.
- Grid the photograph – Draw your grid lightly! Place marks across the top and bottom, and down both sides, mark the paper every ½ inch. Take your time making sure everything is straight.
- Count the number of boxes in the photograph and the final paper to make sure they match.
- Number your paper across the top and down the left side. On a 8/11.5 sheet of paper, you should have 17 lines across the shorter side, and 22 across the longest side.
- Look at each square and draw only the shape and value that you see. Work one square at a time and take your time.
What is Clay?
Pottery is fired ceramic wares or materials which, when shaped, contain a significant amount of clay. Also, it is the term for the art and wares made by potters and a place where pottery wares are made.
Clay is a general term including many combinations of one or more clay minerals with traces of metal oxides and organic matter.
A Kiln is a furnace for the firing of ceramics. Firing is the process of heating clay pottery in a kiln to bring the glaze or clay to maturity.
Bisque firing of stoneware clay is the first initial firing. This happens at low temps of 1945 degrees or Cone 04.
Glaze firing is the second firing where color is applied to your ware. Depending on the glaze this fire can be up to over 2000 degrees.
Stages of Production
Wedging or Kneading is a step in preparing clay for shaping to remove air and ensure the even distribution of moisture. It is somewhat like kneading dough for bread.
Shaping: forming the clay into shapes by handbuilding or throwing on a potter’s wheel.
Leather-Hard is the condition of the when it has been partially dried to the point where all shrinkage has been completed.
Bone-Dry is the final stage of the clay when it has dried to a completely dry state and ready to be fired. In this stage, the clay is very fragile, non-plastic and porous. It is also called Greenware at this stage.
Bisque Fire is the first firing prior to glazing. Bisque is pottery that has been fired but not yet glazed. (Also called Biscuit.)
Glazing is coating the bisque with a mixture that will mature to a glassy state when fired. Glaze Firing is a firing cycle in a kiln to the temperature at which the glaze materials will melt to form a glasslike surface coating.
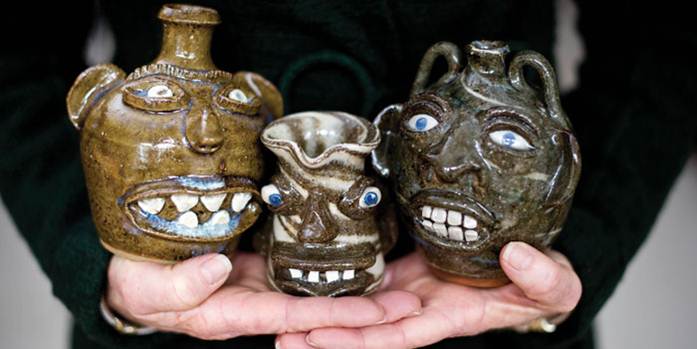
Lesson one; ugly face jugs
Objective
In this lesson, students research the face jug, a 19th century southern folk art tradition. Students will work with clay using a variety of hand building skills.
Standards
Understanding the visual arts in relation to history and culture.
Understanding and applying media, technique, and processes.
Using knowledge of structures and functions.
Reflecting upon and assessing the characteristics of artwork.
Making connections between visual art and other discipline.
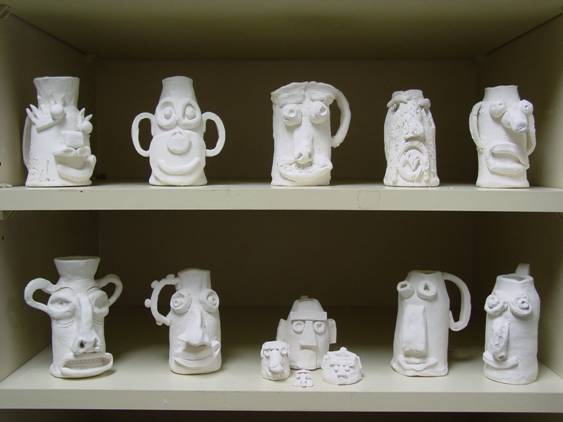
Time To Create:
- Using your chromebook go to google and type ugly face jugs into the browser.
- Look at several examples and draw two examples of face jugs you want to create. Remember to exaggerate some features and to consider, texture, scale, and balance.
- Show Mrs. Latham your sketchbook drawing and then get your clay.
- Options one: begin by making a pinch pot and then add coils to build your vessel up. Make sure you score and slip your coils, and any added pieces. Set to dry for a bit.
- Options two: Use two pinch pots to build. Follow the website visual instructions. http://msdewan.blogspot.com/2013/09/ceramics-ugly-face-jugs.html
- Next, we add eyes, mouth noses using by adding and removing clay from our jug.
- Once it is finished, place it in the bin on the cart so it can go down to the kiln room to dry and be fired.
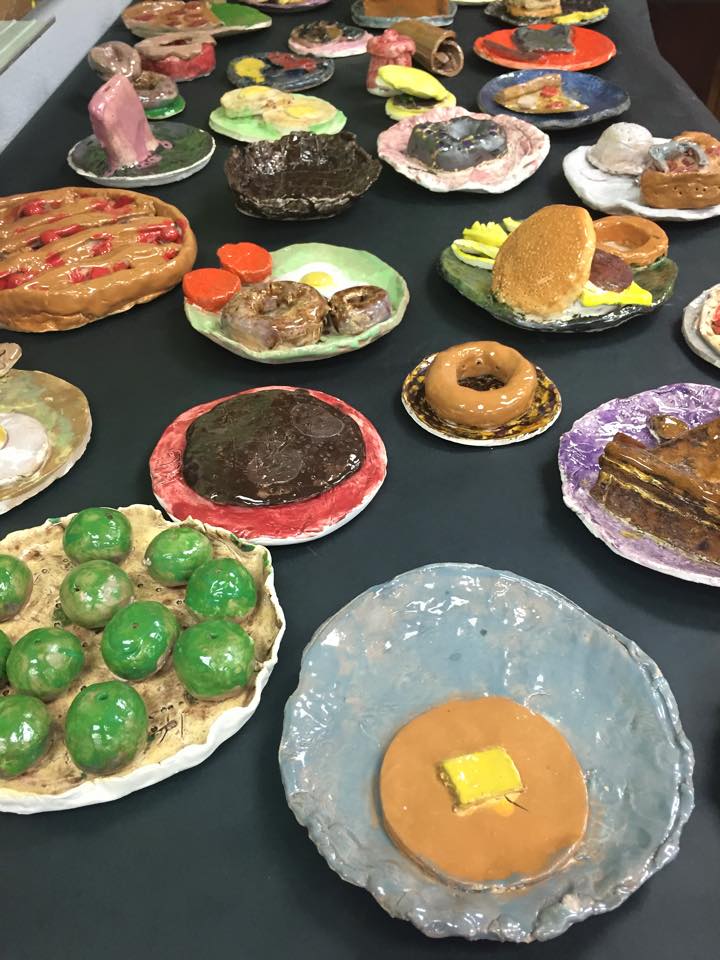
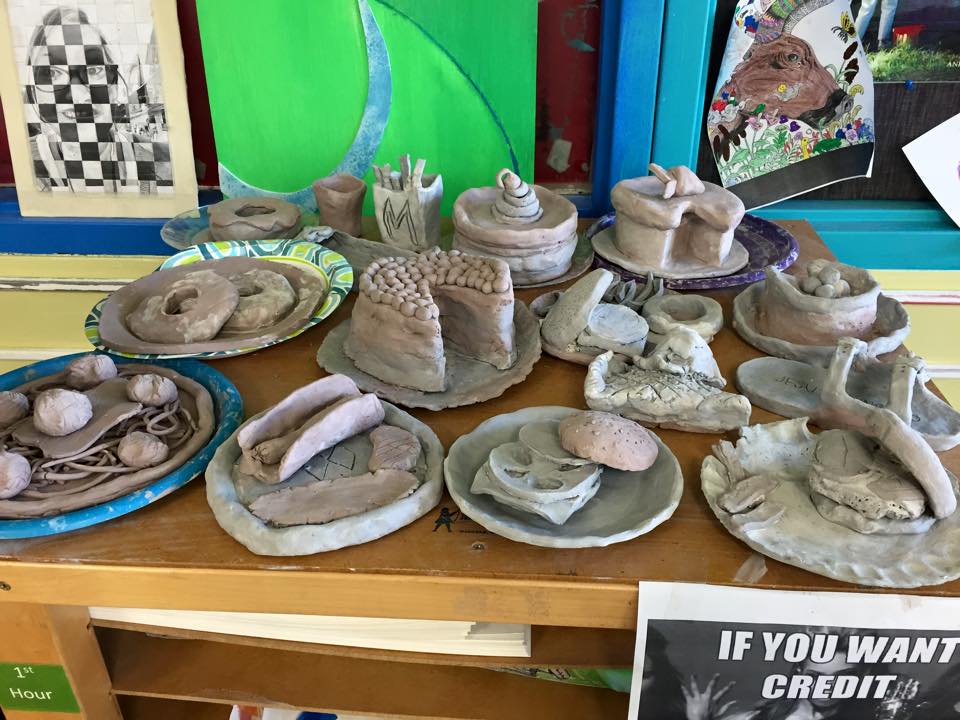
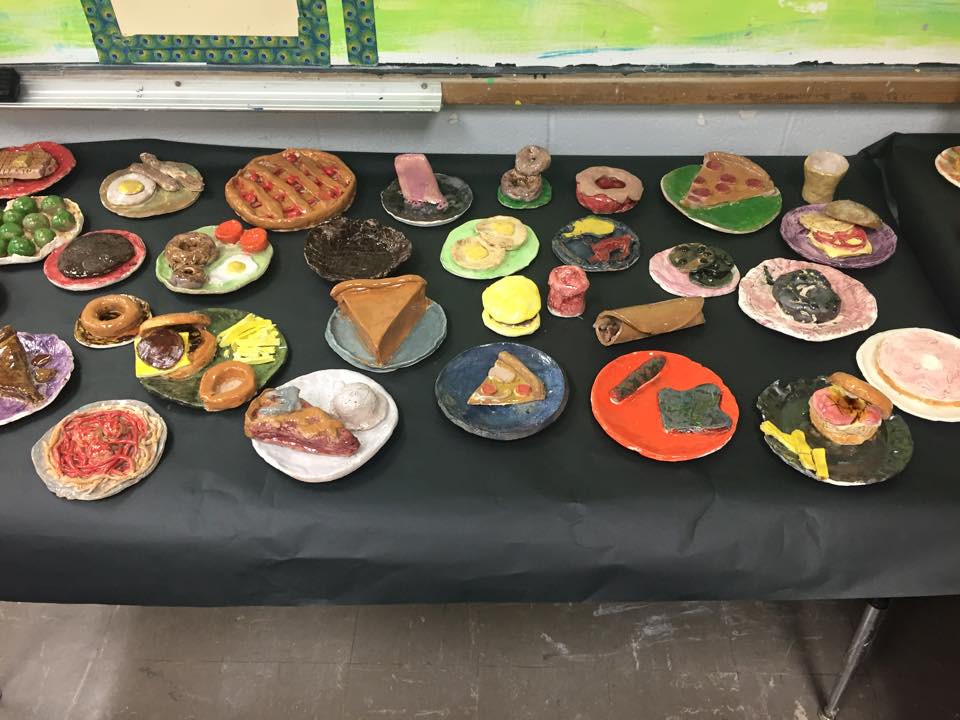
Project two: Pop art clay sculptures
LESSON OBJECTIVE:
8th grade artists now get to explore ideas and concepts of pop art in addition to exploring the work of Claus Oldenburg and other contemporary sculptors who focused on artworks created from objects of everyday life. After gaining an understanding and appreciation of the pop art movement, Jardine students' will get to express their own ideas for a pop art ceramics piece. Our young students will use the medium of clay and learn how to created ceramic art work that reflects the ideas and concepts of pop art. Students may choose between creating a shoe or food.
8th grade artists now get to explore ideas and concepts of pop art in addition to exploring the work of Claus Oldenburg and other contemporary sculptors who focused on artworks created from objects of everyday life. After gaining an understanding and appreciation of the pop art movement, Jardine students' will get to express their own ideas for a pop art ceramics piece. Our young students will use the medium of clay and learn how to created ceramic art work that reflects the ideas and concepts of pop art. Students may choose between creating a shoe or food.
References:
http://artsattrinity.weebly.com/pop-art-food-sculpture.html
http://www.calvertcanvas.blogspot.com/2012/02/good-enough-to-eat.html
https://naea.digication.com/debi_cox_art_educator/8th_Grade_Project_Sample
http://www.lakesidepottery.com/Pages/Pottery-tips/How-to-make-clay-slab-ceramic-shoe-tutorial.htm
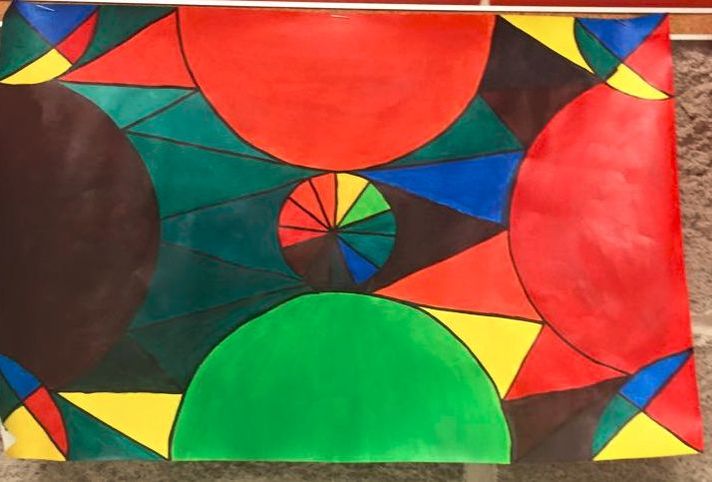
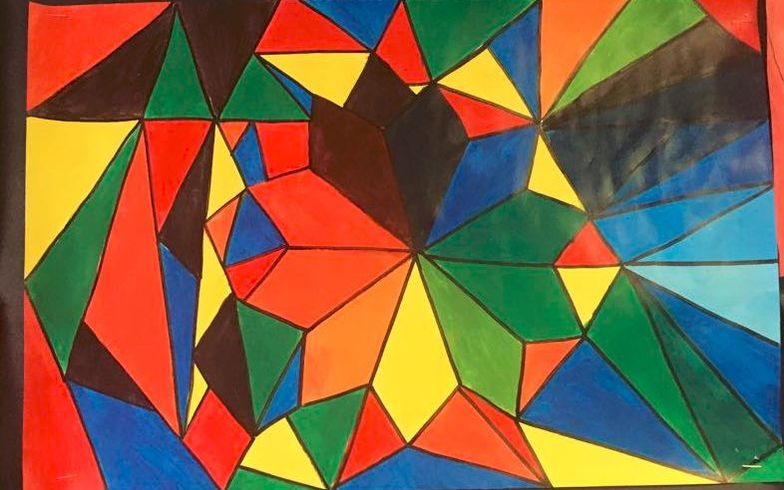
Introduction to color theory / complex color wheel
COMPLEX COLOR WHEEL
Color is a very diverse and useful element. Color can convey emotion, create interest, or enhance a work of art. Learning how to effectively mix color takes a lot of patience, but can also be a lot of fun. For this color wheel you will be creating a composition that will reflect your understanding of the color wheel, tints and tones of a particular color, complementary, split complementary, triadic, and analogous color schemes.
VOCABULARY
Primary Color: Blue, Red, Yellow
Secondary Color: Violet, Orange, Yellow,
Intermediate Color: red-violet, red-orange, blue-violet, blue-green, yellow-green, yellow-orange (Note: intermediate colors are also called tertiary colors.)
Neutral Colors: Neutral colors don't show up on the color wheel. Neutral colors include black, white, gray, and sometimes brown and beige. They are sometimes called “earth tones.”
Tint: any hue that has various amounts of white added to it.
Shade: any hue that has various amounts of black added to it.
Complementary Colors: Two colors that are opposites on the color wheel
Split Complementary: Three color, color scheme. A hue is paired with with the two colors on each side of its complement.
Triadic: A three color, color scheme of hues that are equal distance apart on the color wheel and have three colors between them.
Analogous: Color scheme that uses colors that are next to each other on the color wheel.
TIME TO CREATE
With in your composition you will need to incorporate
6.Once you have completed your drawing and have your colors mapped out, you will use acrylic paint to add the primary, secondary, and intermediate colors, and other color schemes to your design.
7. After it has dried, go over the lines with sharpie and clean up the lines.
CONGRATS, YOU'RE FINISHED!!!
Option One: Students may choose the design of their choice and have full creative freedom to explore the color wheel in a new way
Option Two: Students may choose to create a basic color wheel With a background that is fully painted and meets the guidelines of the lesson.
RUBRIC
Was your work submitted on or before the deadline? 10
Was there 12 different hues mixed and placed acuity with yellow on top? 20
How was your overall craftsmanship: does it show great time and consideration was taken? 10
Did your composition include tints and shades of 1 color? 10
Does your compositions include analogous, split complementary, and triadic color scheme? 30
How was your work ethic during this project, did you make good use of your time? 10
Did you practice safety and use materials responsibly? 10
Color is a very diverse and useful element. Color can convey emotion, create interest, or enhance a work of art. Learning how to effectively mix color takes a lot of patience, but can also be a lot of fun. For this color wheel you will be creating a composition that will reflect your understanding of the color wheel, tints and tones of a particular color, complementary, split complementary, triadic, and analogous color schemes.
VOCABULARY
Primary Color: Blue, Red, Yellow
Secondary Color: Violet, Orange, Yellow,
Intermediate Color: red-violet, red-orange, blue-violet, blue-green, yellow-green, yellow-orange (Note: intermediate colors are also called tertiary colors.)
Neutral Colors: Neutral colors don't show up on the color wheel. Neutral colors include black, white, gray, and sometimes brown and beige. They are sometimes called “earth tones.”
Tint: any hue that has various amounts of white added to it.
Shade: any hue that has various amounts of black added to it.
Complementary Colors: Two colors that are opposites on the color wheel
Split Complementary: Three color, color scheme. A hue is paired with with the two colors on each side of its complement.
Triadic: A three color, color scheme of hues that are equal distance apart on the color wheel and have three colors between them.
Analogous: Color scheme that uses colors that are next to each other on the color wheel.
TIME TO CREATE
With in your composition you will need to incorporate
- 12 sections in a circular rotation for the color wheel.
- 7 sections where you can show the tints and shades of one color
- 3 spaces for analogous,
- 3 spaces for split complementary,
- 3 spaces for triadic color schemes.
6.Once you have completed your drawing and have your colors mapped out, you will use acrylic paint to add the primary, secondary, and intermediate colors, and other color schemes to your design.
7. After it has dried, go over the lines with sharpie and clean up the lines.
CONGRATS, YOU'RE FINISHED!!!
Option One: Students may choose the design of their choice and have full creative freedom to explore the color wheel in a new way
Option Two: Students may choose to create a basic color wheel With a background that is fully painted and meets the guidelines of the lesson.
RUBRIC
Was your work submitted on or before the deadline? 10
Was there 12 different hues mixed and placed acuity with yellow on top? 20
How was your overall craftsmanship: does it show great time and consideration was taken? 10
Did your composition include tints and shades of 1 color? 10
Does your compositions include analogous, split complementary, and triadic color scheme? 30
How was your work ethic during this project, did you make good use of your time? 10
Did you practice safety and use materials responsibly? 10
Monochromatic Self Portrait
Congratulations Jardine 8th graders, very soon you will be leaving Jardine to further your education at the High School Level. I would like you all to take time to reflect on your time here as a Jardine Jaguars, and more importantly, reflect on this particular juncture of your own personal life. The next four years will be the catalyst in beginning to build an academic foundation for future life endeavors. Your academic foundation can lead you down pathways that may ultimately effect your adult lives. In the next five years you will have to ask yourself questions such as "where do I want to go to college"? "What skill set or training should I obtain to work in a specific industry? "What do I want to do as a career and where do I see myself as as young adult?" These questions are overwhelming but its important to pause for a moment and consider them.
In this lesson we are going to explore the concept of the self portrait and reflect on our time here as well as our future.
Objective: I can create a self portrait of myself using tints and shades of one color.
I can utilize technology to posterize a photo of myself.
In this lesson we are going to explore the concept of the self portrait and reflect on our time here as well as our future.
Objective: I can create a self portrait of myself using tints and shades of one color.
I can utilize technology to posterize a photo of myself.
