WELCOME YOUNG ARTIST!!!!
Welcome my most amazing artists! Here you will find all tutorials, detailed lessons, and project rubrics. This semester I invite you to make messes, take chances, learn from our failures, celebrate our accomplishments, and develop a love for the creative process. Welcome to the best part of your day~ Mrs. Latham
What is art?
Lesson One: Wax resist and collage sketchbook covers
Instruction & Process: Dive into art making. We are going to practice our studio thinking skills while learning wax resist process and learn the rules of the art room along the way.
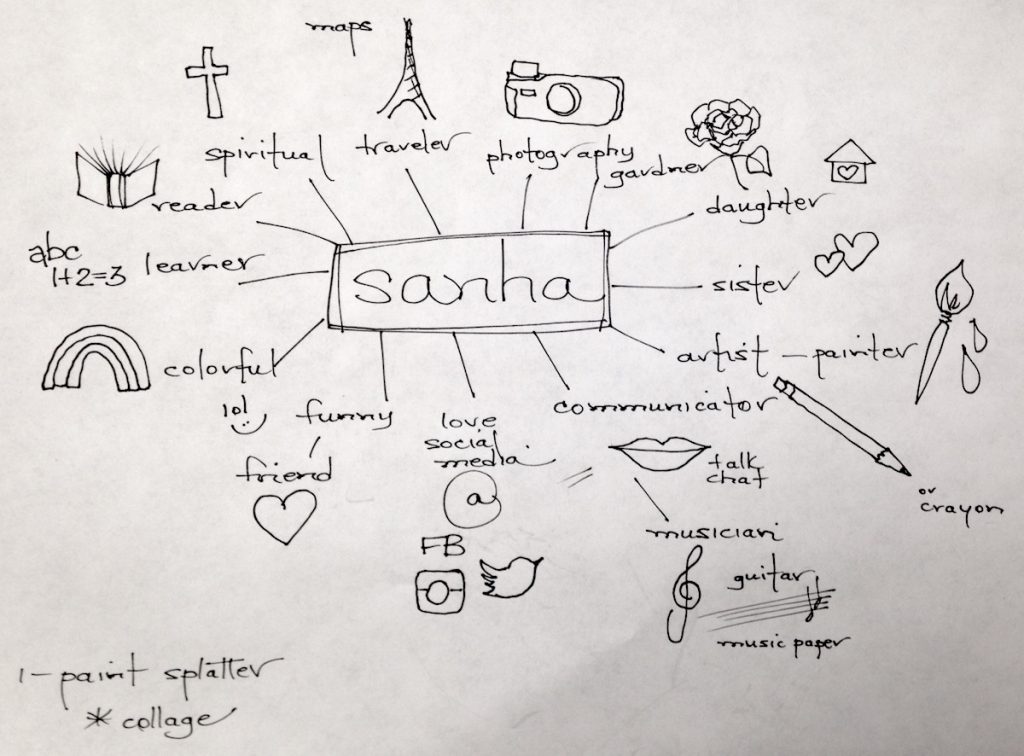
Step One: write your name large on the front cover of your paper. The seam should be on the left side like a book. Make it interesting and explore a variety of font styles. ie, bubble, cursive, block, ect.
Step two: write your name and hour again on the inside of your work.
Step Three: One the back side of the paper, answer the following questions as Mrs. Latham reads them aloud.
Step four: Create a mind map. Make a list of symbols base on the words you wrote from the questions.
Step five: Take symbols from your map and draw them out on your sketchbook cover with a pencil. You do not have to use all of them. You may wish to add more later with collage and ink drawings.
Step One: write your name large on the front cover of your paper. The seam should be on the left side like a book. Make it interesting and explore a variety of font styles. ie, bubble, cursive, block, ect.
Step two: write your name and hour again on the inside of your work.
Step Three: One the back side of the paper, answer the following questions as Mrs. Latham reads them aloud.
- What is your favorite food?
- List five hobbies you wish to explore? Ie, gardener, drawing, baking......
- Before I die, I want to .... list 10 things.
- Write the lyrics to your favorite song. Just an exert, and please make sure it's school appropriate.
- My 3 favorite people in the whole world are?
- Name a character from a book, video game, comic book, or movie that you relate to.
- What is your favorite number, season, and holiday?
- My favorite place to be is?
- My favorite social media site is?
Step four: Create a mind map. Make a list of symbols base on the words you wrote from the questions.
Step five: Take symbols from your map and draw them out on your sketchbook cover with a pencil. You do not have to use all of them. You may wish to add more later with collage and ink drawings.
Step six: Trace over all of your line work with wax pastel. Fill in spaces with wax. These areas will not get painted. The wax will push the paint away. Keep this in mind as you design.
Step Seven: Paint over your wax with watered down tempera cakes.
Step Eight: Collage images from magazines on top of your sketchbook, draw with pen, add lyrics.
Step Seven: Paint over your wax with watered down tempera cakes.
Step Eight: Collage images from magazines on top of your sketchbook, draw with pen, add lyrics.
Lesson Objective: Create artwork using wax resist, learn classroom procedures and expectations while engaged in art making. Students begin to learn studio thinking processes on day one.
Vocabulary: Wax resist, collage, symbolism,
Materials needed: Paper, watercolor, oil pastel, pencils,
Resources:paintingwatercolor.com/Art-Lessons/Art-Lesson-Wax-Resist.html
www.theartofed.com/2018/08/07/name-designs-the-perfect-lesson-to-start-your-year/?utm_source=hs_email&utm_medium=email&utm_content=65135076&_hsenc=p2ANqtz--1HnqiGiaDzIZG-_mIYa6lTV2twoizA13QGJovS09TiQmgwIx72-ga65LrcH0T_0e1bOEYjKsipaQSMzl6IXkCSDPbamZy9444mXuyZ8SceyfgGEo&_hsmi=651350
Once you are finished with the project, take a picture of your work and upload it to google classroom. I will demonstrate how to do this in class. This project is worth 20 points.
RUBRIC
| assignment_one___sketchbook_cover.pdf |
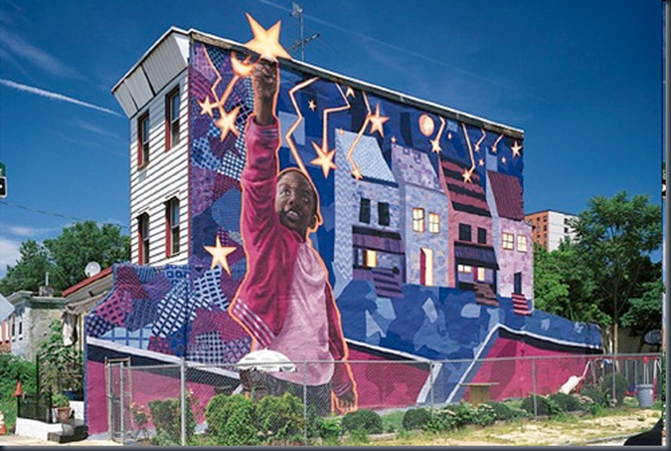
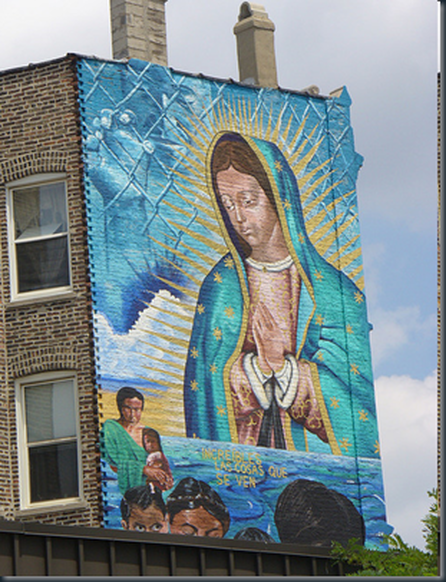
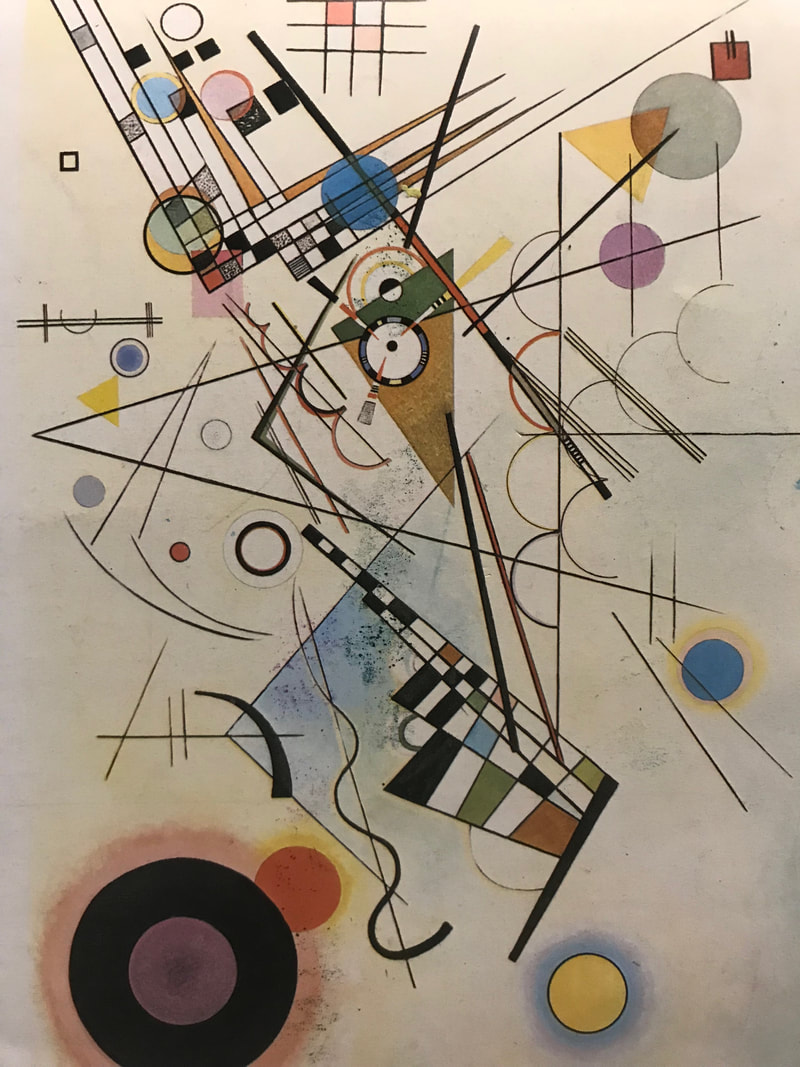
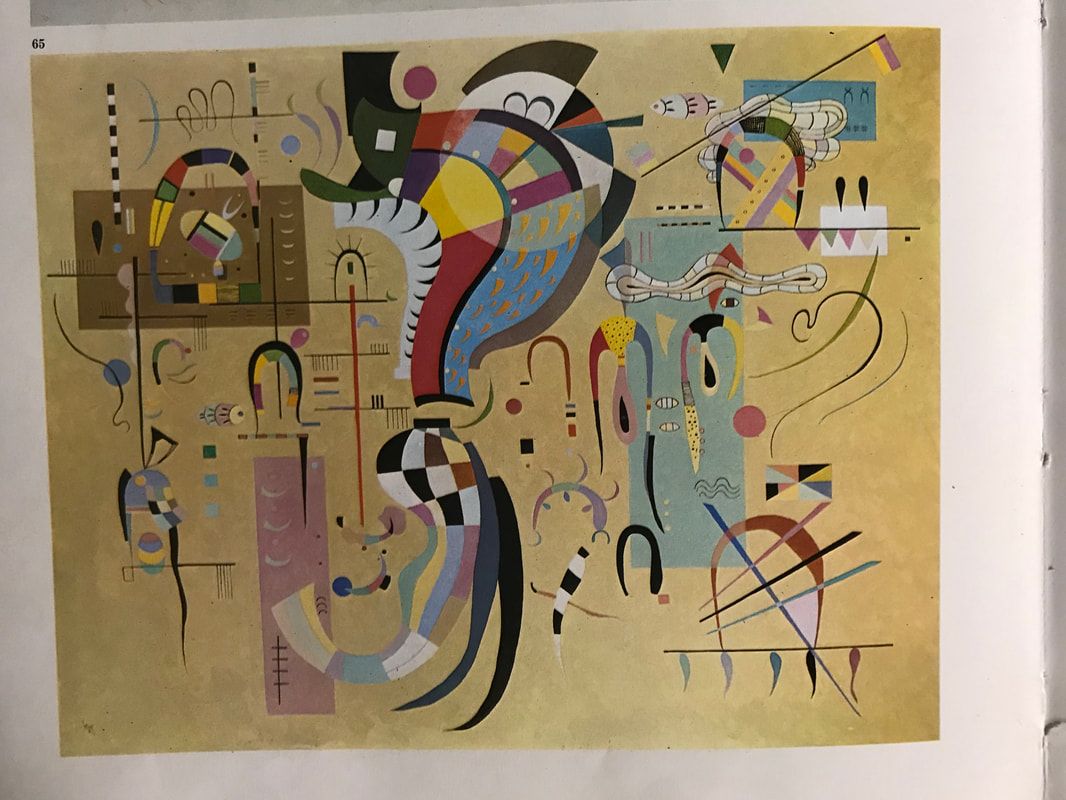
Lesson Two/ KANDINSKY Murals
Lesson Introduction: take a look at collaborative murals and the impact it has on society.
Learning Objective: collaborative lesson that focuses on drawing big, and introducing line, shape, space in a composition.
National Standards:
Creating
(Cr1.1.7) Apply methods to overcome creative blocks.
(Cr1.2.7) Develop criteria to guide making a work of art or design to meet an identified goal. (Cr2.1.7) Demonstrate persistence in developing skills with various materials, methods, and approaches in creating works of art or design.
(Cr2.3.7) Apply visual organizational strategies to design and produce a work of art, design, or media that clearly communicates information or ideas.
(Cr3.1.7) Reflect on and explain important information about personal artwork in an artist statement or other format.
Presenting
(Pr5.1.7) Based on criteria, analyze and evaluate methods for preparing and presenting art.
Responding
(Re7.1.7) Explain how the method of display, the location, and the experience of an artwork influence how it is perceived and valued.
(Re7.2.7) Analyze multiple ways that images influence specific audiences.
(Re8.1.7) Interpret art by analyzing art-making approaches, the characteristics of form and structure, relevant contextual information, subject matter, and use of media to identify ideas and mood conveyed.
Connecting
(Cn10.1.7) Individually or collaboratively create visual documentation of places and times in which people gather to make and experience art or design in community.
(Cn11.1.7) Analyze how response to art is influenced by understanding the time and place in which it was created, the available resources, and cultural uses.
Vocabulary: Wiley Kandinsky, Line, Shape, Positive Space, Negative Space, Pattern, community murals
Keagan activities: Carousel feedback, time, pair, share.
Instruction & Process: Discuss murals, Introduce Kandinsky, Give Sketchbook prompt.
Materials needed: Corrugated paper, black paint, large brushes, Artist Statement.
Grading Format: Collaborative project rubric and group artist statement.
www.rcampus.com/rubricshowc.cfm?code=JXBW6X3&sp=no&mode=framed&nocache=1535054795554
Resources: This is the first time I have taught this lesson I found it at http://elementaryartfun.blogspot.com/2011/02/hip-hop-kandinsky-murals.htmlI ade modifications for this lesson to better meet the needs of my 7th graders.
Group critique: Carousel Feedback
The students work collaboratively with their peers to use parts of their work and bring it together so that all four individuals have visual representation in the collaborative mural.
Next: begin painting with black paint.
Day 3: , Students pick two colors. They can values of the same color or two complementary colors. They had to leave some parts white.
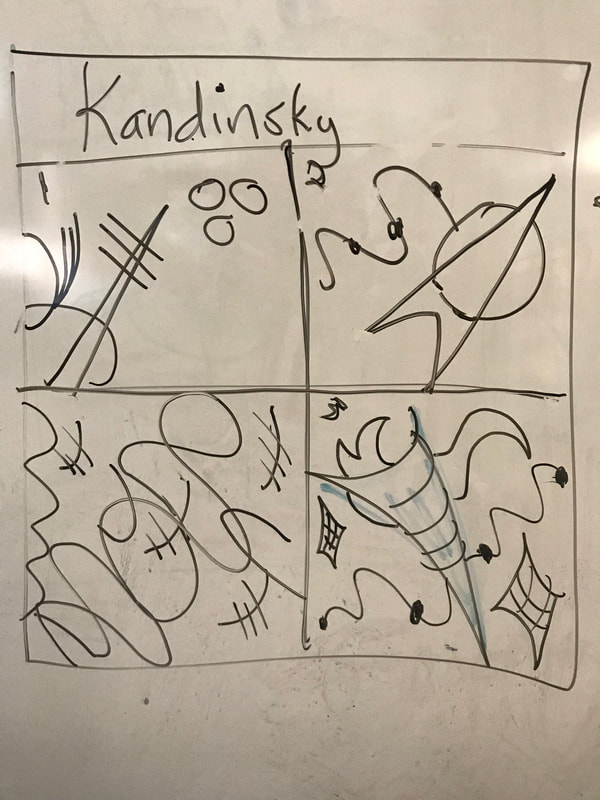
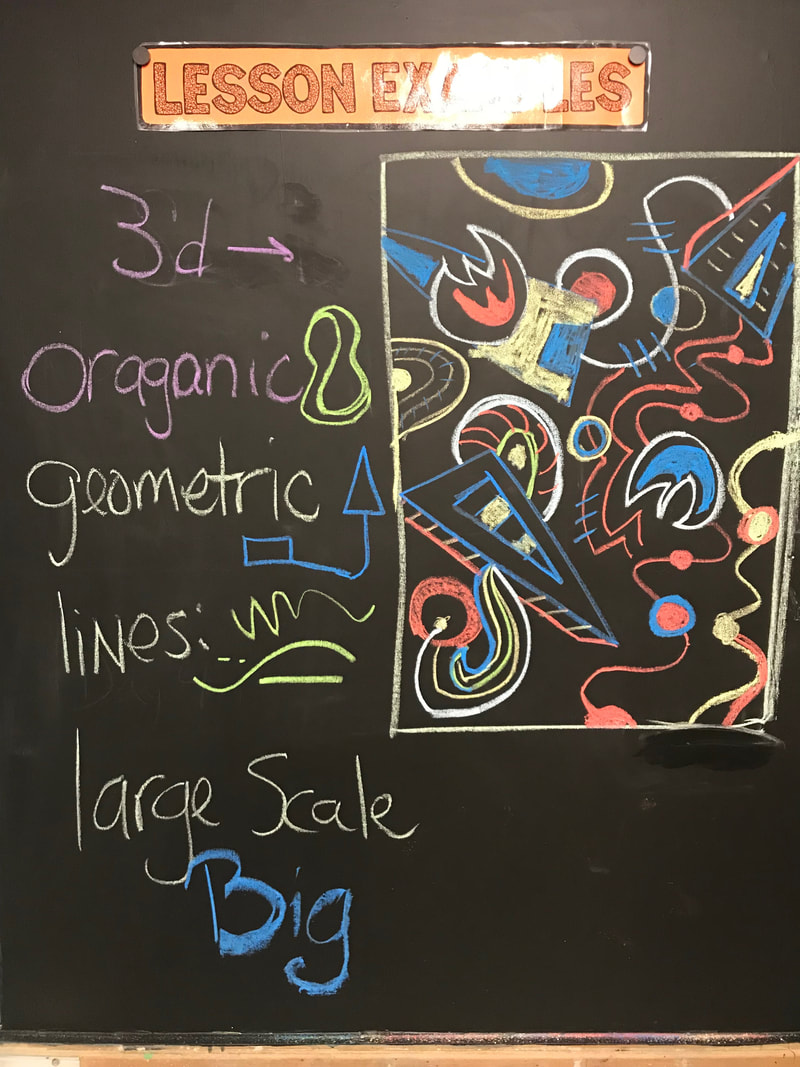
Time To Create
2. Repeating Shapes (geometric and organic)
3.Shapes inside of shapes
4.line (follow the leader lines)
5. colors
6. Things that run off the edge of the paper
7. 3-D shapes
8. shapes and background areas that are filled in and some that are open.
- We we talked about the artist, Wassily Kandinsky and looked at some of his paintings. Thinking of his work, create your own work that includes each students draws ideas on paper. Your work must have....
2. Repeating Shapes (geometric and organic)
3.Shapes inside of shapes
4.line (follow the leader lines)
5. colors
6. Things that run off the edge of the paper
7. 3-D shapes
8. shapes and background areas that are filled in and some that are open.
- Next, as a group, compare your work, and plan out a new collaborative composition that includes ideas from everyone’s original drawings.
- Draw it out with pencil on the white corrugated paper.
- Paint over lines with black paint.
- Paint area’s with two different colors, and leave some areas white.
- Fill out a group artist statement, take a picture and turn in.
LeSSON THREE: DIGITAL PORTFOLIO
What is a portfolio? A collection of your artwork
Why do we have to have one? To showcase our growth and interests as an artists. To share our work and to create a digital presence. To learn the 21st century skill of building a website.
Objectives:
- I can create a website.
- I can write an artist statement that reflects where I am as an artist.
- I can upload photos to my site in order to show my personal growth both short and long term.
- I can understand and demonstrate digital citizenship.
Steps to creating your site.
- Go to google sites.
- Click on the new google sites on the bottom right column.
- Click on the plus sign in bottom corner.
- Name your site Your First & Last Name
- Your Homepage should say… Your name and Art Portfolio
- On the right you see three tabs. Inserts, pages, themes. The insert page helps you build each page. The pages tab creates separate pages and the themes controls your font styles and size.
- Your portfolio needs to have a Home page, a page titled My Artwork, and a page titled Artist Statement. You will be expected to write a detailed artist statement. In your sketchbook you have an artist statement worksheet. Follow the prompts and you will great.
- MY EXAMPLE IS HERE!
- sites.google.com/s/0B1UhhwV6e74OcEhkSUs2ZGlRZXc/p/0B1UhhwV6e74OOUFoVzhaTkhqUnM/edit
Student Checklist
- The Homepage is an introduction of yourself. It must include at least one picture of yourself or of you and your family and friends. Use this page to share some of your personal interests. Think of it as an “about me” page. Tell us something about yourself? Consider including your favorite quote
- My Artwork: On this page you will upload pictures of your work. You will give your work a title, and then medium that you created it with. Example: Title: The Thinking Chair, Medium: Digital Photography
- Artist Statement: Write a detailed artist statement. Please be mindful of your grammar, and punctuation. Follow the artist statement flowchart in your sketchbook. Here is an electronic copy of that document.
file:///C:/Users/clatham/Downloads/Artist-Statement-Flow-Chart-final1.pdf
Once you are finished, publish it using your first and last name and then submit the link to google classroom under the portfolio assignment. Set the view for Topeka 501 so you may share it with future art teachers.
Discussion points:
- Their invisible audience – many students choose to set their digital portfolios to be limited to users on our school’s Google Apps domain. However, that means that everyone in our community who has an account can access student work. Eportfolios can be viewed by students, teachers, administrators, parents, and anyone with access to a username/password. This should influence students to write informatively without oversharing, and place emphasis on grammar and spelling.
- Appropriate commenting – write a comment that is specific and/or can initiate a discussion. Something like, “I liked your use of color” or “I see you painted a guitar. Do you play any other instruments?” Constructive criticism such as “ I am curious as to why you chose this specific color green, It doesn’t work for me because it doesn’t go well with the rest of your color scheme.”
- Digital citizenship and having a sound understanding of creative commons, permission, and giving credit to others for their work.
- Inserting an image by linking to the URL of the image online rather than taking a screen snapshot or dragging a copy of the image to the desktop. By using the URL, students can simply point to something else online. The alternative is to copy/take/steal a version of it which is tantamount to theft (depending on how the work is licensed).
"Digital citizenship" is an umbrella term that covers a whole host of important issues. Broadly, it's the guidelines for responsible, appropriate behavior when one is using technology. But specifically, it can cover anything from "netiquette" to cyberbullying; technology access and the digital divide; online safety and privacy; copyright, plagiarism, and digital law, and more. " for more resources check out this page.
REFERENCES:
www.educatorstechnology.com/2013/10/5-excellent-videos-to-teach-your.html
Nine Elements - Digital Citizenship
Great Student Examples here!!!
sites.google.com/topekapublicschools.net/adisyn-caryl/artist-statement
sites.google.com/topekapublicschools.net/cjohnston/home
https://sites.google.com/topekapublicschools.net/jacobcassell2021/home
https://sites.google.com/topekapublicschools.net/kaydeevotaw/home
https://sites.google.com/topekapublicschools.net/kamm/home
https://sites.google.com/topekapublicschools.net/meganhuffman/home
Videos : How to create an electronic portfolio.
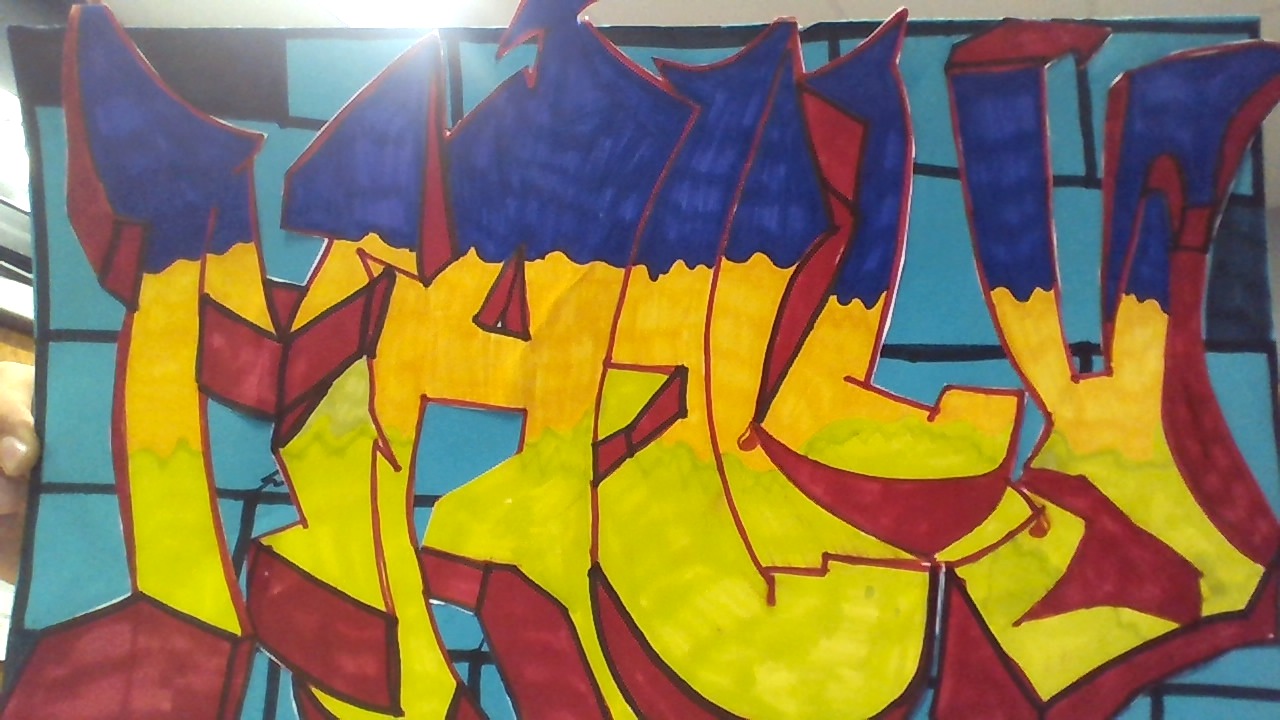
Introduction to one point perspective
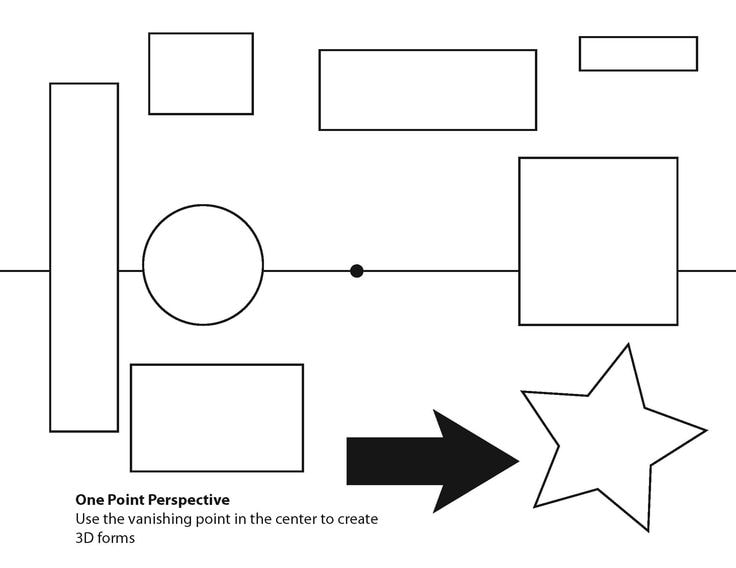

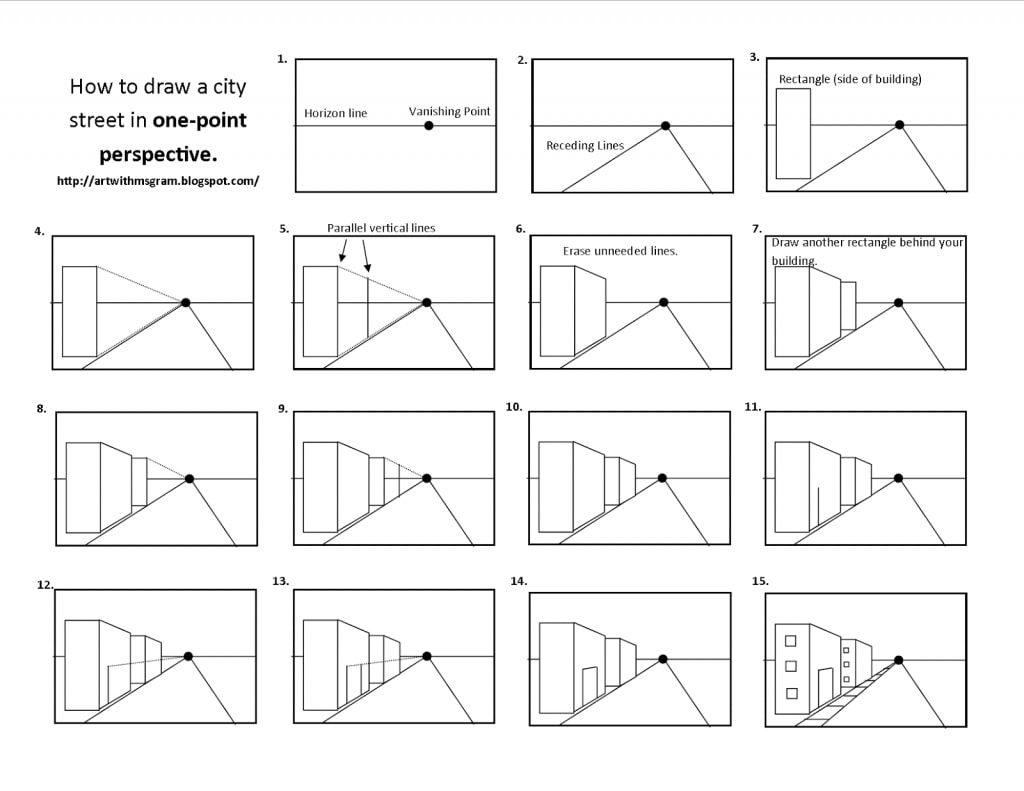
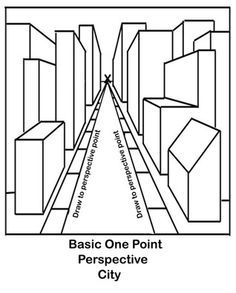
LESSON PLAN OBJECTIVE:
I CAN CREATE SPACE AND MAKE 3D LETTERS ON A 2D PLANE USING ONE POINT PERSPECTIVE.
I CAN APPLY ONE POINT PERSPECTIVE TO BLOCK LETTERS AND OR GRAFFITI.
MATERIALS
PENCIL COLOR PENCIL, PENS, SHARPIES, PAPER, RULER
VOCABULARY: One point perspective, vantage point, horizon line, space, 3d, 2d,
OPTION 1:
OPTION 2: WILDSTYLE GRAFFITI
LENGTHEN LETTERS: START WITH LETTER AND THEN ABSTRACT IT TO HAVE CURVES.
ADD ARROWS.
PLACE YOUR VANTAGE POINT ON THE BOTTOM OF THE PAGE. MAKE SURE THAT YOU DO NOT EXTEND YOUR LINES ALL THE WAY TO THE VANTAGE POINT.
INSTEAD, EXTEND LINE ¼ TO ½ INCH AND THEN STOP AND PLACE THE PARALLEL LINES TO COMPLETE THE SQUARE.
COLOR THE WHOLE PAGE. THINK ABOUT YOUR USE OF VALUE.
Resources
http://www.studentartguide.com/articles/one-point-perspective-drawing
One point perspective.jpg
http://prezi.com/llf1qa3n4p77/?utm_campaign=share&utm_medium=copy&rc=ex0share
Kagan activities: During discussion use time pair share for discussion. Stand up, stray, at the bell, find a contrasting color.
Instruction & Process: Follow the art of ed resource and watch video.
Grading Format: https://docs.google.com/document/d/1Z7CltWi8aDuRHLEbD4LwOY8f2ry5emWHTPaY0o6nuDM/edit
Resources:
https://www.theartofed.com/2017/08/18/implement-graffiti-inspired-unit-week-one/
https://prezi.com/r2nkjiwvcsxx/graffiti-names/?webgl=0
https://prezi.com/rnh4-tuhktcp/1-point-perspective-in-art/?utm_campaign=share&utm_medium=copy
http://www.graffitidiplomacy.com/FreeGraffitiDrawingLessons.html
http://arteascuola.com/2015/10/name-in-graffiti-style/
https://prezi.com/ctb1mp4tmfv8/graffiti-art/?webgl=0#
I CAN CREATE SPACE AND MAKE 3D LETTERS ON A 2D PLANE USING ONE POINT PERSPECTIVE.
I CAN APPLY ONE POINT PERSPECTIVE TO BLOCK LETTERS AND OR GRAFFITI.
MATERIALS
PENCIL COLOR PENCIL, PENS, SHARPIES, PAPER, RULER
VOCABULARY: One point perspective, vantage point, horizon line, space, 3d, 2d,
OPTION 1:
- BLOCK LETTERS CREATE EVENLY SPACED BOXES ACROSS YOUR PAGE.
- USE THE ENTIRE BOX TO MAKE LETTER
- PLACE YOUR VANTAGE POINT ON THE BOTTOM OF THE PAGE AND DRAW LINES FROM CORNERS OF LETTERS TO THE VANTAGE POINT.
- SELECT YOUR COLORS AND USE VALUE TO COLOR IN THE LETTERS.
OPTION 2: WILDSTYLE GRAFFITI
LENGTHEN LETTERS: START WITH LETTER AND THEN ABSTRACT IT TO HAVE CURVES.
ADD ARROWS.
PLACE YOUR VANTAGE POINT ON THE BOTTOM OF THE PAGE. MAKE SURE THAT YOU DO NOT EXTEND YOUR LINES ALL THE WAY TO THE VANTAGE POINT.
INSTEAD, EXTEND LINE ¼ TO ½ INCH AND THEN STOP AND PLACE THE PARALLEL LINES TO COMPLETE THE SQUARE.
COLOR THE WHOLE PAGE. THINK ABOUT YOUR USE OF VALUE.
Resources
http://www.studentartguide.com/articles/one-point-perspective-drawing
One point perspective.jpg
http://prezi.com/llf1qa3n4p77/?utm_campaign=share&utm_medium=copy&rc=ex0share
Kagan activities: During discussion use time pair share for discussion. Stand up, stray, at the bell, find a contrasting color.
Instruction & Process: Follow the art of ed resource and watch video.
Grading Format: https://docs.google.com/document/d/1Z7CltWi8aDuRHLEbD4LwOY8f2ry5emWHTPaY0o6nuDM/edit
Resources:
https://www.theartofed.com/2017/08/18/implement-graffiti-inspired-unit-week-one/
https://prezi.com/r2nkjiwvcsxx/graffiti-names/?webgl=0
https://prezi.com/rnh4-tuhktcp/1-point-perspective-in-art/?utm_campaign=share&utm_medium=copy
http://www.graffitidiplomacy.com/FreeGraffitiDrawingLessons.html
http://arteascuola.com/2015/10/name-in-graffiti-style/
https://prezi.com/ctb1mp4tmfv8/graffiti-art/?webgl=0#
TIME TO CREATE
- Practice through and tags on white board
- sketch in your sketchbook.
- Plan out your color scheme and add your one point perspective. ..Make sure it looks "3d" This is a rough sketch so it needs enough information that I know you are ready!
- Show Mrs. Latham and then get your final paper.
- Draw your name in pencil lightly. Make sure it take up the whole page and has one point perspective.
- Create a design to frame out your name or word in the back ground. Remember the examples of brick wall and cool outlines we looked at.
- Outline your drawing with sharpie
- Color in your one point “3d” area first.
- Choose a contrasting color and color the rest.
- Cut out and glue to paper.
- Cut it out one more time to go with the shape of your name.
- Don't forget to tag it, take a pic, and turn it in to hang or take home. Your choice.
Wayne Thiebaud Form, value, COMPLEMENTARY colors
Wayne thiebaud from woolridgep
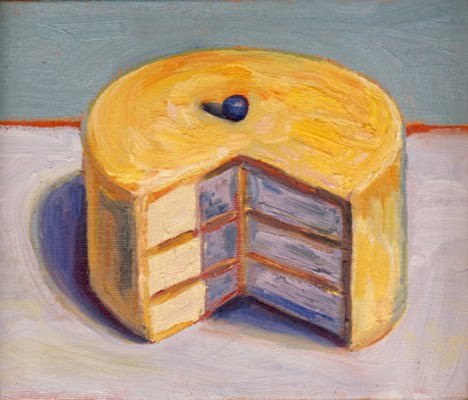
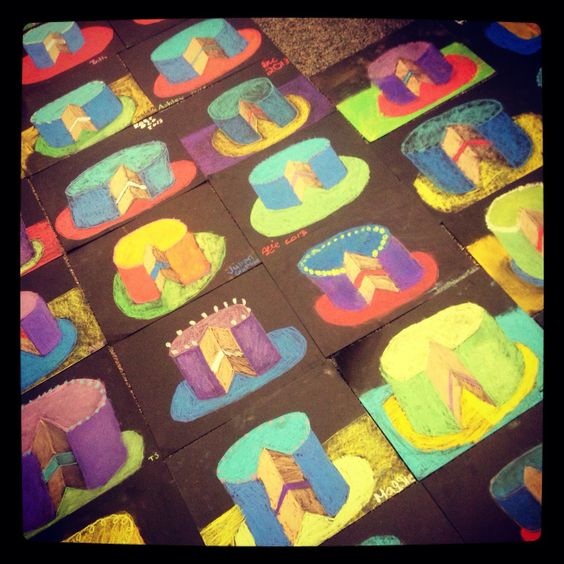
Lesson Introduction: slide show and video
Lesson Objective: I can demonstrate how to use chalk pastel to create value. I can explain who Wayne Theibaud is. I can explain what pop art is. I will practice all eight studio habits of mind through the creating of this project.
Getting Started: Before we dive in to our final drawing, lets practice drawing our cakes on the dry eraser boards with marker. Once you feel you have the correct angles down, lets practice working with chalk pastels. Here you will find the proper steps to using the media of chalk pastel.
Time to Create:
National Standards:
Creating
(Cr1.1.7) Apply methods to overcome creative blocks.
(Cr1.2.7) Develop criteria to guide making a work of art or design to meet an identified goal. (Cr2.1.7) Demonstrate persistence in developing skills with various materials, methods, and approaches in creating works of art or design.
(Cr2.3.7) Apply visual organizational strategies to design and produce a work of art, design, or media that clearly communicates information or ideas.
(Cr3.1.7) Reflect on and explain important information about personal artwork in an artist statement or other format.
Presenting
(Pr5.1.7) Based on criteria, analyze and evaluate methods for preparing and presenting art.
Responding
(Re8.1.7) Interpret art by analyzing art-making approaches, the characteristics of form and structure, relevant contextual information, subject matter, and use of media to identify ideas and mood conveyed.
Connecting
(Cn11.1.7) Analyze how response to art is influenced by understanding the time and place in which it was created, the available resources, and cultural uses.
Vocabulary: Ellipsis, value, blending, acute and obtuse angels, chalk pastel, pop art.
Kagan activities: Time Share Pare:
Instruction & Process: Direct demonstration & written instructions on the table.
Materials needed: Black paper cut 12 x 12, pencil, eraser, chalk pastel, aqua net hair spray.
Resources: www.boredart.com/2015/08/chalk-pastel-techniques-learn-how-to-use-it.html
http://nhartgallery.blogspot.ca/2012/12/middle-school-art-tint-and-shade.html
Assessment:
Lesson Objective: I can demonstrate how to use chalk pastel to create value. I can explain who Wayne Theibaud is. I can explain what pop art is. I will practice all eight studio habits of mind through the creating of this project.
Getting Started: Before we dive in to our final drawing, lets practice drawing our cakes on the dry eraser boards with marker. Once you feel you have the correct angles down, lets practice working with chalk pastels. Here you will find the proper steps to using the media of chalk pastel.
Time to Create:
- On black paper Plan your drawing. ...draw it lightly!
- Choose your pastels. ...
- Gather stumps to use for blending and a kneaded rubber eraser to remove pigment. ...
- Work from dark to light. ...
- Clear the pastel dust from your work frequently. ...
- Keep your hands clean. ...
- Clean off each pastel stick after you use it.
- Spray your work with fixative to protect your work.
National Standards:
Creating
(Cr1.1.7) Apply methods to overcome creative blocks.
(Cr1.2.7) Develop criteria to guide making a work of art or design to meet an identified goal. (Cr2.1.7) Demonstrate persistence in developing skills with various materials, methods, and approaches in creating works of art or design.
(Cr2.3.7) Apply visual organizational strategies to design and produce a work of art, design, or media that clearly communicates information or ideas.
(Cr3.1.7) Reflect on and explain important information about personal artwork in an artist statement or other format.
Presenting
(Pr5.1.7) Based on criteria, analyze and evaluate methods for preparing and presenting art.
Responding
(Re8.1.7) Interpret art by analyzing art-making approaches, the characteristics of form and structure, relevant contextual information, subject matter, and use of media to identify ideas and mood conveyed.
Connecting
(Cn11.1.7) Analyze how response to art is influenced by understanding the time and place in which it was created, the available resources, and cultural uses.
Vocabulary: Ellipsis, value, blending, acute and obtuse angels, chalk pastel, pop art.
Kagan activities: Time Share Pare:
Instruction & Process: Direct demonstration & written instructions on the table.
Materials needed: Black paper cut 12 x 12, pencil, eraser, chalk pastel, aqua net hair spray.
Resources: www.boredart.com/2015/08/chalk-pastel-techniques-learn-how-to-use-it.html
http://nhartgallery.blogspot.ca/2012/12/middle-school-art-tint-and-shade.html
Assessment:
Contour Shoes/ Elements of aRT

Time to Create
Tiempo para crear
- After you have practiced, get a final piece of paper and draw a contour line drawing of you shoe. It must fill the page, so draw it to fit your page. Make sure it is a line drawing that “Looks” 3d. If you draw the edges of what you see, it will.
- Once you have completed the shoe, go over it with a fine point sharpie.
- Next, get a ruler and divide the background space into 1/6th. This means you should have 6 separate spaces drawn behind your shoe.
- In each space we are going to use one element of art to fill the space. Use a variety of lines, shapes, values, colors, textures, and space to fill each separate space. We talked about these in class.
Tiempo para crear
- Después de que hayas practicado, obtén una última hoja de papel y dibuja un dibujo de contorno de tu zapato. Debe llenar la página, así que dibuja para que se ajuste a tu página. Asegúrese de que se trata de un dibujo de línea que "mira" 3d. Si dibujas los bordes de lo que ves, lo hará.
- Una vez que hayas completado el zapato, repásalo con un afilador de punta fina.
- A continuación, obtenga una regla y divida el espacio de fondo en 1/6. Esto significa que debes tener 6 espacios separados dibujados detrás de tu zapato.
- En cada espacio vamos a utilizar un elemento de arte para llenar el espacio. Use una variedad de líneas, formas, valores, colores, texturas y espacios para llenar cada espacio por separado. Hablamos de esto en clase.
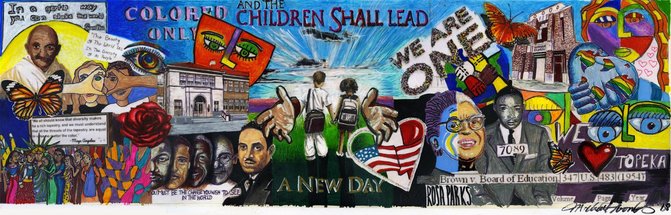
Art For Social Change
- What is the change you wish to see?
Think of a topic that is something you would like to address for this project.
Why do you support this movement?
Construct an opinion for or against a certain movement.
Why do you react this way?
Does your position in life have anything to do with your stance on this topic?.
TIME TO CREATE
- Day One: You goal for the class time is to pick a topic and use a word/ symbol map bank to create images for your for your project. Get it drawn out in your sketchbook.
- Option one.... you can use one to thee symbols that represent your cause by way of repetitions and proportion. You must fill the page and have images going off of the page.
- Option two... create a symbolic story like Picasso did using large shapes, and utilizing the rule of thirds. It must also fill the page.
- Day Two: Using a pencil, carefully draw out your design or composition on your final piece of paper. Everything must be drawn using shapes. Remember, your addressing a specific cause, so your story or design must reflect these ideas.
- Look at your composition, think about your message. As we have discussed not everything is black and white. What color would best represent your message? Show your sketchbook to Mrs. Latham and get final piece of paper on it.
- Put your name and class hour on the back of your paper!
- Redraw your image to fill the page on your final piece of paper.
- Remember, you are going to use tints, tones, and shades of that one color. Your finished work is going to be monochromatic. Your final work is going to be completely painted. Once you have decided a color, and drawing is complete, get paint and a pallet from Mrs. Latham.
- Paint your positive and negative shapes and spaces using a variety of tints, shades, and tones of one color.
- When you are finished, photograph it, turn it in to google classroom, and complete to artist reflection on classroom.
- Día uno: su meta para el tiempo de clase es elegir un tema y usar un banco de mapas de palabras / símbolos para crear imágenes para su proyecto. Sácalo en tu cuaderno de bocetos.
- Opción uno ... puede usar uno a los símbolos que representan su causa por medio de repeticiones y proporciones. Debes llenar la página y que las imágenes salgan de la página.
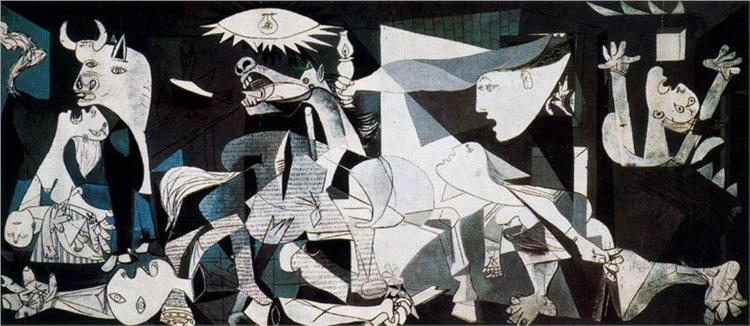
- Opción dos ... crear una historia simbólica como Picasso hizo usando formas grandes y utilizando la regla de los tercios. También debe llenar la página.
- Día dos: con un lápiz, dibuje con cuidado su diseño o composición en su hoja de papel final. Todo debe ser dibujado utilizando formas. Recuerde, está abordando una causa específica, por lo que su historia o diseño debe reflejar estas ideas.
- Mira tu composición, piensa en tu mensaje. Como hemos comentado no todo es blanco y negro. ¿Qué color representaría mejor tu mensaje? Muestre su cuaderno de bocetos a la Sra. Latham y obtenga el último papel en él.
- ¡Ponga su nombre y hora de clase en la parte posterior de su papel!
- Redibuje su imagen para llenar la página en su hoja de papel final.
- Recuerde que va a utilizar tintes, tonos y sombras de ese color. Tu trabajo terminado será monocromático. Tu trabajo final será completamente pintado. Una vez que haya decidido el color y el dibujo esté completo, obtenga pintura y un palé de la Sra. Latham.
- Pinta tus formas y espacios positivos y negativos con una variedad de tonos, tonos y tonos de un solo color.
- Cuando haya terminado, fotografíelo, entréguelo en el aula de Google y complete la reflexión del artista sobre el aula.
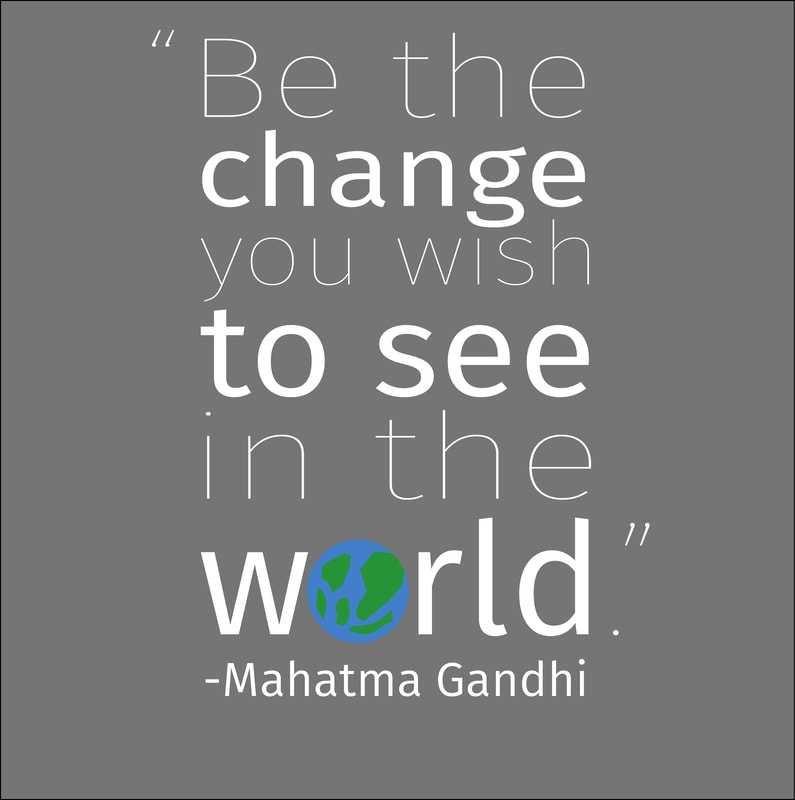
Art For Social Change:
It’s never too late to do the right thing. Be the change you wish to see. Mahatma Gandi
Standards/ Essential Questions:
#VA:Re7.2 Anchor Standard: Perceive and analyze artistic work.
✓ Enduring Understanding: Visual imagery influences understanding of and responses
to the world.
✓ Essential Question: What is a symbol? Where and how do we encounter sybolism in
our world? How do images influence our views of the world?
#VA:Re7.1 Anchor Standard: Perceive and analyze artistic work.
✓ Enduring Understanding: Individual aesthetic and empathetic awareness developed
through engagement with art can lead to understanding and appreciation of self, others,
the natural world, and constructed environments.
#VA:Pr6.1 Anchor Standard: Convey meaning through the presentation of artistic work.
✓ Enduring Understanding: Objects, artifacts, and artworks collected, preserved, or
presented either by artists, museums, or other venues communicate meaning and a
record of social, cultural, and political experiences resulting in the cultivating of
appreciation and understanding.
Teaching Tolerance Social Justice Standards
JU.9-12.12 I can recognize, describe and distinguish unfairness and injustice at different levels of society.
AC.9-12.19 I take responsibility for standing up to exclusion, prejudice and injustice.
Lesson Introduction: Day One: Discuss quote, watch the video and let them pick a topic for their symbolism.
Learning Objective:
I can create artwork that can affect global change.
I can identify social movements for which I am naturally inclined to be an activist for.
I can demonstrate an understanding on how art can be a powerful tool in being social activist.
I can plan a visual image in response to a current social issue, or in response to my feelings on a historic social issues.
I can reflect on how art is used to provoke emotion, draw awareness, and harnessed as a voice for change..
I can create an artwork that shows tints, tones, shades, of one color.
Alternative Lesson
: I can read for understanding to learn what activism is and who can be an activist.
I can read for understanding to learn about Civil Rights activist Mahatma Gandhi.
National Standards:
Creating:
(Cr1.1.7) Apply methods to overcome creative blocks.
(Cr1.2.7) Develop criteria to guide making a work of art or design to meet an identified goal.
(Cr2.1.7) Demonstrate persistence in developing skills with various materials, methods, and approaches in creating works of art or design.
(Cr2.2.7) Demonstrate awareness of ethical responsibility to oneself and others when posting and sharing images and other materials through the internet, social media, and other communication formats.
(Cr2.3.7) Apply visual organizational strategies to design and produce a work of art, design, or media that clearly communicates information or ideas.
(Cr3.1.7) Reflect on and explain important information about personal artwork in an artist statement or other format.
Presenting
((Pr5.1.7) Based on criteria, analyze and evaluate methods for preparing and presenting art.
(Pr6.1.7) Compare and contrast viewing and experiencing collections and exhibitions in different venues.
Responding
(Re7.1.7) Explain how the method of display, the location, and the experience of an artwork influence how it is perceived and valued.
(Re7.2.7) Analyze multiple ways that images influence specific audiences.
(Re8.1.7) Interpret art by analyzing art-making approaches, the characteristics of form and structure, relevant contextual information, subject matter, and use of media to identify ideas and mood conveyed.
Connecting
(Cn10.1.7) Individually or collaboratively create visual documentation of places and times in which people gather to make and experience art or design in community. (Cn11.1.7) Analyze how response to art is influenced by understanding the time and place in which it was created, the available resources, and cultural uses.
Vocabulary: Social activism through art. Symbolism, Monochromatic Painting ,Tint, Shades, Tones. proportion, repetition, Rule of thirds, positive and negative space
Collaborative activities: discussion: I take responsibility for standing up to exclusion, prejudice and injustice in my community by way of?
Instruction & Process: Guided practice, small group discussion, demonstration, daily goals.
Materials needed: rulers, protractors, compass, paint, heavy paper 12x18, paint palettes, brushes, table instructions.
Grading Format: Rubric
Resources: https://www.amnestyusa.org/activism-guide/ https://bigideas.berkeley.edu/art/
Connect and Respond
Students will reflect on how art is used to provoke emotion, draw awareness, and harnessed as a voice for change. https://newsela.com/read/lib-grassroots-activism/id/37405
Contests and Community Showing
https://hreusa.org/projects/art-contest/#more-7700
Topeka DMK Contest in Topeka Ks
Art Show in the foyer of Jardine Middle School.
Option One: pick a topic from the following
Topics:
Option Two: bring your own ideas and we will discuss them as a possibilities.
It’s never too late to do the right thing. Be the change you wish to see. Mahatma Gandi
Standards/ Essential Questions:
#VA:Re7.2 Anchor Standard: Perceive and analyze artistic work.
✓ Enduring Understanding: Visual imagery influences understanding of and responses
to the world.
✓ Essential Question: What is a symbol? Where and how do we encounter sybolism in
our world? How do images influence our views of the world?
#VA:Re7.1 Anchor Standard: Perceive and analyze artistic work.
✓ Enduring Understanding: Individual aesthetic and empathetic awareness developed
through engagement with art can lead to understanding and appreciation of self, others,
the natural world, and constructed environments.
#VA:Pr6.1 Anchor Standard: Convey meaning through the presentation of artistic work.
✓ Enduring Understanding: Objects, artifacts, and artworks collected, preserved, or
presented either by artists, museums, or other venues communicate meaning and a
record of social, cultural, and political experiences resulting in the cultivating of
appreciation and understanding.
Teaching Tolerance Social Justice Standards
JU.9-12.12 I can recognize, describe and distinguish unfairness and injustice at different levels of society.
AC.9-12.19 I take responsibility for standing up to exclusion, prejudice and injustice.
Lesson Introduction: Day One: Discuss quote, watch the video and let them pick a topic for their symbolism.
Learning Objective:
I can create artwork that can affect global change.
I can identify social movements for which I am naturally inclined to be an activist for.
I can demonstrate an understanding on how art can be a powerful tool in being social activist.
I can plan a visual image in response to a current social issue, or in response to my feelings on a historic social issues.
I can reflect on how art is used to provoke emotion, draw awareness, and harnessed as a voice for change..
I can create an artwork that shows tints, tones, shades, of one color.
Alternative Lesson
: I can read for understanding to learn what activism is and who can be an activist.
I can read for understanding to learn about Civil Rights activist Mahatma Gandhi.
National Standards:
Creating:
(Cr1.1.7) Apply methods to overcome creative blocks.
(Cr1.2.7) Develop criteria to guide making a work of art or design to meet an identified goal.
(Cr2.1.7) Demonstrate persistence in developing skills with various materials, methods, and approaches in creating works of art or design.
(Cr2.2.7) Demonstrate awareness of ethical responsibility to oneself and others when posting and sharing images and other materials through the internet, social media, and other communication formats.
(Cr2.3.7) Apply visual organizational strategies to design and produce a work of art, design, or media that clearly communicates information or ideas.
(Cr3.1.7) Reflect on and explain important information about personal artwork in an artist statement or other format.
Presenting
((Pr5.1.7) Based on criteria, analyze and evaluate methods for preparing and presenting art.
(Pr6.1.7) Compare and contrast viewing and experiencing collections and exhibitions in different venues.
Responding
(Re7.1.7) Explain how the method of display, the location, and the experience of an artwork influence how it is perceived and valued.
(Re7.2.7) Analyze multiple ways that images influence specific audiences.
(Re8.1.7) Interpret art by analyzing art-making approaches, the characteristics of form and structure, relevant contextual information, subject matter, and use of media to identify ideas and mood conveyed.
Connecting
(Cn10.1.7) Individually or collaboratively create visual documentation of places and times in which people gather to make and experience art or design in community. (Cn11.1.7) Analyze how response to art is influenced by understanding the time and place in which it was created, the available resources, and cultural uses.
Vocabulary: Social activism through art. Symbolism, Monochromatic Painting ,Tint, Shades, Tones. proportion, repetition, Rule of thirds, positive and negative space
Collaborative activities: discussion: I take responsibility for standing up to exclusion, prejudice and injustice in my community by way of?
Instruction & Process: Guided practice, small group discussion, demonstration, daily goals.
Materials needed: rulers, protractors, compass, paint, heavy paper 12x18, paint palettes, brushes, table instructions.
Grading Format: Rubric
Resources: https://www.amnestyusa.org/activism-guide/ https://bigideas.berkeley.edu/art/
Connect and Respond
Students will reflect on how art is used to provoke emotion, draw awareness, and harnessed as a voice for change. https://newsela.com/read/lib-grassroots-activism/id/37405
Contests and Community Showing
https://hreusa.org/projects/art-contest/#more-7700
Topeka DMK Contest in Topeka Ks
Art Show in the foyer of Jardine Middle School.
Option One: pick a topic from the following
Topics:
- Bullying/ Cyber Bullying
- Unlawful Police Killings
- Abolish the Death Penalty
- Gun Violence
- Violence Against Women
- Immigration and Refugees
- Child and Women Trafficking
- Discrimination against race, gender, sexual orientation.
Option Two: bring your own ideas and we will discuss them as a possibilities.
how to make tint, tones, and shades

Introduction to value
Introduction to clay
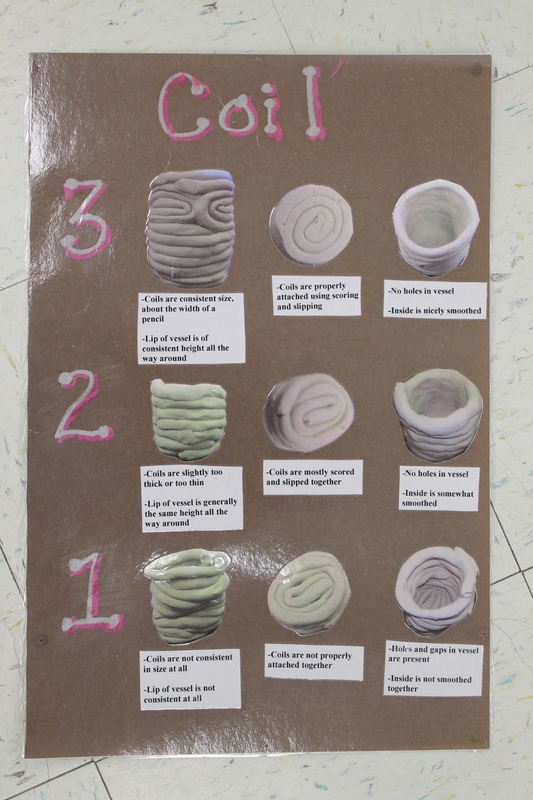
Jardine Students, follow the link below to see a step by step instruction on how to build a clay pot. This website is a wealth of information! Enjoy.
http://www.lakesidepottery.com/Pages/Pottery-tips/Making-a-clay-coiled-pot-Lakeside-Pottery-Tutorial.htm
http://www.lakesidepottery.com/Pages/Pottery-tips/Making-a-clay-coiled-pot-Lakeside-Pottery-Tutorial.htm
INTRODUCTION TO THROWING ON THE WHEEL!
GarGoyles Project two
Jardine artist have recently finished making clay coil pots. This week we will explore Midevil Gothic architecture and learn how gargoyles and grotesques were used.
http://www.slideshare.net/kl138502/7th-clay-gargoyles
Vocabulary & Techniques discussed/shown:
http://www.slideshare.net/kl138502/7th-clay-gargoyles
Vocabulary & Techniques discussed/shown:
- Bisque Firing: The first firing of unglazed ware at a low temperature. Removes all moisture from the clay and makes it easier to handle.
- Glaze: A compound of minerals that is applied to the surface of greenware or bisqued ware that forms a glassy coating when fired.
- Glaze Firing: A kiln firing that reaches temperatures at which glaze will melt. A glaze firing typically brings the clay body to its maturation point.
- Leather Hard: The condition of a clay body that has dried somewhat but can still be carved or joined.
- Slip: A mixture of clay and water; Works as glue to fuse two clay pieces together.
- Score: Making small marks into the surface of the clay before adding slip or water to help fuse clay.
- Pinch Pot: Creating a piece of pottery by pinching and molding a solid piece of clay with your fingers/hands.
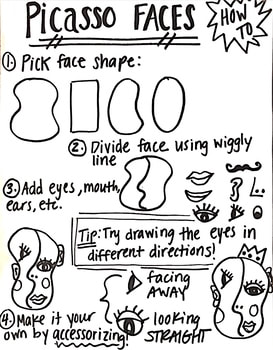
Picasso: Working from 2d into 3d/ Lesson ONe
Lesson Introduction: Slideshow, silly game.
Learning Objective: Students will be able to recreate an abstract portrait based upon the work of Picasso. Students will learn the processes of mix media collage.
National Standards:
Creating
(Cr1.1.7) Apply methods to overcome creative blocks.
(Cr1.2.7) Develop criteria to guide making a work of art or design to meet an identified goal. (Cr2.1.7) Demonstrate persistence in developing skills with various materials, methods, and approaches in creating works of art or design.
(Cr2.3.7) Apply visual organizational strategies to design and produce a work of art, design, or media that clearly communicates information or ideas.
(Cr3.1.7) Reflect on and explain important information about personal artwork in an artist statement or other format.
Responding
(Re8.1.7) Interpret art by analyzing art-making approaches, the characteristics of form and structure, relevant contextual information, subject matter, and use of media to identify ideas and mood conveyed.
Vocabulary: Contour line, Geometric shapes, Cubism portraits, Pablo Picasso, collage, proportion, color
Keagan activities:
Day one: Students get to draw one another. The smaller, the better.
Instruction & Process:
Day One: Look intently at a variety of Picasso Portraits, then have students work in pairs drawing to draw one another, using the dice game. Show them the project and cutting backgrounds.
Day Two : Glue backgrounds.
Day Three: Begin Drawing, and trace out your image.
Day Four: Color in your image using the colors from the original painting.
Day Five: Finish your work, Photograph it and turn it in to google classroom.
Materials needed: paper, glue, oil pastel, marker, oil pastel, color copy pictures of picasso’s paintings.
Grading Format: Rubric
Resources: http://arteascuola.com/2014/05/portraits-by-picasso/
https://www.pablopicasso.org/
IN CASE YOU MISSED THE INTRODUCTION, WATCH THIS!
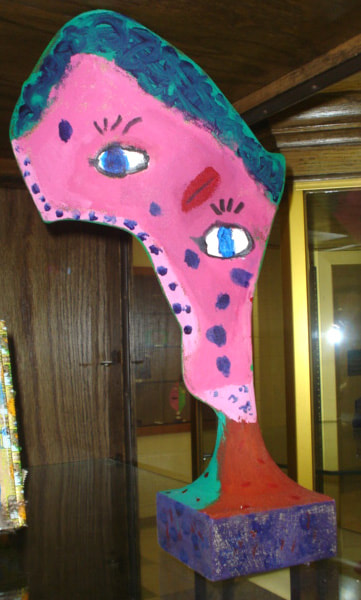
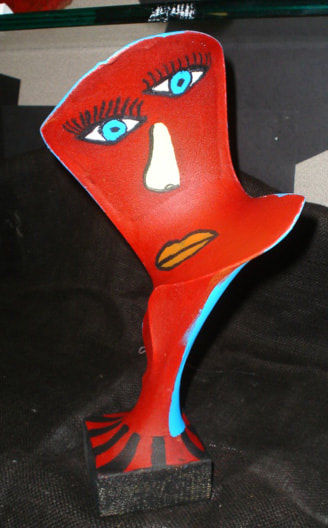
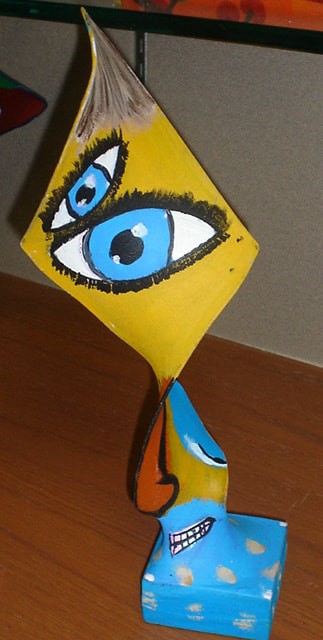
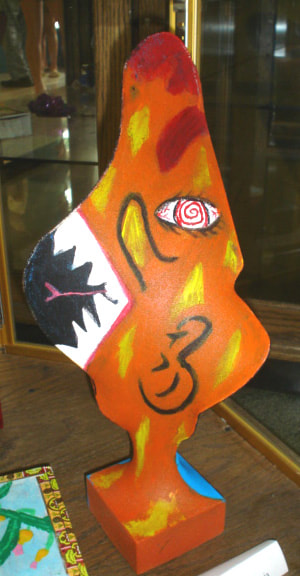
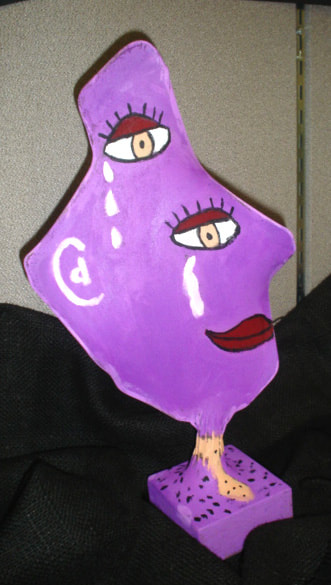
3D Picasso Sculptures
Lesson Introduction:
Day One: Introduction to sculpture slide show. Draw 3 different faces for the two sides of your work. Plan your eyes, nose, mouth, color schemes. You will show this to Mrs. Latham and keep and turn in with final work.
Day Two: Begin distributing wire and blocks
get our sculpture build and begin glue process.
Day three: finish 2nd coat of glue.
Day four: paint:
Day five: continue to paint and complete project. Please photograph and take home.
Learning Objective:
I can demonstrate my understanding of abstract art and the work of Pablo Picasso by way of recreating an abstract free standing sculpture that reflects his characteristics found in his cubist portraits we previously studied.
The purpose of this project is to explore the challenges and consideration an artist must make while working from 2d to 3d in consideration to space and depth.
I know my process is successful when the following criteria have been mastered.
- My sculpture can stand freely
- My sculpture has abstract features that can be seen from all angles.
- My abstract Picasso sculpture has eyes, nose, mouth and geometric shapes that are reflective of Picasso’s portraits we have previously studied.
- My work is painted with several coats where it is opaque, and each color is carefully painted in layers so that it does not mix and become a blended runny mess.
- My sculpture has no more than four colors and I have used my understanding of the color wheel and colors schemes to guide my artistic decisions.
- My works reflects great time and consideration was taken in my creative process. I have three thumbnail sketches completed to help me transition from 2d-3d process.
National Standards:
Creating
(Cr1.1.7) Apply methods to overcome creative blocks.
(Cr1.2.7) Develop criteria to guide making a work of art or design to meet an identified goal. (Cr2.1.7) Demonstrate persistence in developing skills with various materials, methods, and approaches in creating works of art or design.
(Cr2.2.7) Demonstrate awareness of ethical responsibility to oneself and others when posting and sharing images and other materials through the internet, social media, and other communication formats.
(Cr2.3.7) Apply visual organizational strategies to design and produce a work of art, design, or media that clearly communicates information or ideas.
(Cr3.1.7) Reflect on and explain important information about personal artwork in an artist statement or other format.
Responding
(Re8.1.7) Interpret art by analyzing art-making approaches, the characteristics of form and structure, relevant contextual information, subject matter, and use of media to identify ideas and mood conveyed.
Vocabulary: Pablo Picasso, Contour line, geometric shapes, unity, balance, triadic, split complementary, and analogous color schemes, free standing sculpture.
Contour Line: line that defines and describes the edges of a shape/form
Geometric Shapes: “Man-made shapes; usually have straight lines and corners
Unity: overall quality of wholeness in an artwork
Balance: equally distributed details in an artwork (can be symmetrical or asymmetrical)
Value: degree of lightness or darkness of a color Contrast: degree of difference
Freestanding Sculpture: 3D artwork that can be viewed from all angles or sides
Collaborative engagement activities: Shoulder partner discussion, collaboratively working with others at table with supplies.
Instruction & Process: Time to create instructions on slideshow and table tops.
Materials needed: wire hangers, wood blocks, stockings, glue, paint, paint brushes
Grading Format: rubric based on the I can statement project success check list.
Resources: https://www.waunakee.k12.wi.us/faculty/swagner/cubism.cfm
www.wikihow.com/Make-a-Panty-Hose-Sculpture

Visual Arts through Technology
Day One. Graphic Design. Introduction to Pixlr Editor
KEEP CALM AND …..learn Photoshop.
KEEP CALM AND …..learn Photoshop.
Day Two. Stop Motion Animation via Clap Motion on Chrome
Sculpt a character with clay and pick a background.
Make a claymation animation clip. You’re story must be 15 seconds long.
Sculpt a character with clay and pick a background.
Make a claymation animation clip. You’re story must be 15 seconds long.
Day Three. Canva : Learn how to make invitations, and explore graphic design.
